Intermatic Mechanical Timer Replace

I know there are similar posts about this exact question. I looked over them and my Mechanical Timer looks different. I asked some guy “Gene” here for help but he just ignored me so I thought i’d make a post.

I have 2 Zones. Let me know if you need pictures of anything or have any questions. I’m not sure if its allowed but I am open to options of another smart system.

I want to upgrade this to Raicho 3. Im assuming based on the cover of the box that my system is a 220-240V. My water is well water. I want to get down to what I need to buy and get done, so I have everything before I do it.

If you don’t know what you’re doing, hire a pro.
PRO FINDER:
https://pro-tools.rachio.com/?_ga=2.132673934.1295053688.1592019817-93199847.1588108811

Thanks for the reply. I was under the conclusion that I would get help, since there has been two similar post to mine and they received help.

Bump… I would like some help please.

@iamdago - sorry I missed your original post, it is a volunteer community. I know Gene has been busy with good situation personally.

Here is what I think you’ll need:

  1. Rachio external enclosure
  2. Rachio (3e or 3 will work)
  3. Pump start relay for the size pump you have. Make sure it is a low power (on the relay activation) so it won’t pull too much current when switching on. Orbit has one. Should be available at Home Depot or Lowe’s. I think this is the one, didn’t have time to double check the switching draw -> https://www.homedepot.com/p/1-2-HP-Pump-Start-Relay-57009/100181554
  4. A two maniofold valve system to replace the indexing valve setup. Orbit available at Home Depot or Lowe’s. https://www.homedepot.com/p/Orbit-2-Valve-Inline-Manifold-Assembly-57250/202206756
  5. Waterproof wire nuts/connectors https://www.homedepot.com/p/DryConn-Aqua-Orange-Waterproof-Wire-Connectors-4-Pack-62104/202889869
  6. Enough field wire to run from the Rachio to the above manifold with at least three wires (common and two zones). https://www.homedepot.com/p/Southwire-By-the-Foot-18-4-Black-Solid-UL-Sprinkler-System-Wire-49276999/204724986
  7. Some 120 VAC rated wire and conduit to wire in the Rachio external enclosure.
  8. PVC pipe to connect to manifold and manifold connections.
  9. PVC glue
  10. In ground rectangular valve box for manifold.

I would have access to a volt/ohm meter for testing, too.

Standard caveats apply and YMMV.

3 Likes

Thank you for the reply. Not sure why I didn’t get a notification someone replied. Was talking to someone who does this for living. He was recommending not to use manifold and use slip on, like Hunter 24V Inline and have them separate (thoughts?).

As for the valve box? What size, there seem to be many or how can I tell what size. I would be using a 2 Line Manifold.

https://www.amazon.com/gp/product/B000I19I5E/ref=ox_sc_act_title_3?smid=A1V6UCH5WP7W10&psc=1

That relay good?

Hi @iamdago, how did you try to get in touch with me? Did not mean to ignore you, but as @DLane has mentioned, I do not have time to read every new post lately. Be sure to include “@” in front of whoever you wish to see your post, @Gene for example, otherwise it will not be very visible for them.

I recommend Rachio 2 or 3, as “e” version is missing flex daily schedule which is personally my favorite.
You are free to explore other controllers, but few will be able to comment about any particular system outside of what we are familiar with.
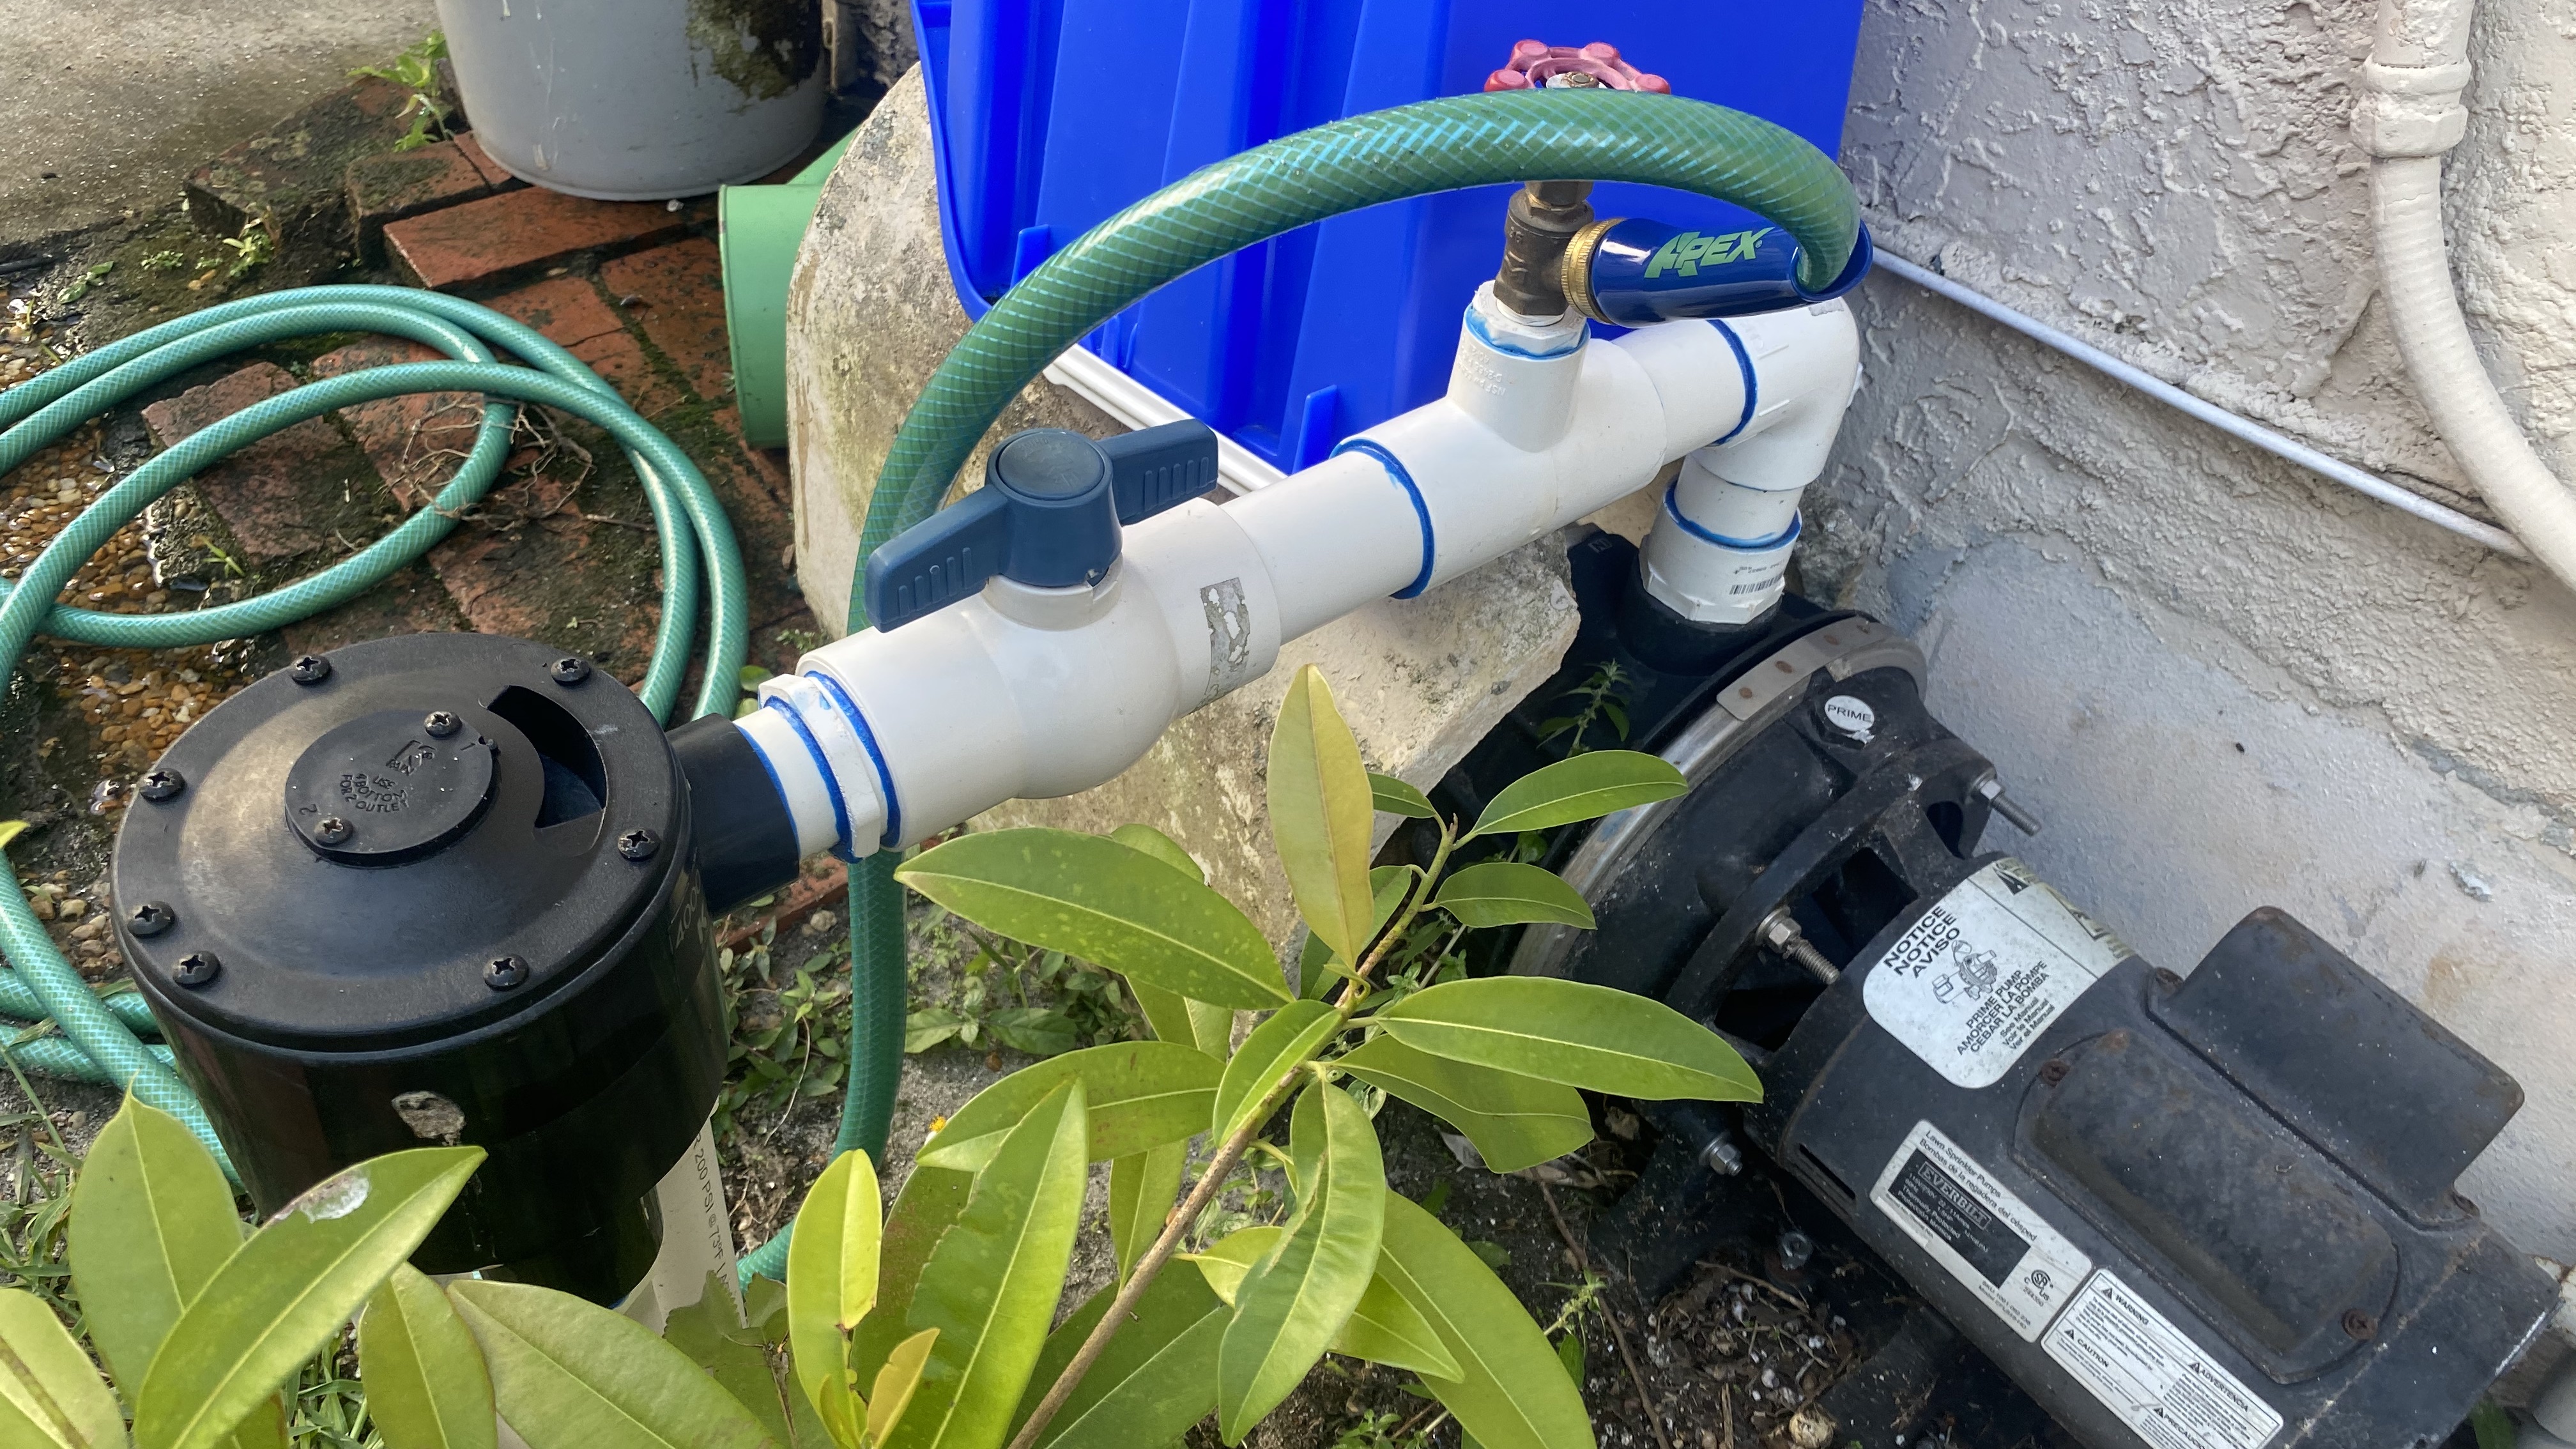
Start relay you’ve linked to will work, looks to be the same version as sold via homedepot / lowes, but with unrelated photos in the listing. Be sure to check other sellers, if you prefer to use prime shipping.

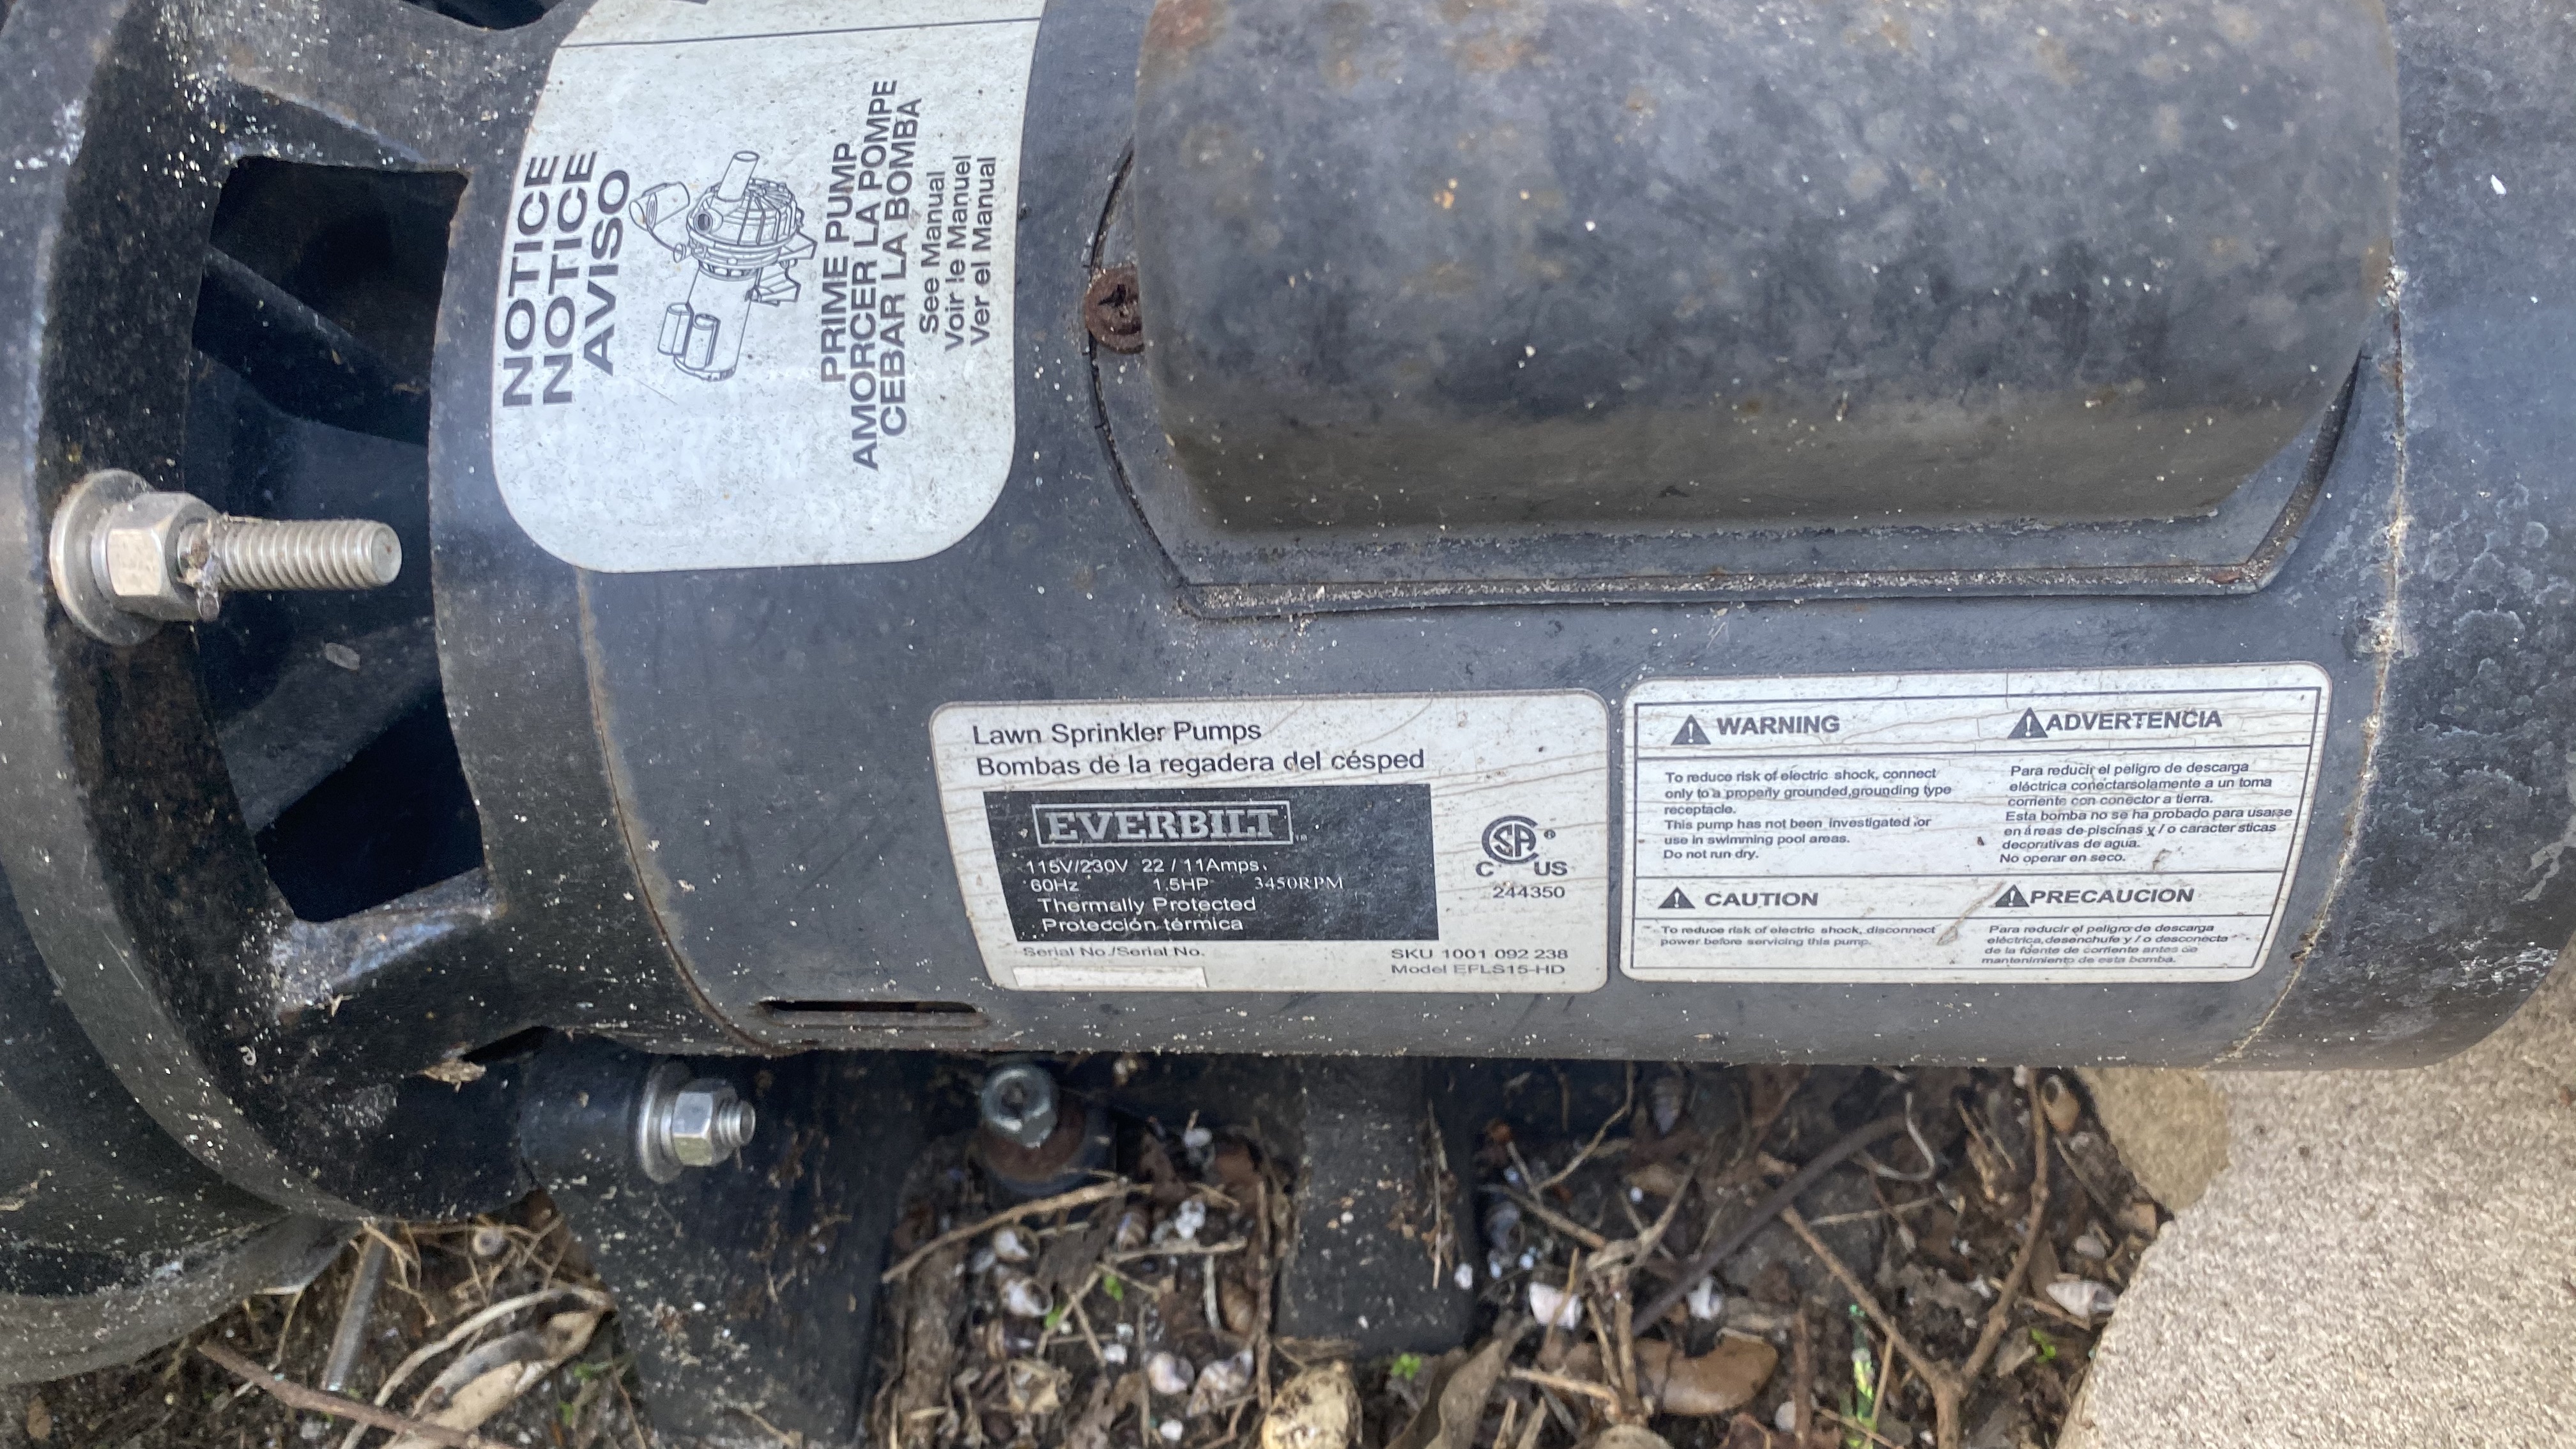
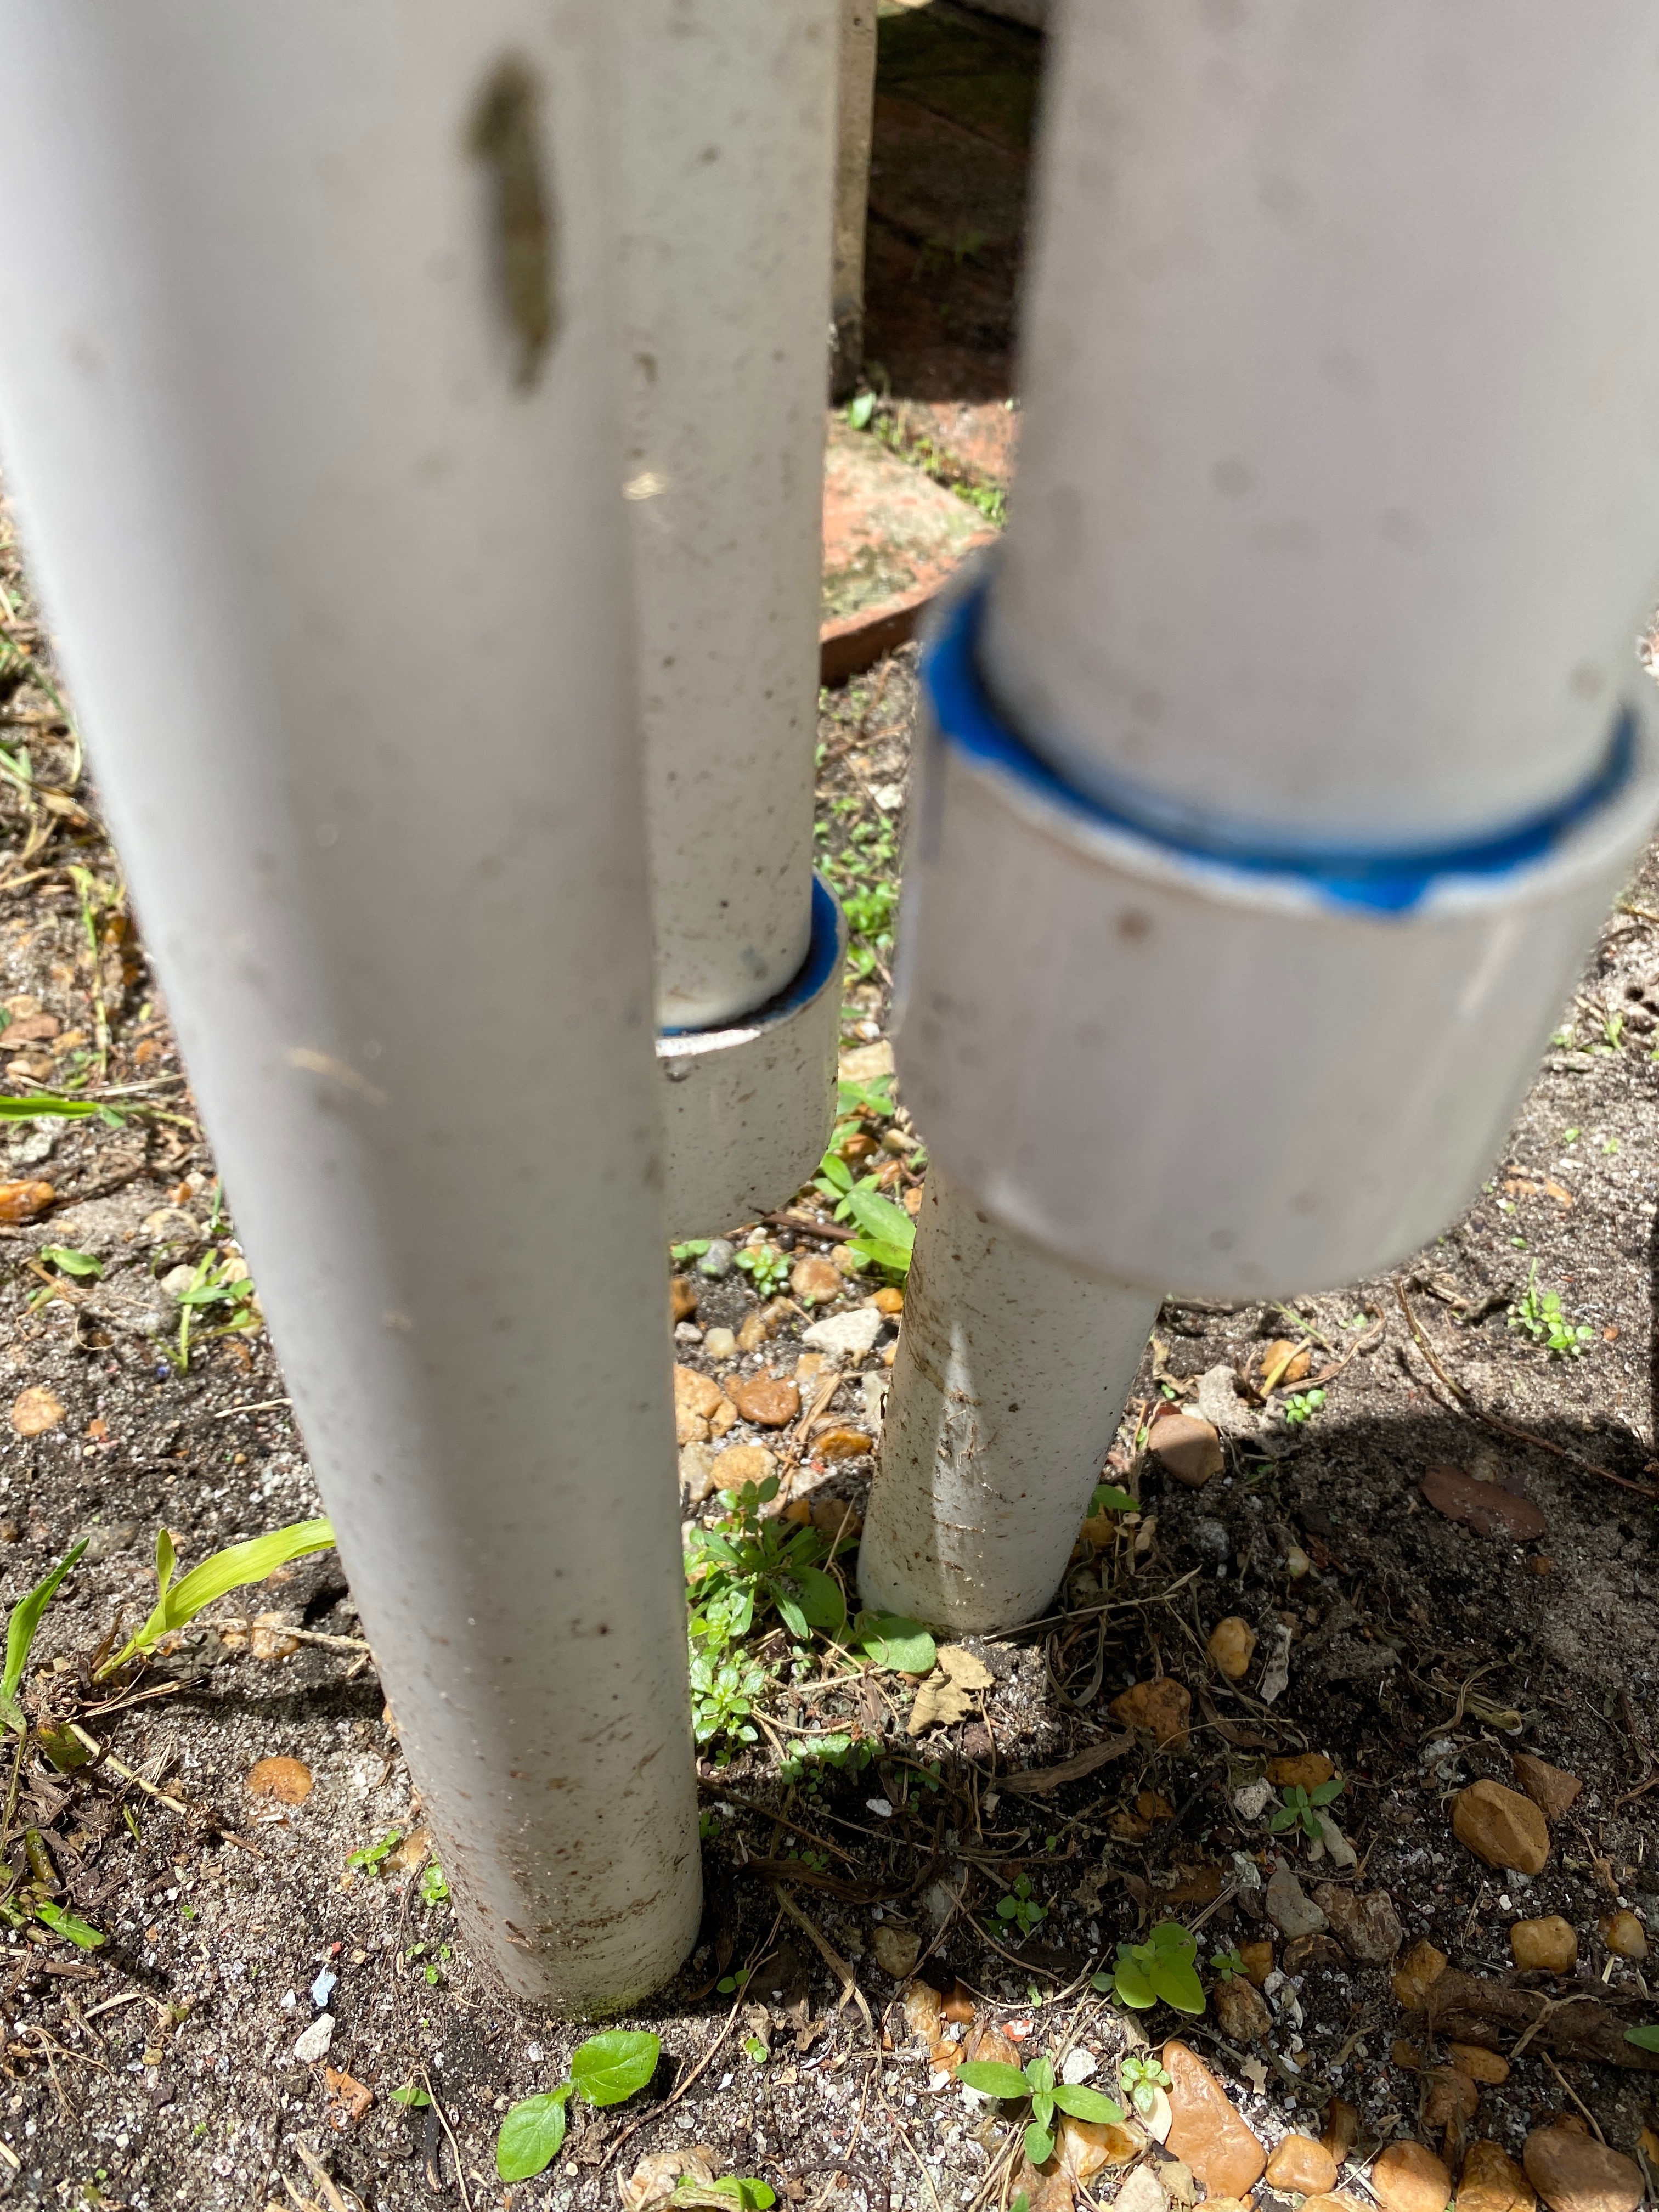
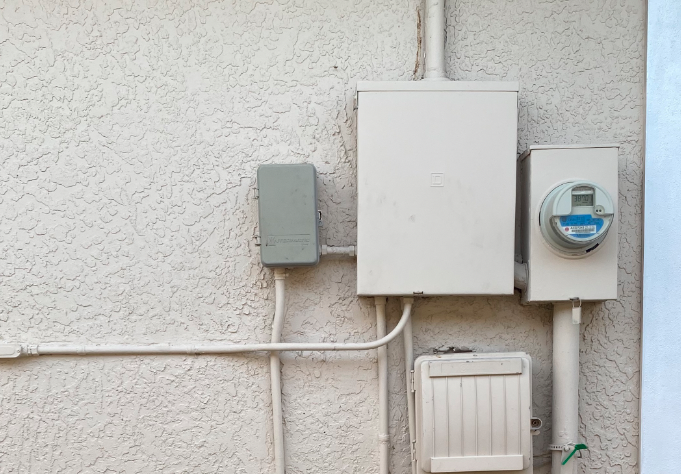
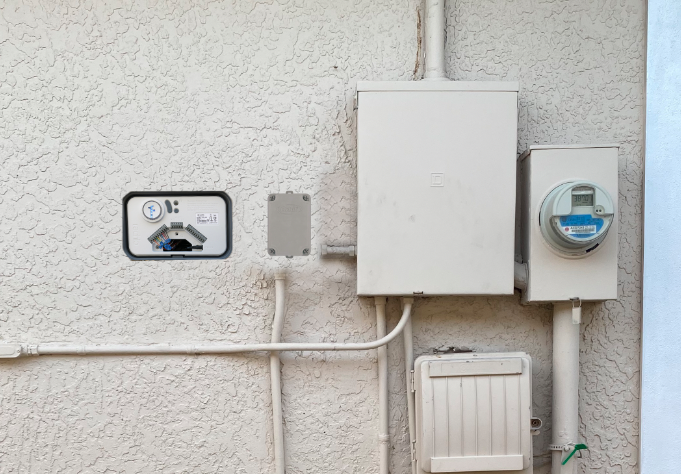
You look to have 220V (two pink wires) and Netral / GND (white wire) running to your old Intermatic.
Ideally you’d run separate 110V to the Rachio enclosure, as @DLane has mentioned, but you can also use either of the pink wires with the white wire to get 110V. Your pump & start relay should still use both pink wires for the full 220V.

Be sure to buy a multi-meter, from the DIY savings, in order to verify all of the voltages and turn off the power at the breaker before working with any of the wires.

The valve manifold that @Dlane has linked to in #4 of his responce is great if you wish to bury your valves, but with just two zones, it may be easier for you to keep the valves above ground and install a pair of above ground valves, such as these from Orbit (link), again be sure to check “other sellers” for prime delivery. On that note, please verify if you have 1 inch plumbing or 3/4 and buy an appropriate valve.
Above ground valves come with the anti-siphon valve (back-flow preventer), which you strictly do not need but there will not be any negative side effects from having them.

For anything else I’ll refer you back to @Dlane’s comment, he did a great job outlining the needed parts.

Most of the important questions will come as you get stared. Do not hesitate to ask and you should have a straightforward conversion.

Cheers,
Some guy Gene (better late than never)

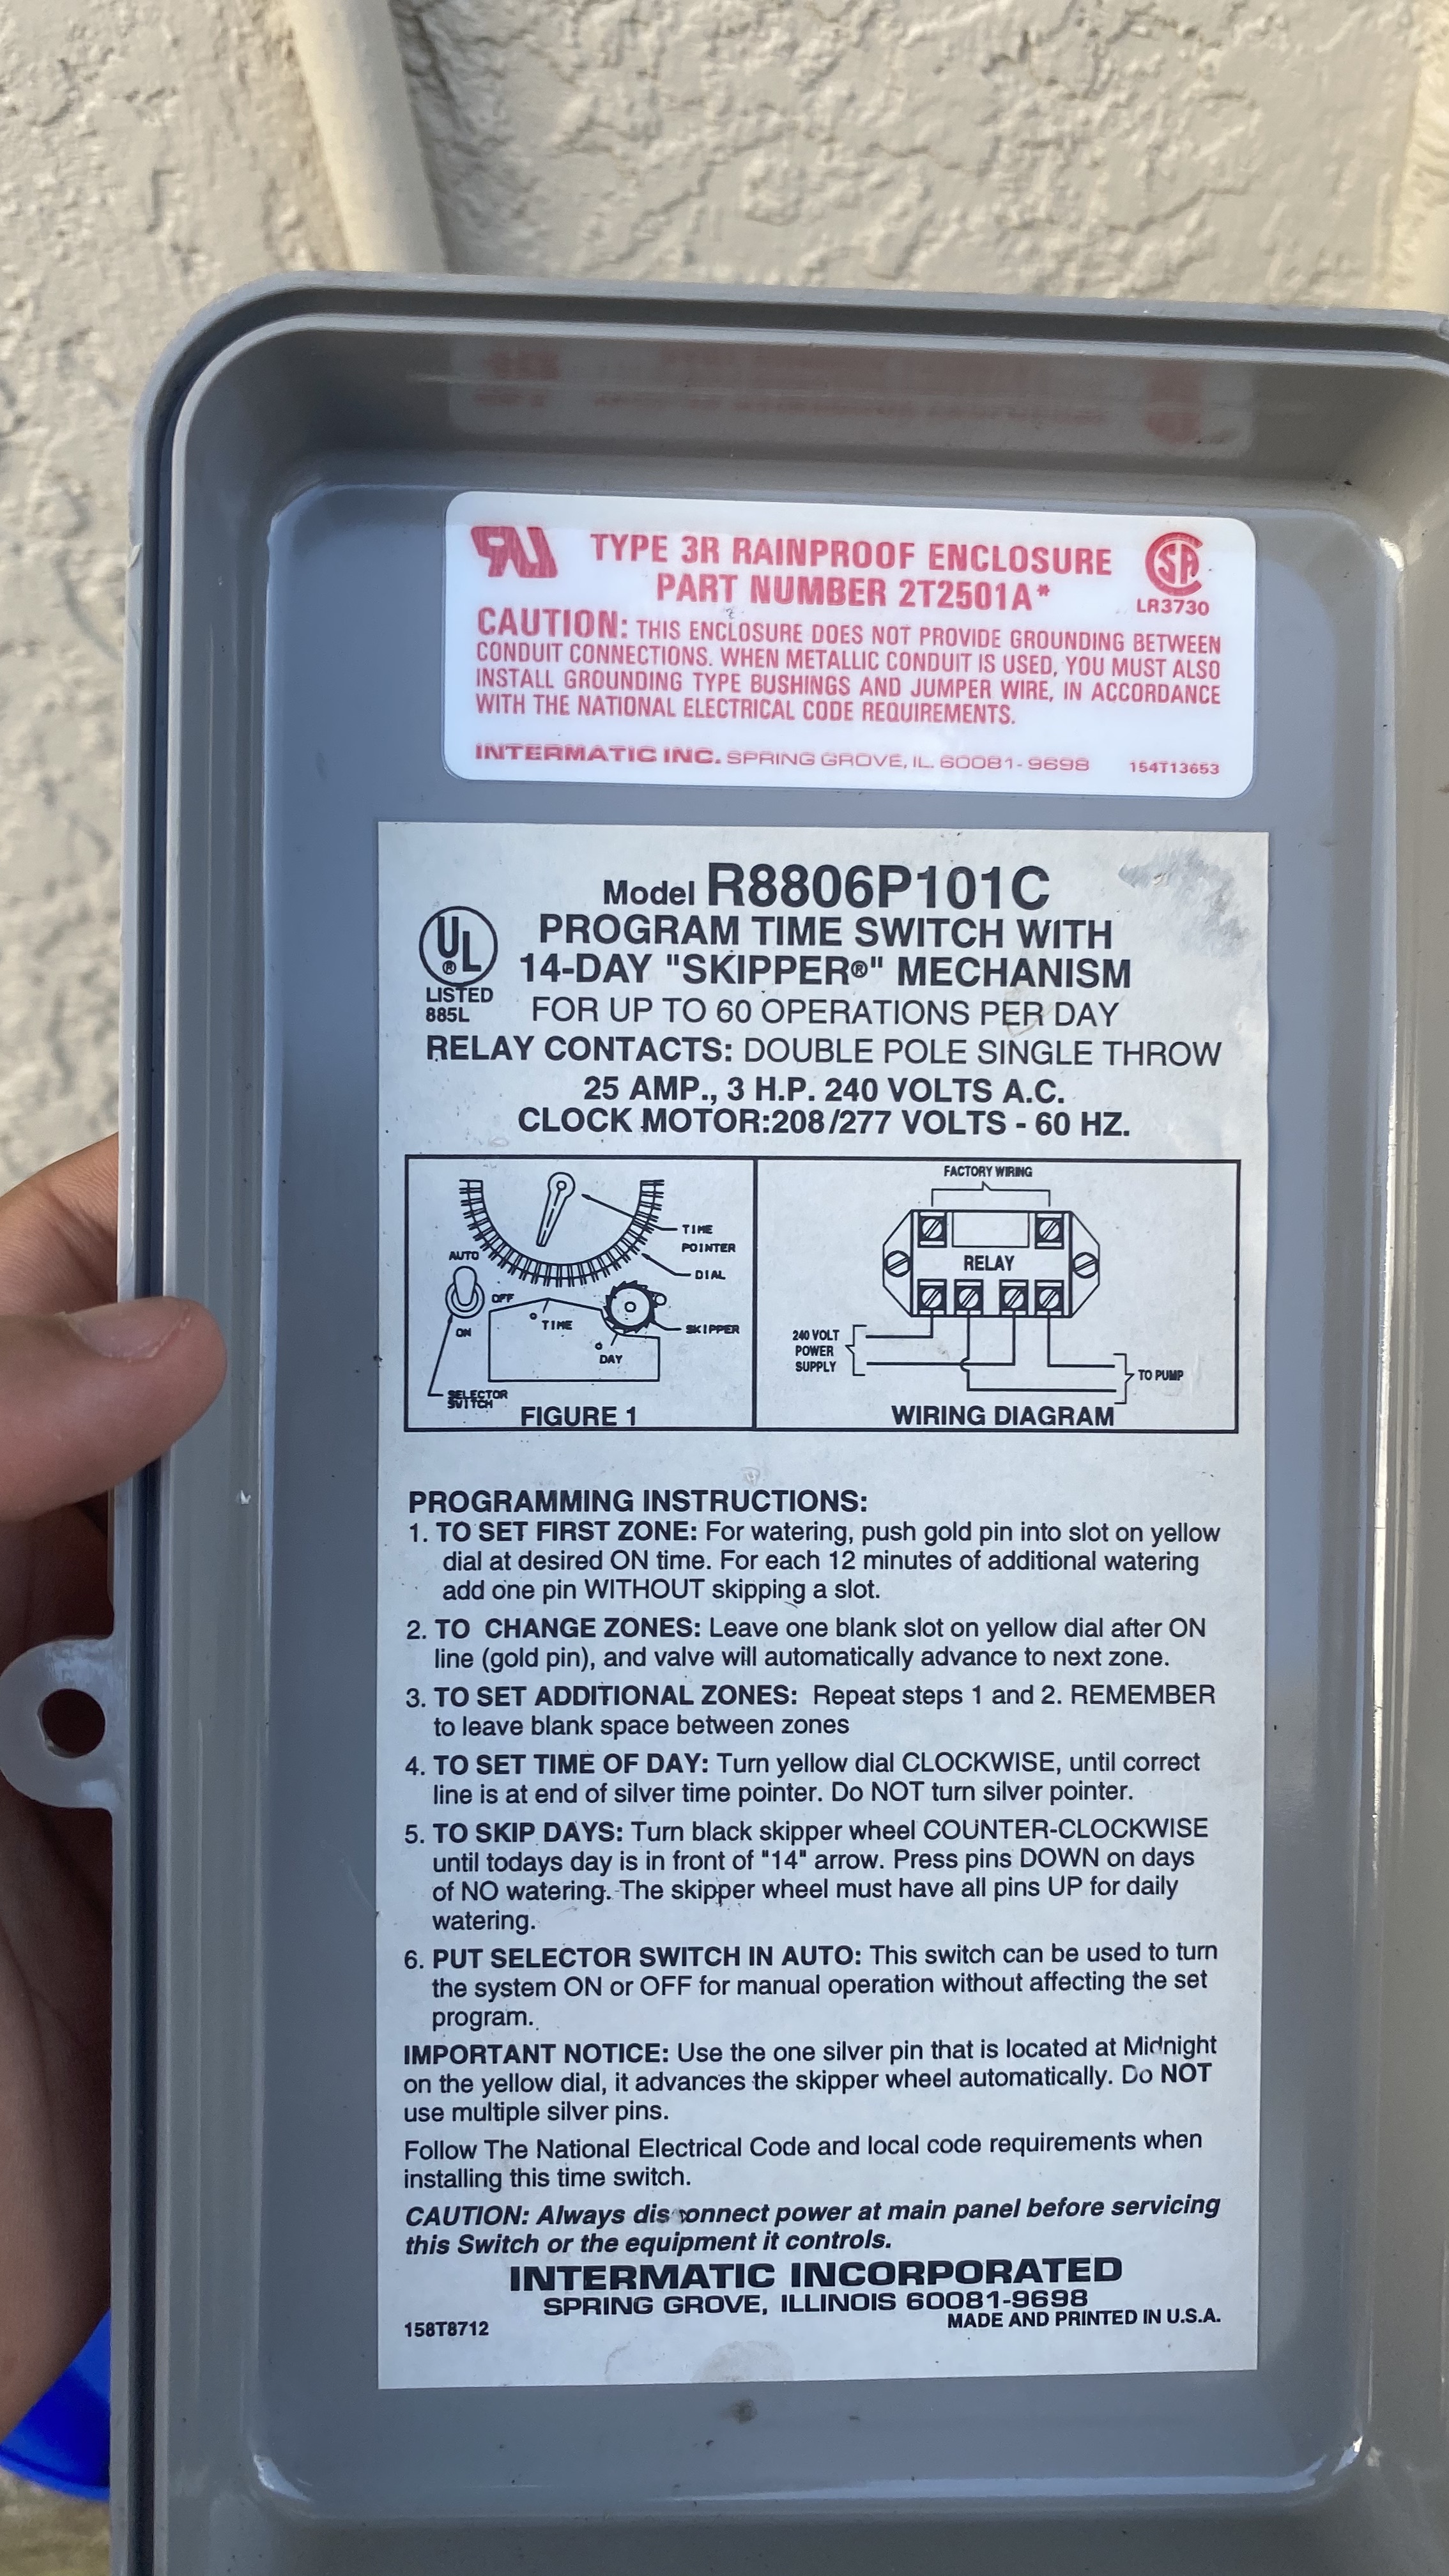
P.S. Are you sure you have two zones? There are six pins on the timer, indicating that you likely have three zones. (three pins to turn ON the zones, and three to turn them back off).

1 Like

I read your post awhile back about the pins and made sure to asked but there’s only two zones. When I turn on, one zone turns on and when i turn it off and do a full circle to pass pins and turn on again the other zone turns on.

We spoke through email you replied to my initial email and when I asked if it was possible for you to help since you were local with questions. You never replied. But like you said better late then never.

I purchased the orbit start pump relay, picking up rachio today with outdoor enclosed. I know what wires to get based on a quote from a person trying to rip me off. For those I’ll go in person to home depot to pick up.

As for the manifold is there a downside to these versus inline single ones? The guy would warranty that or orbit if he installed.

I have a multimeter. As for the manifold is there a specific box to get there is a lot of sizes and not sure which one to go for. Right now I see no box so it might be in the ground with one of those 6” covers.

The person who gave a quote said it was 1”. Should I start by digging to see what’s what? I was gonna start by installing the outdoor box for rachio and relay. How close should it be to were pump relay is or can you draw on one of my pictures?

I saw rachio has a wall plug, is that for indoor? A since I’ll be using a relay am ai going to have to use that or?

Let me know if email or text or anything would work better for you. I’d be open to a quote too for the labor if you wanted to throw one by me.

Ah, I see our conversation over email now, I definitely did not ignore you with several emails back and forth, the last one having no further questions:

There is no downside to using a manifold over single valves. Advantage of the manifold is that it comes with the connectors which make it possible to replace an individual valve, in case it breaks, without cutting and gluing PVC. You’d just untwist the two connectors next to the valve you are replacing and put a new one in it’s place, if case of individual valves they are usually glued into place making a repair more difficult.

I still think you have three zones, take an unobstructed view of your index valve (first picture you’ve posted on this thread), how many pipes (and what size) do you have going into the ground?

Rachio power brick will fit inside the outdoor enclosure:

Sorry, I am not in irrigation business, you’d be better served by someone local who specializes in this. I can answer your questions, to the best of my knowlage and experience doing a similar thing myself, DIY style.

That screenshot you shared, I never got any response. The “Sure, it’s possible” I never got that. So my Thanks again was a sarcastic one since I believed I got ignored. Regardless thats in the past now.

But I’ll ask someone who’s home right now and edit this post. Alright about orbit, the person who quoted me was trash talking it but he was already trying to upcharge me on materials so I guess his word is also garbage.

Would I be able to reach you for a possible quote or quicker conversation?

Do you mean to plug it in the enclosed? like route a plug in there? Also how close to place that and relay

What pipe you buying to feed cables?

It’s official, Rachio forums are better than email :wink:
It’s also official that you have two zones, definitely stay above ground and avoid the headache of digging.

Ones you’ve got all the parts (post here as you get them and we’ll advise what’s missing), the project should be a quick/ez one. If you have never worked with PVC, search youtube for “PVC join” and get yourself a few trial / learner peaces which will not end up part of your irrigation setup, practice makes perfect. If you discover that you still prefer not to deal with PVC / glue, ask your / neighborhood landscaper how much they would charge just to glue everything together, it will be cheaper if you provide all the parts.

Outdoor enclosure has an outlet where you’d plug the Rachio power block that came with your controller. You’d need to run power to the socket, but the process will be clearer once you have the part.

Rachio officially recommends a few feet between controller and the relay, but with low power Orbit relay, distance should not be an issue, just don’t have both in the same box.

I still prefer you use forums for your questions, rather than handling it over text. It may not be me with the best / fast advice.

DIY route may take more than a day, your lawn will be fine, especially with frequent rains the Florida is getting. Do not fall into an anxiety trap that you’d need to complete it in one go.

1 Like

So I got the Rachio 3 and Encloser.

Orbit 57009 Sprinkler System 1 or 2 Horsepower Pump Start Relay https://www.amazon.com/dp/B000I19I5E/ref=cm_sw_r_cp_api_i_blH.EbV94RK75

Apas Waterproof Wire Connectors Kit Outdoor Electrical Wire Nuts 25 PCS(AWG # 22-8) (Green) https://www.amazon.com/dp/B07GJM22VM/ref=cm_sw_r_cp_api_i_zlH.EbXWKBBV5

so do you have an example of what above ground looks like with what I have now? Like set up wise? or video.

The wire I will probably get last. So blue glue, the above ground inline x2, what else and links work so i have a reference please

Here is an example video of above ground valves being used:

Basically you’d leave the pipes going into the ground and cut them as high / close to index valve as possible. You’d install the above ground valves connected straight to the existing pipes. The pump side will need a T slitter installed and routed to both valves.

Alright cool, will be planning to do this tomorrow after watching more videos. The guy kind of just transitioned it done. I rather see someone do it. Will reach out back with before and after pictures.

Be sure to check out videos about “dry fitting”, it’s a technique to make sure all of your peaces are cut right and will fit before you start gluing everything together.

The conduit I’ve used to run the wires is a standard electrical conduit, from home depot / lowes:

That said, because you are not berrying the valves, you can avoid it all together and simply run the wires exposed / shallowly berried. Conduit is best if you need to run / replace the wire going to underground box, otherwise it’s not necessary.

Thoughts on the placement of relay and rachio. I figured removing mechanical timer and then using the tubing use for the wires already there. Then any new wires I would run along the pipe with a cover on the wires ofc on the side. Before is the one with one box.

Screen Shot 2020-07-02 at 7.26.50 PM Screen Shot 2020-07-02 at 7.26.47 PM

1 Like

You could also remove the guts from the old timer and insert the heart / relay from orbit. Only downside to it would be slightly harder addition for conduit / AC wire from old timer box to Rachio enclosure. If you buy an outdoor rated AC cable, you can simply drill a hole for it and run it exposed.

Like this?

There is no need for master valve, your pump is already performing this function.
Your water line setup will be
… … … … … … … … … … … > valve > existing pipe into the ground
Pump > Faucet adapter > T split
… … … … … … … … … … … > valve > existing pipe into the ground

Note that, besides the index valve, you can remove the manual valve as well (your field valves will allow you to use the water hose without turn off the water down the line).

Let me see if I can draw cause I need visuals.
Also my outdoor box has two holes on the bottom. Just like the picture you put and once leading to where the cable plugs.