This is a guide for installing the Rachio wireless flow meter on 3/4” copper pipe if you don’t mind sweating a bit (of pipe, that is)!
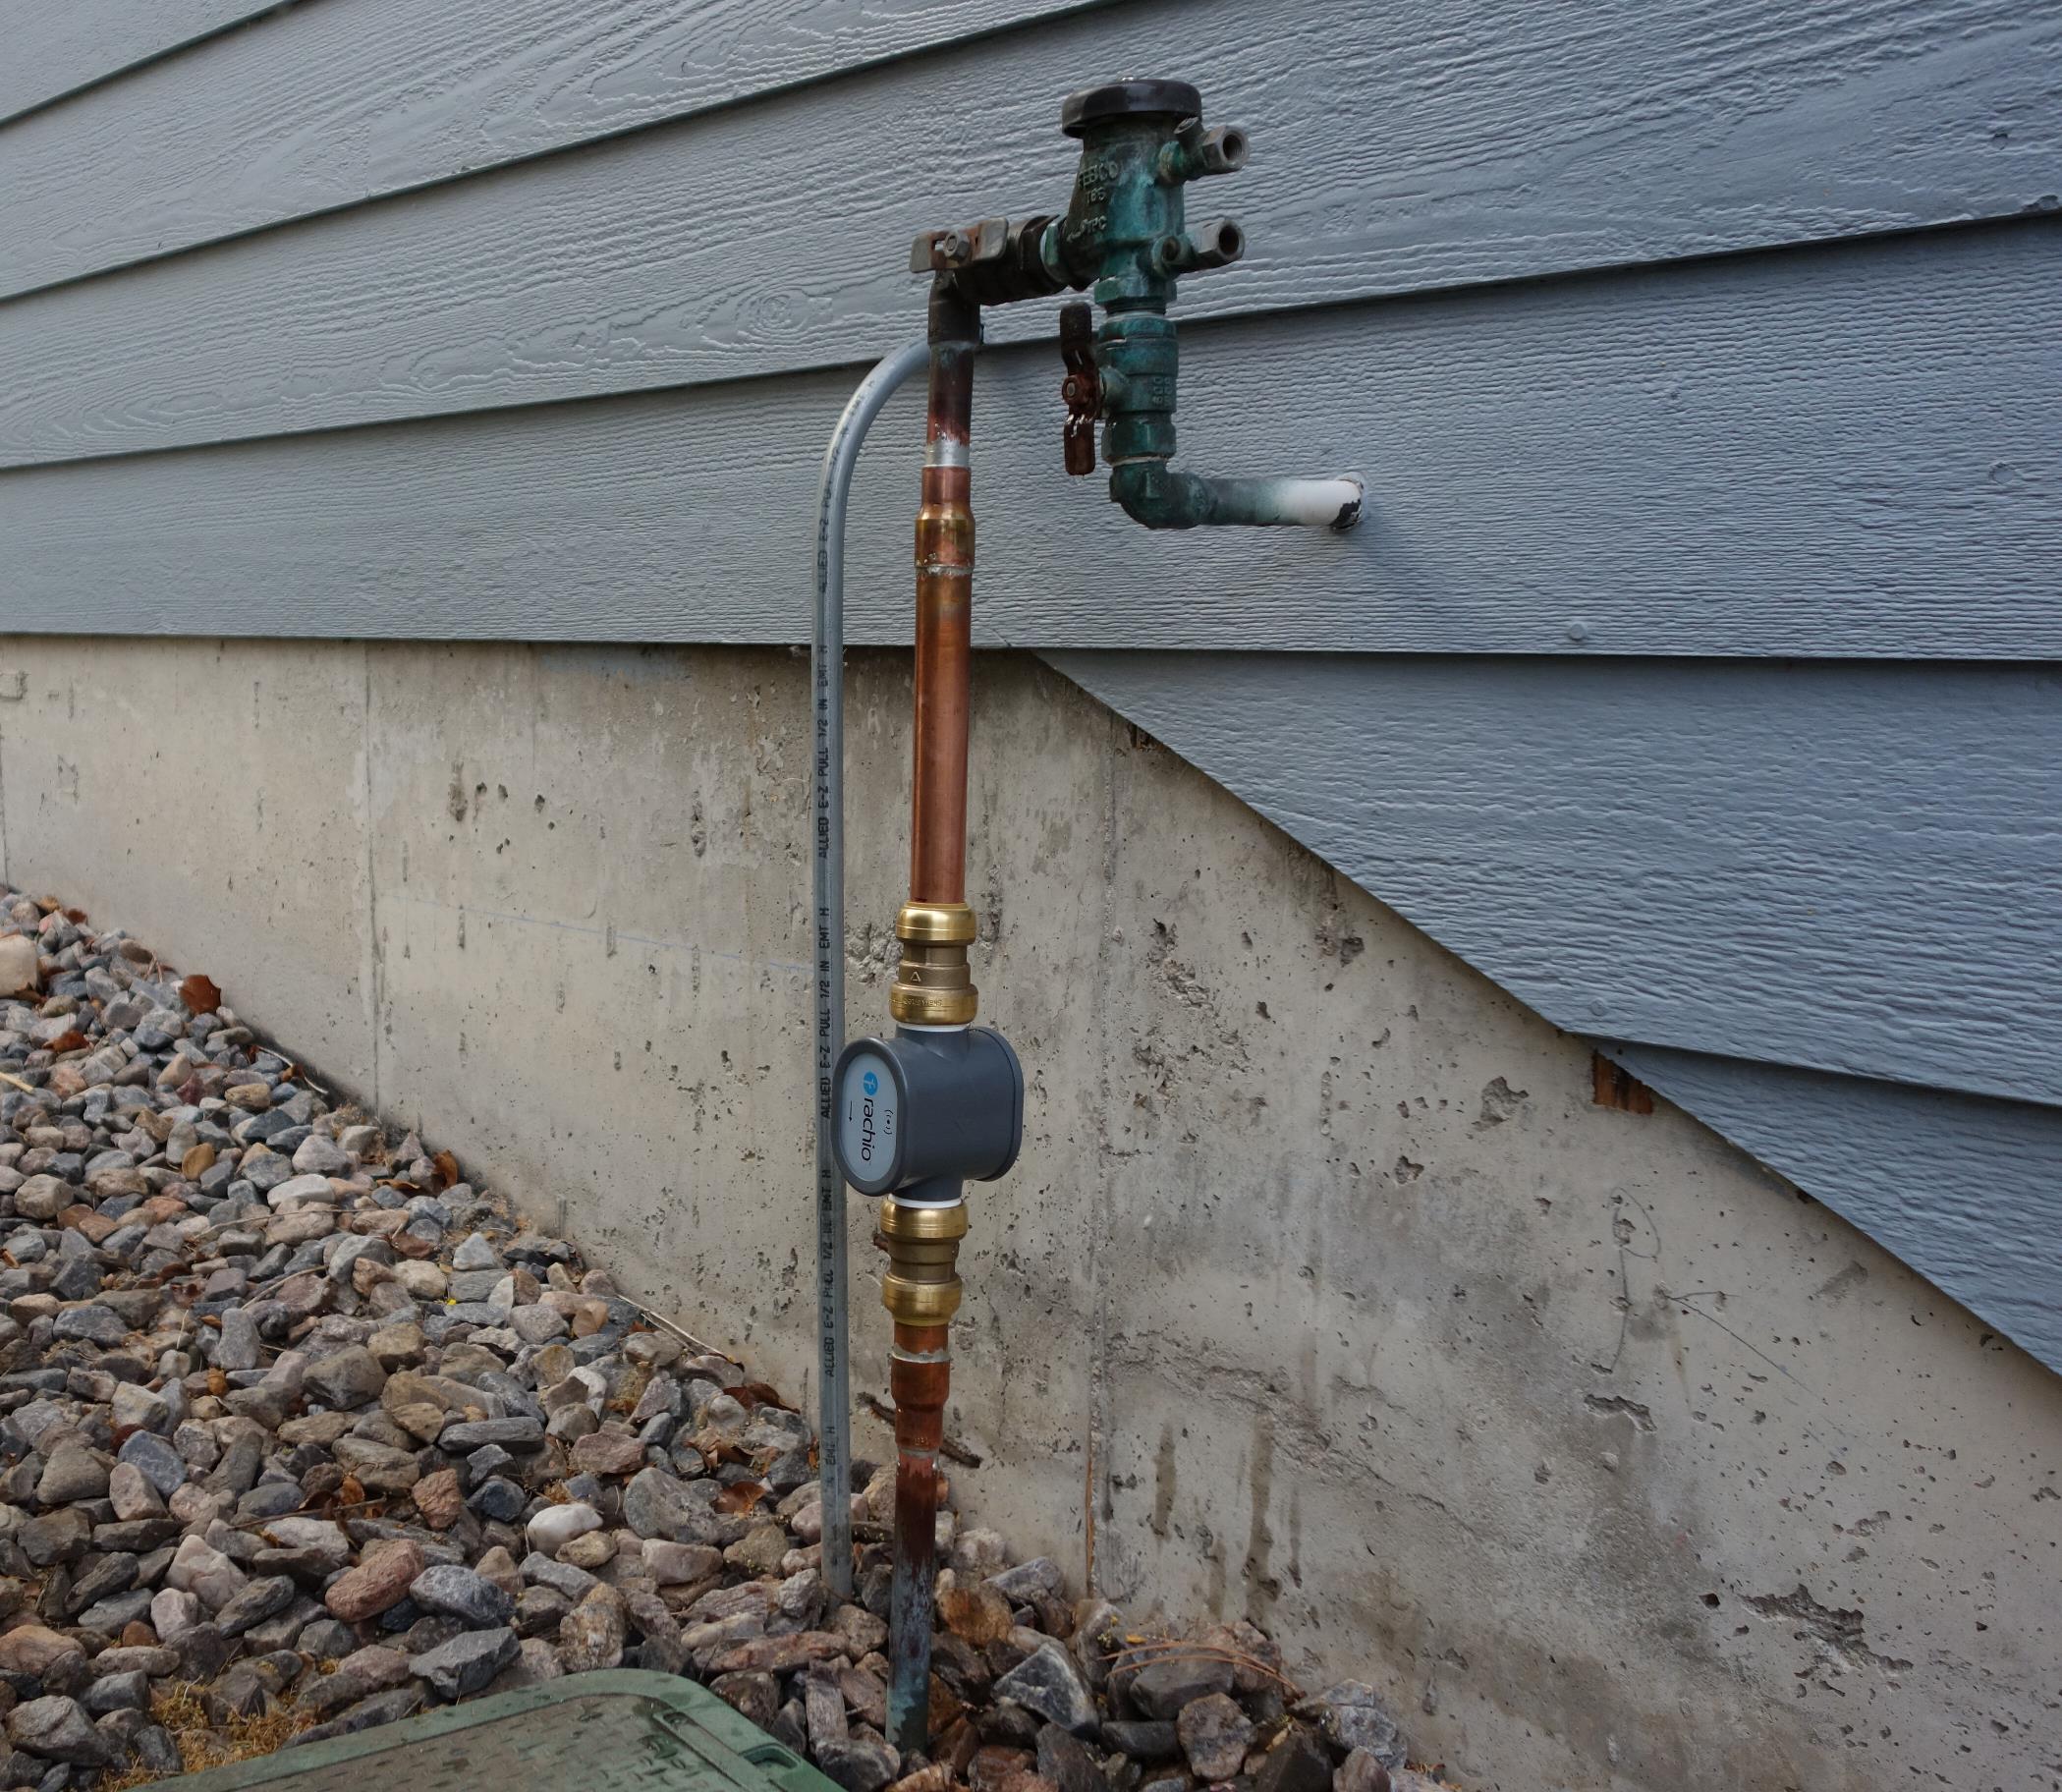
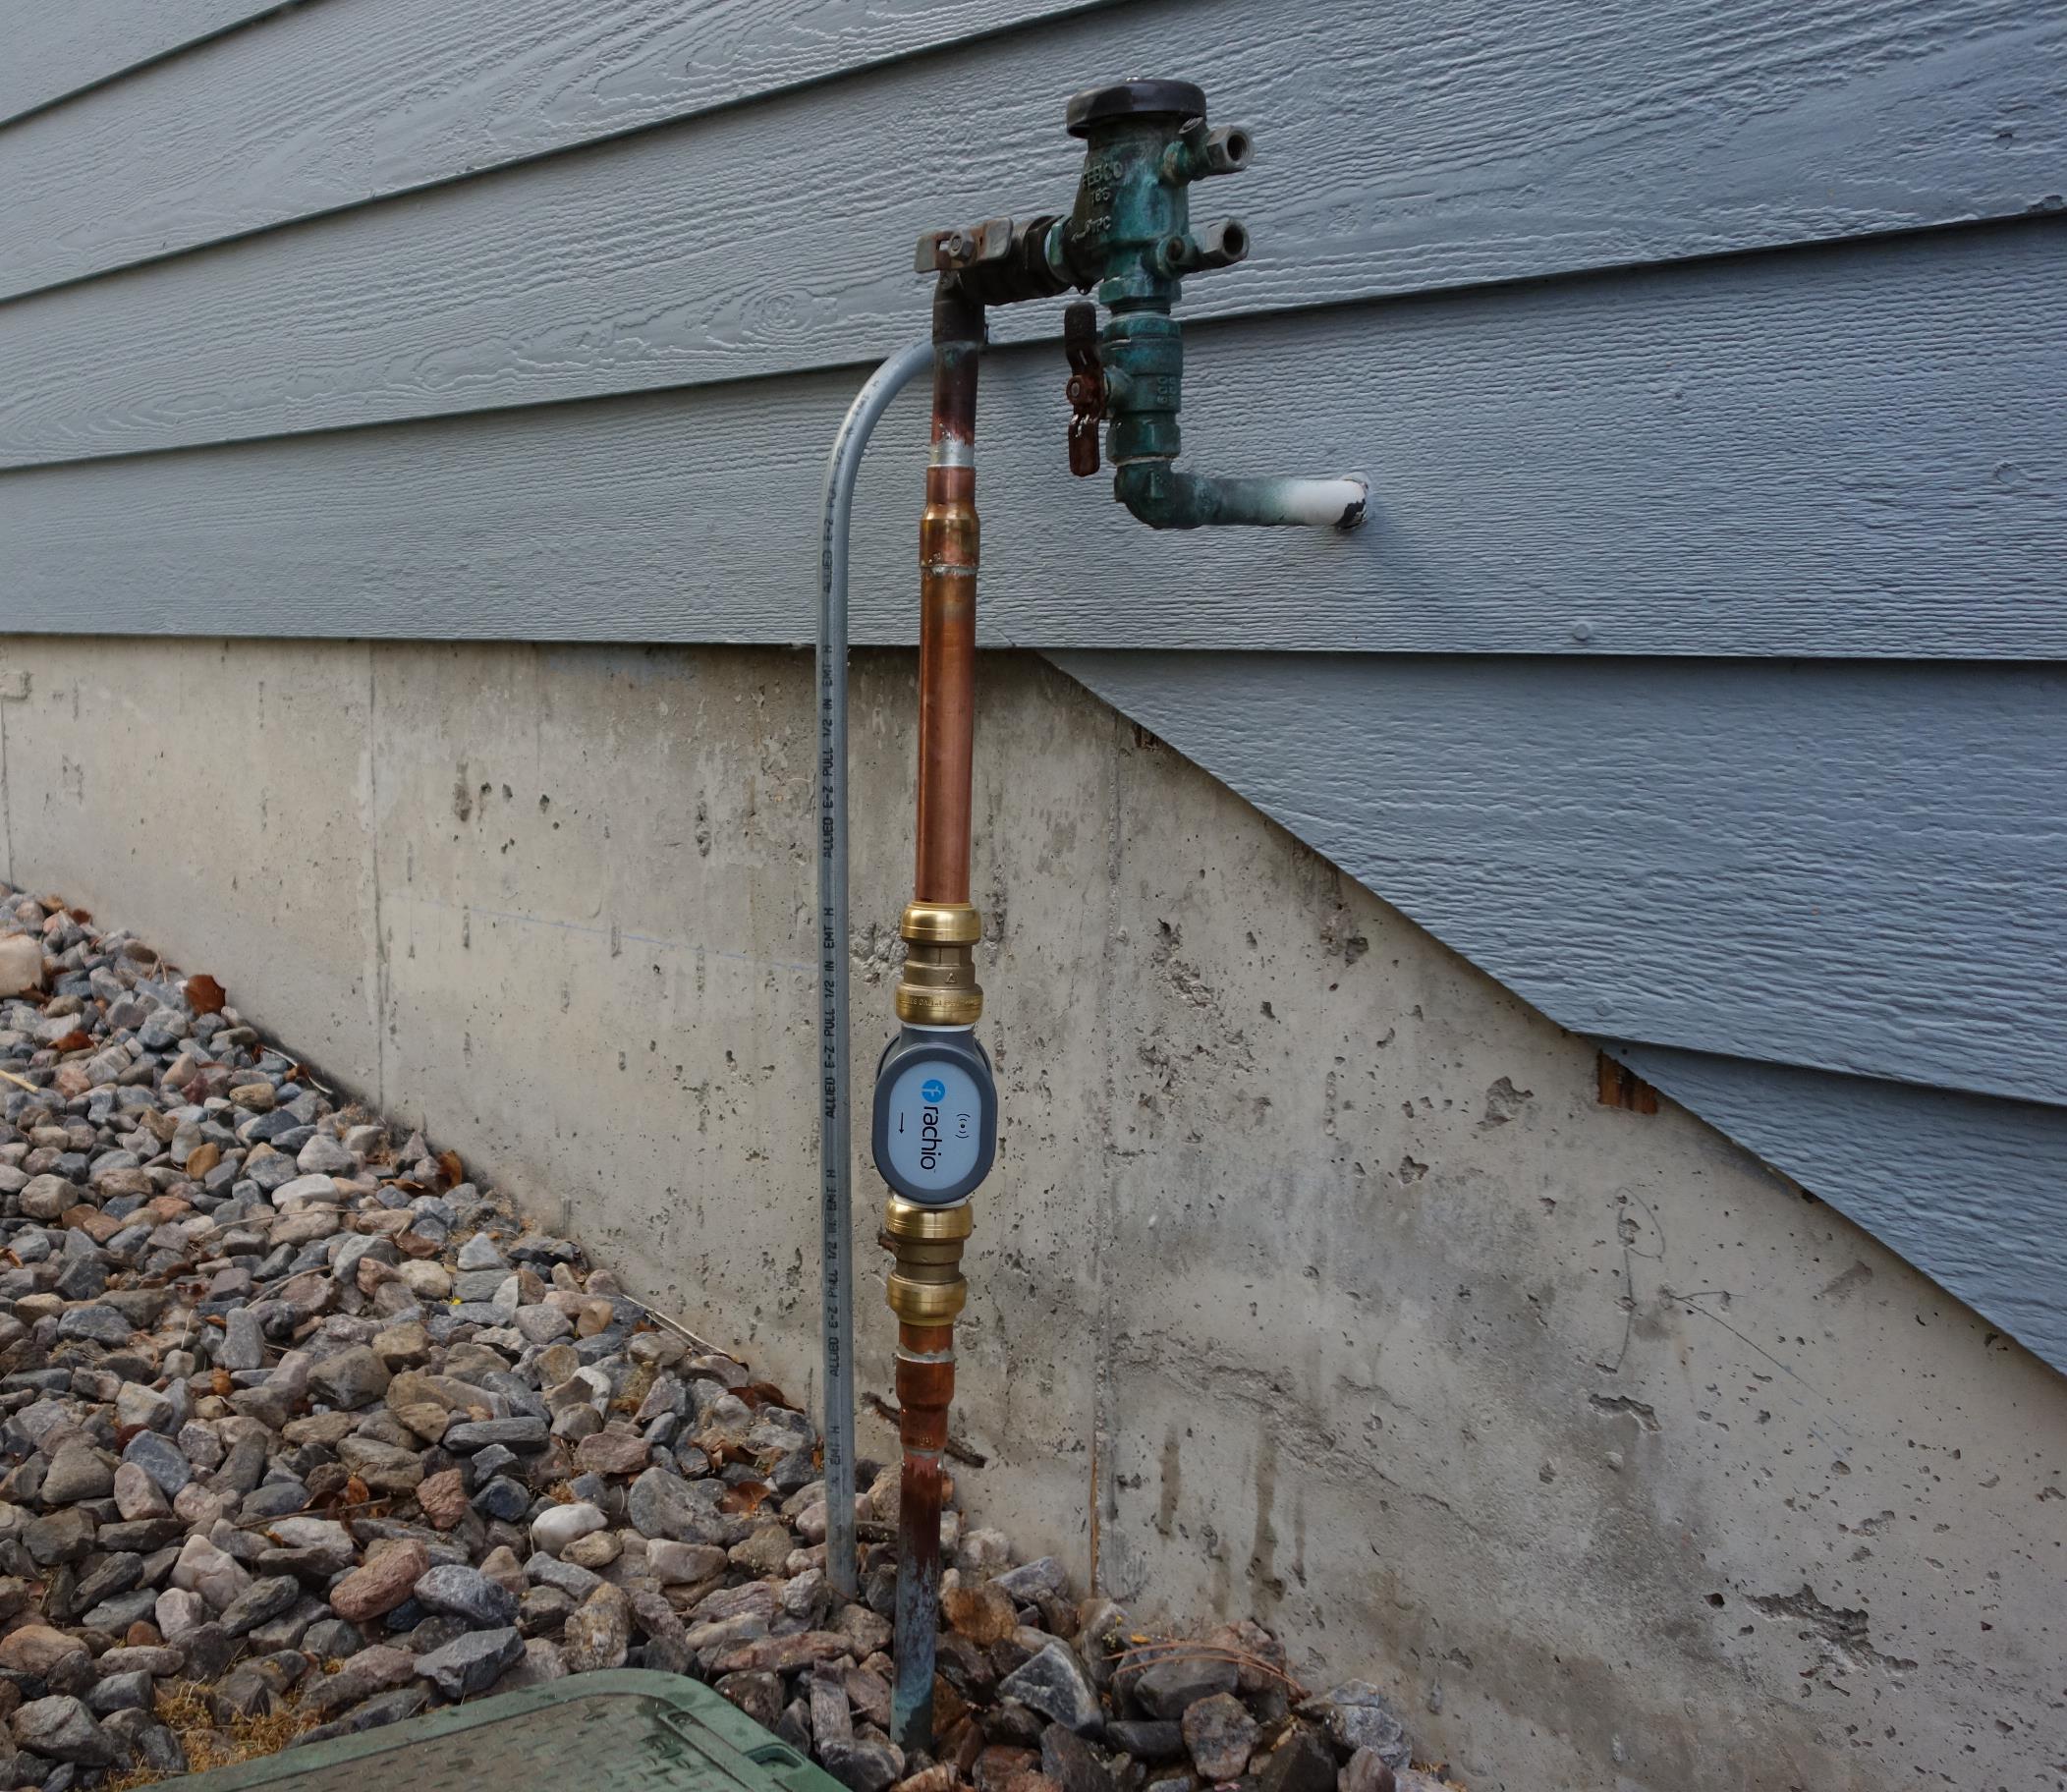
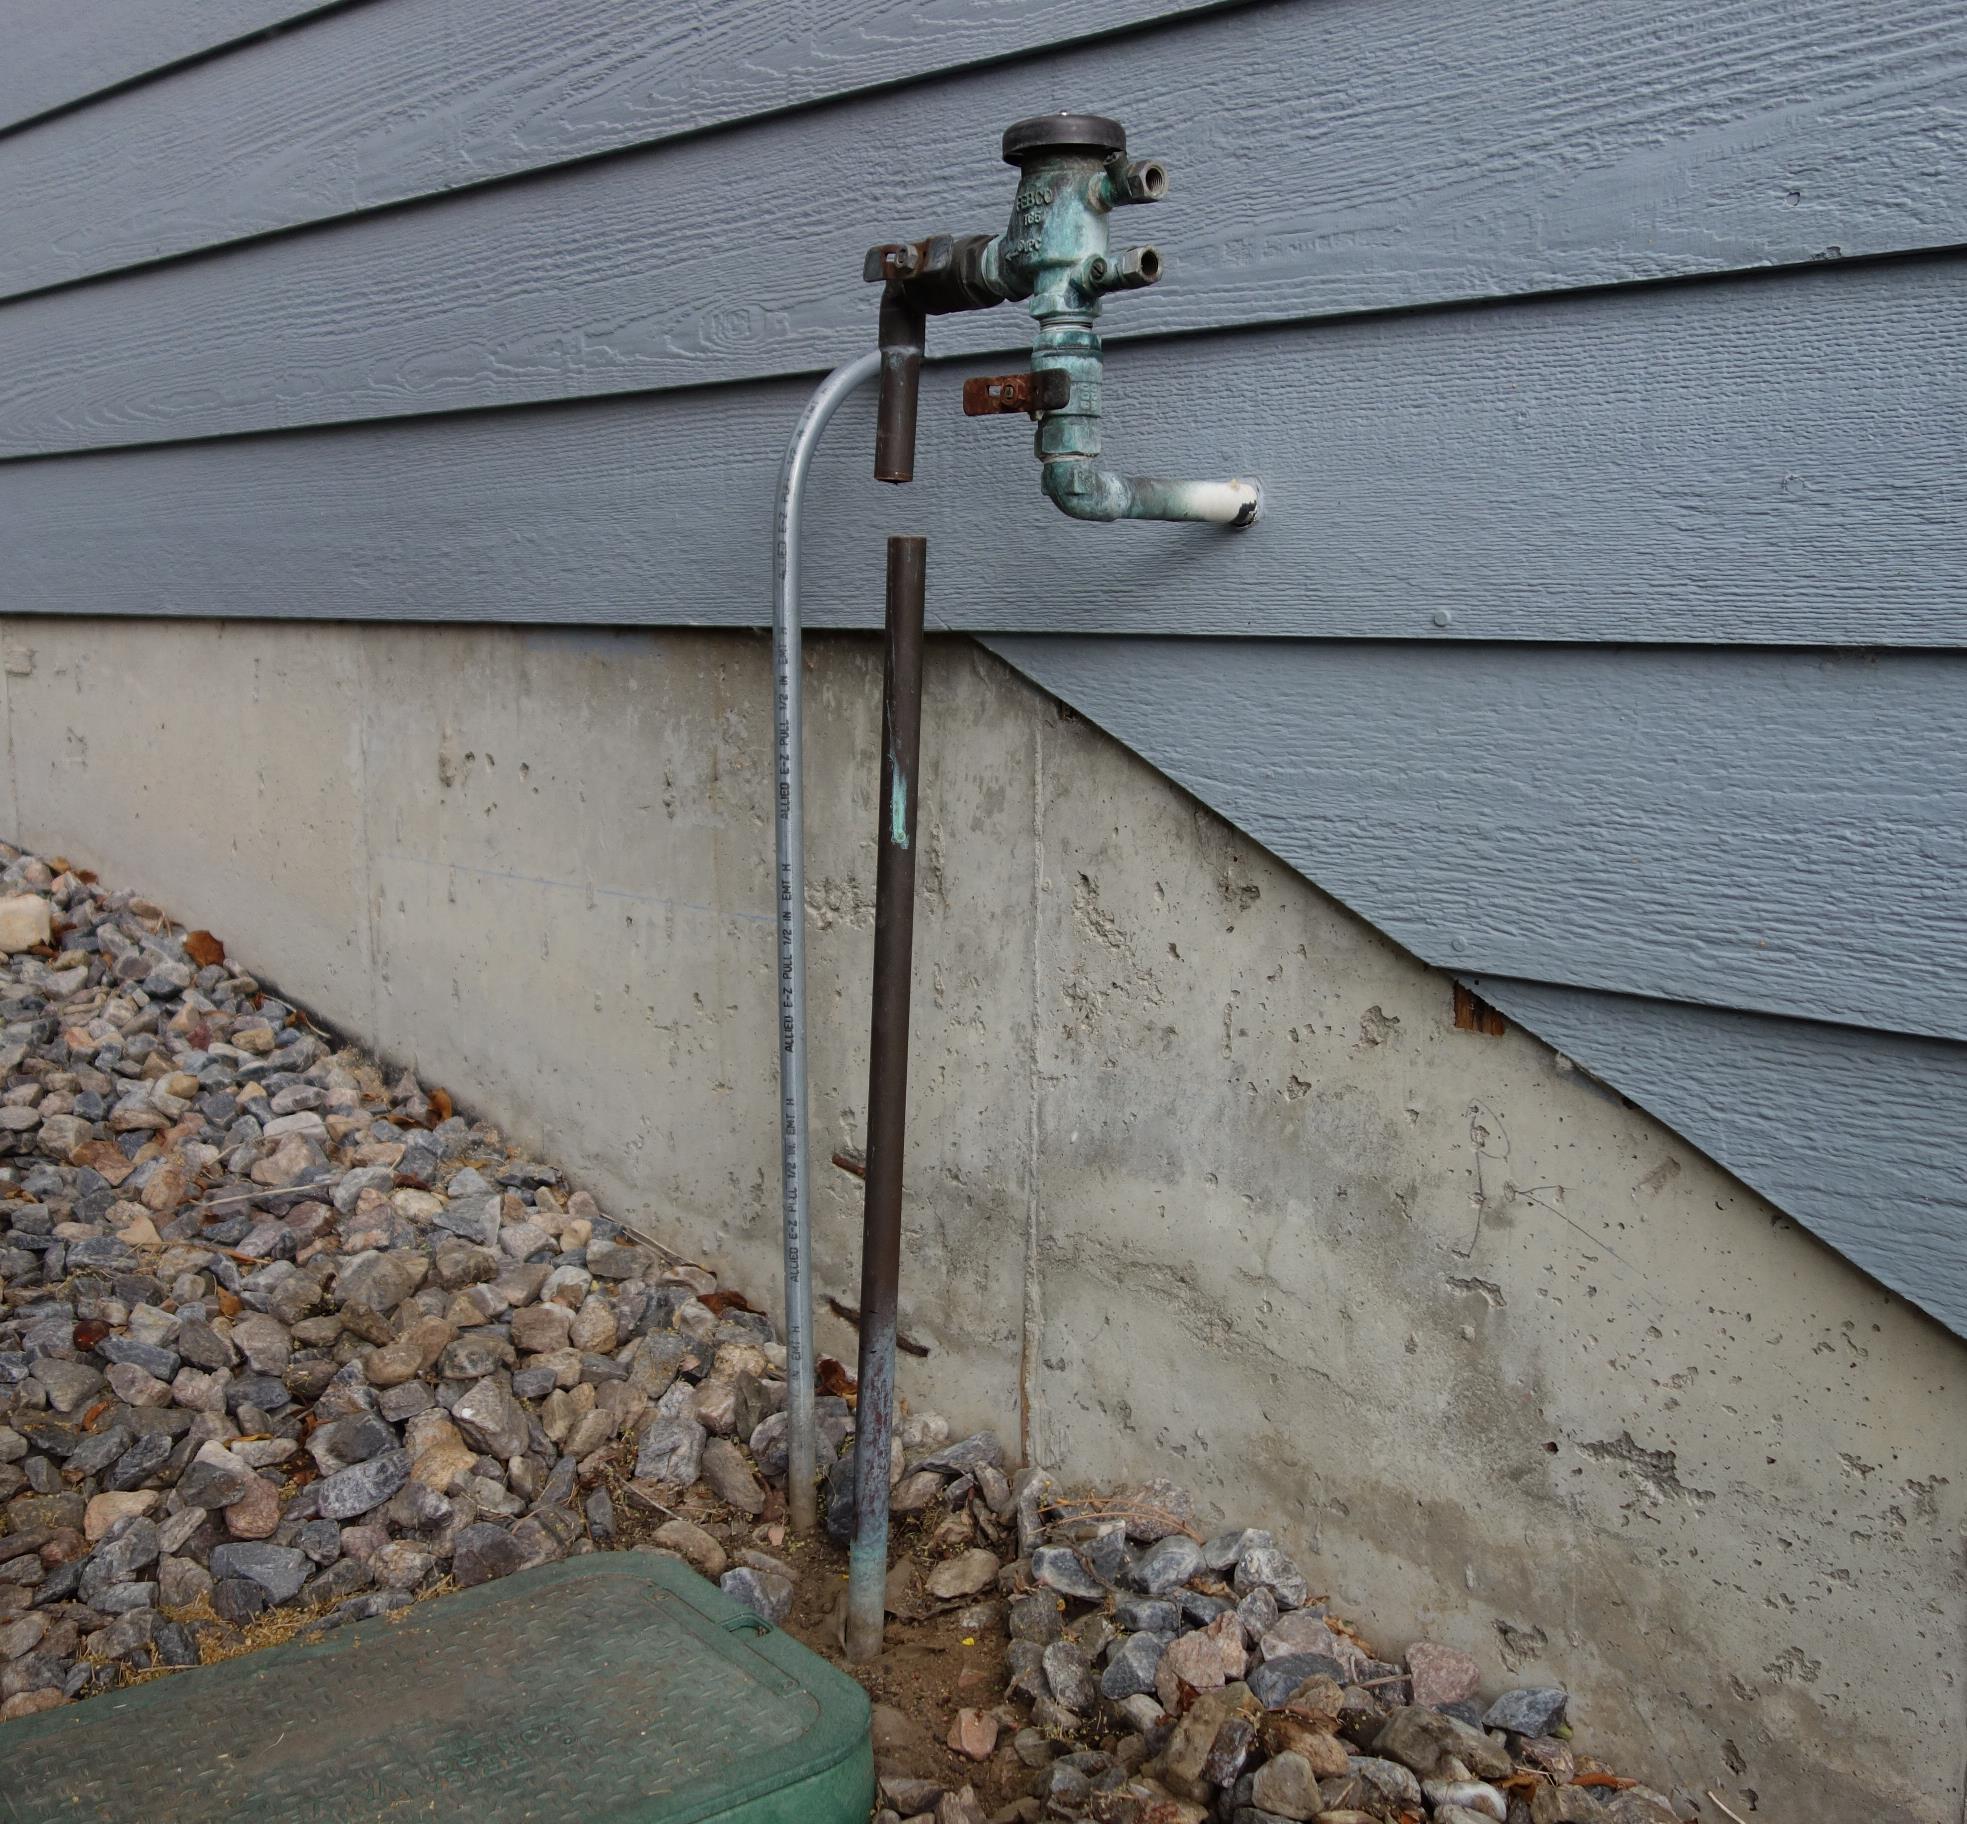
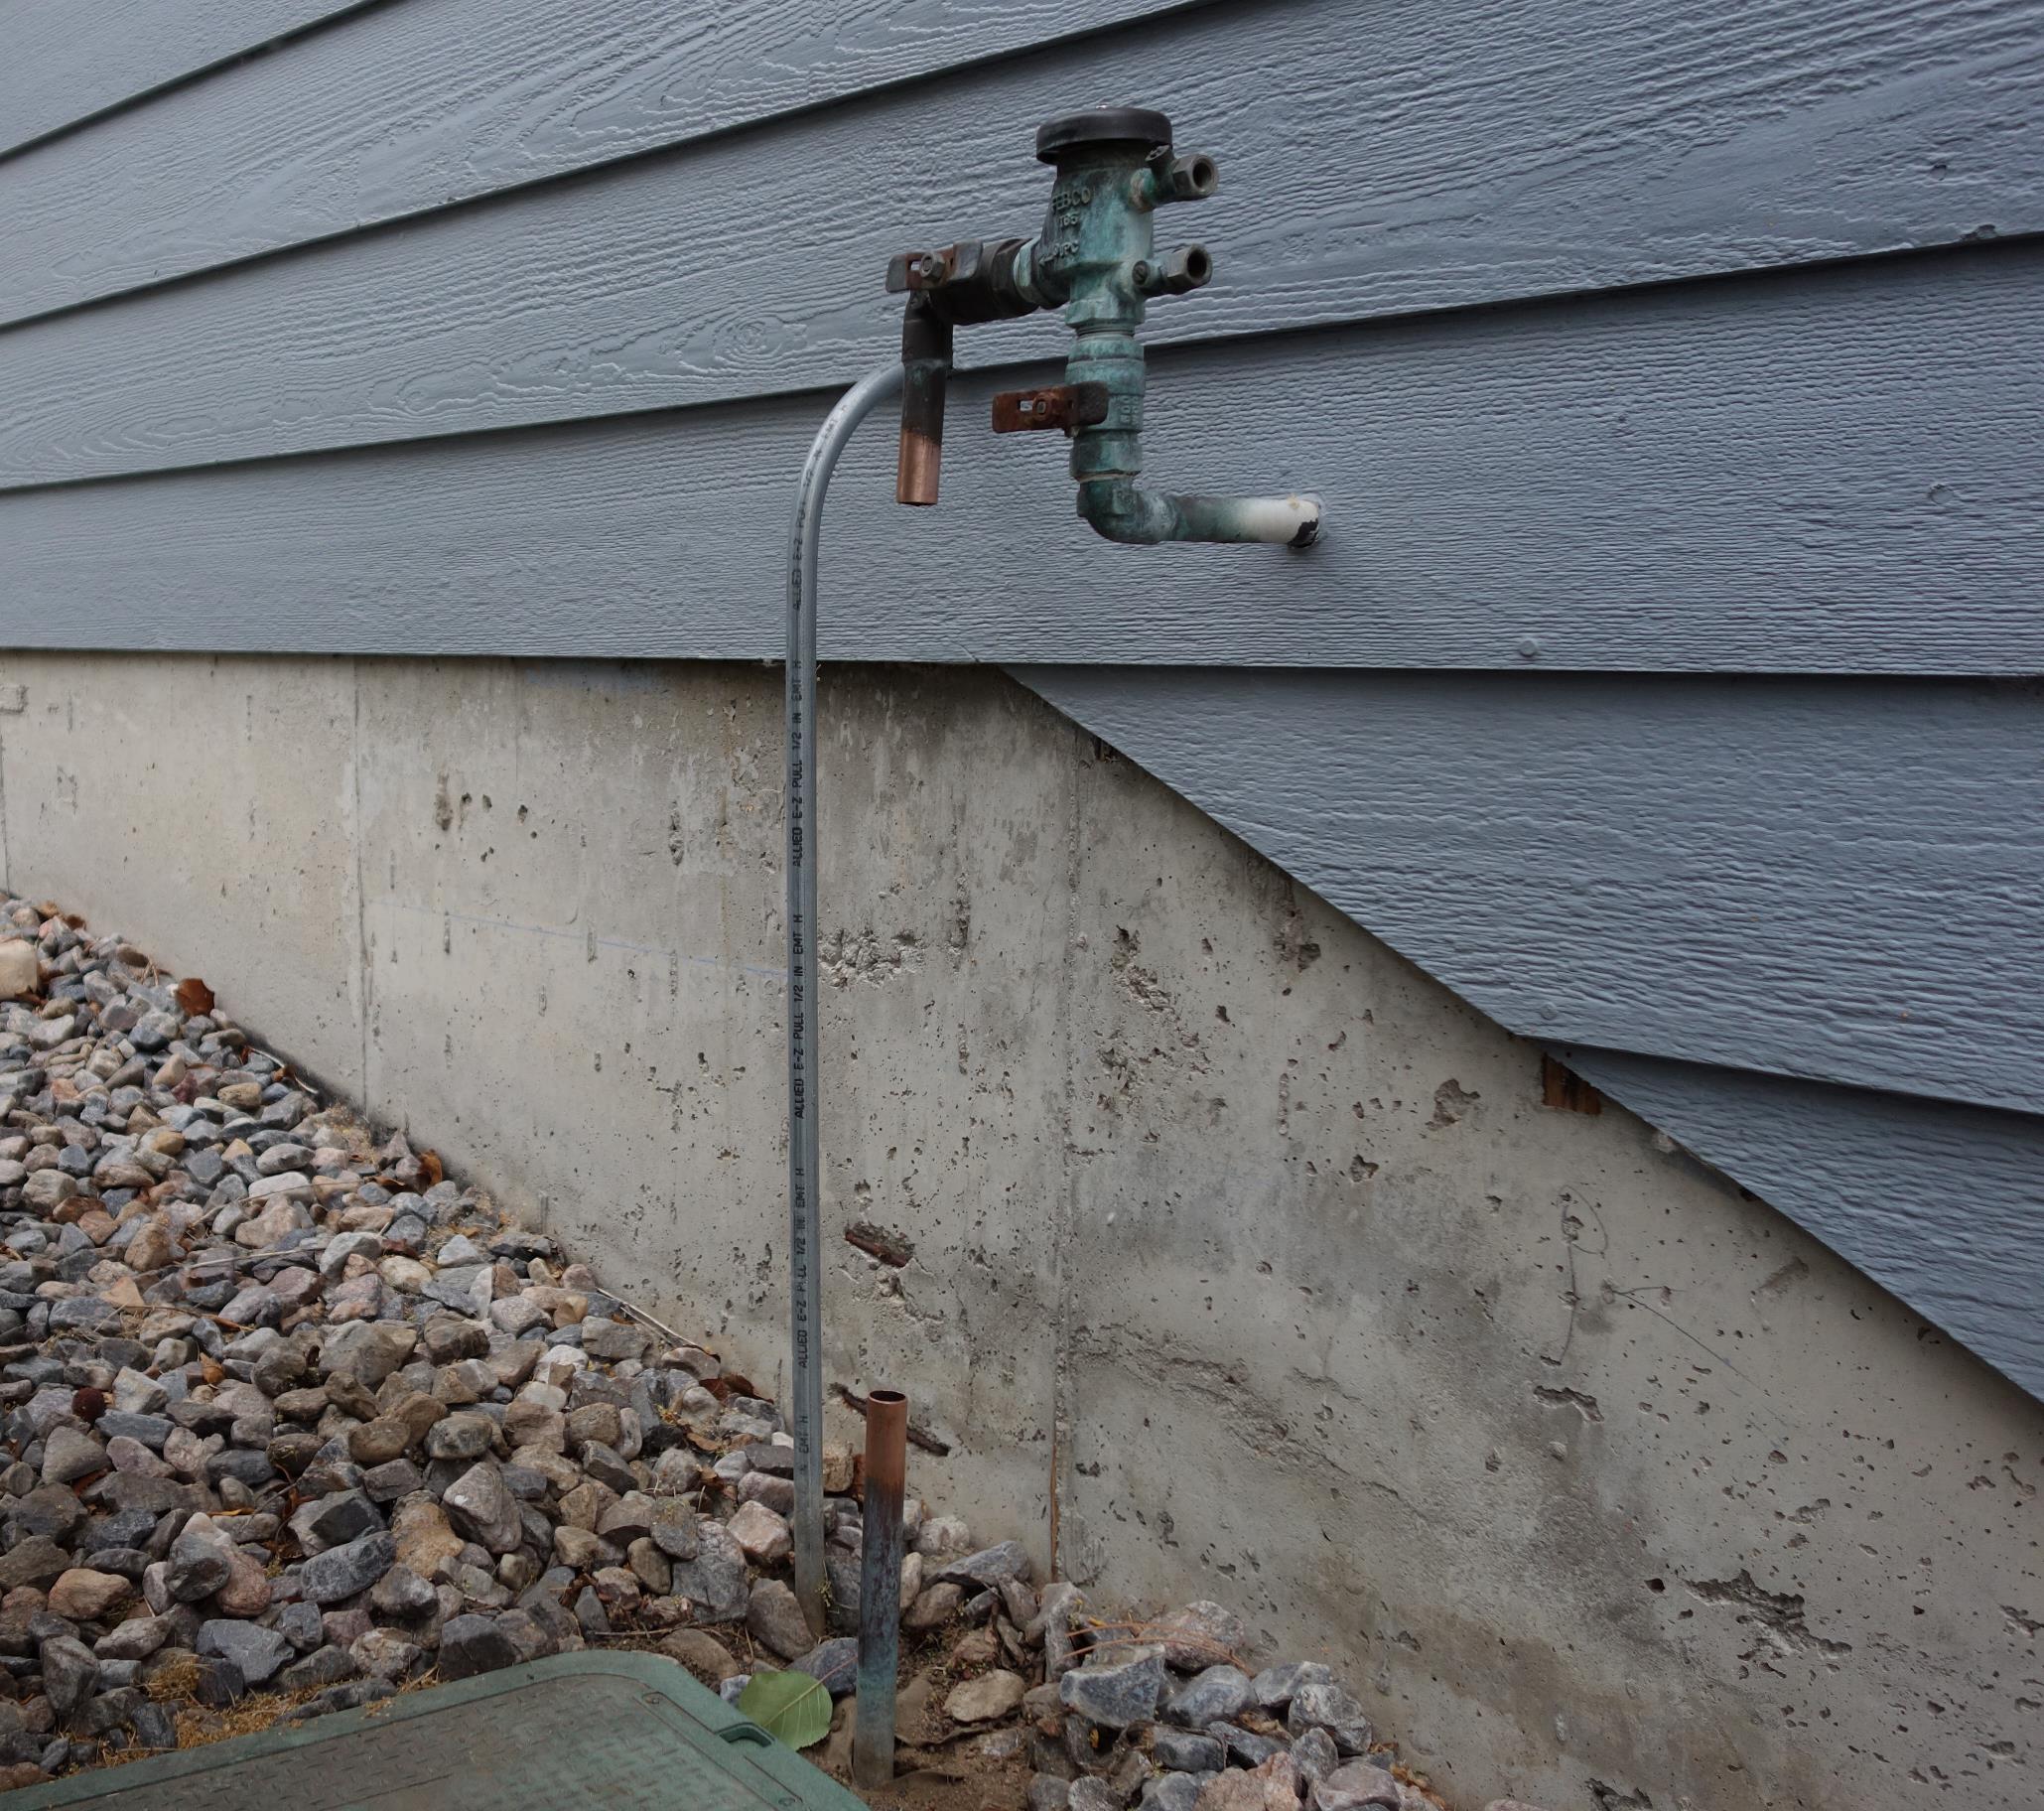
First, the finished installation:
Information
Familiarize yourself with Rachio’s instructions for DIY flow sensor installation on 1” copper pipe; you’re going to perform all of those steps on the piece of copper pipe you’ll be putting in place of a section of your 3/4” downpipe.
Bits and pieces
Here are the parts you’ll need to do-it-yourself sweat style:
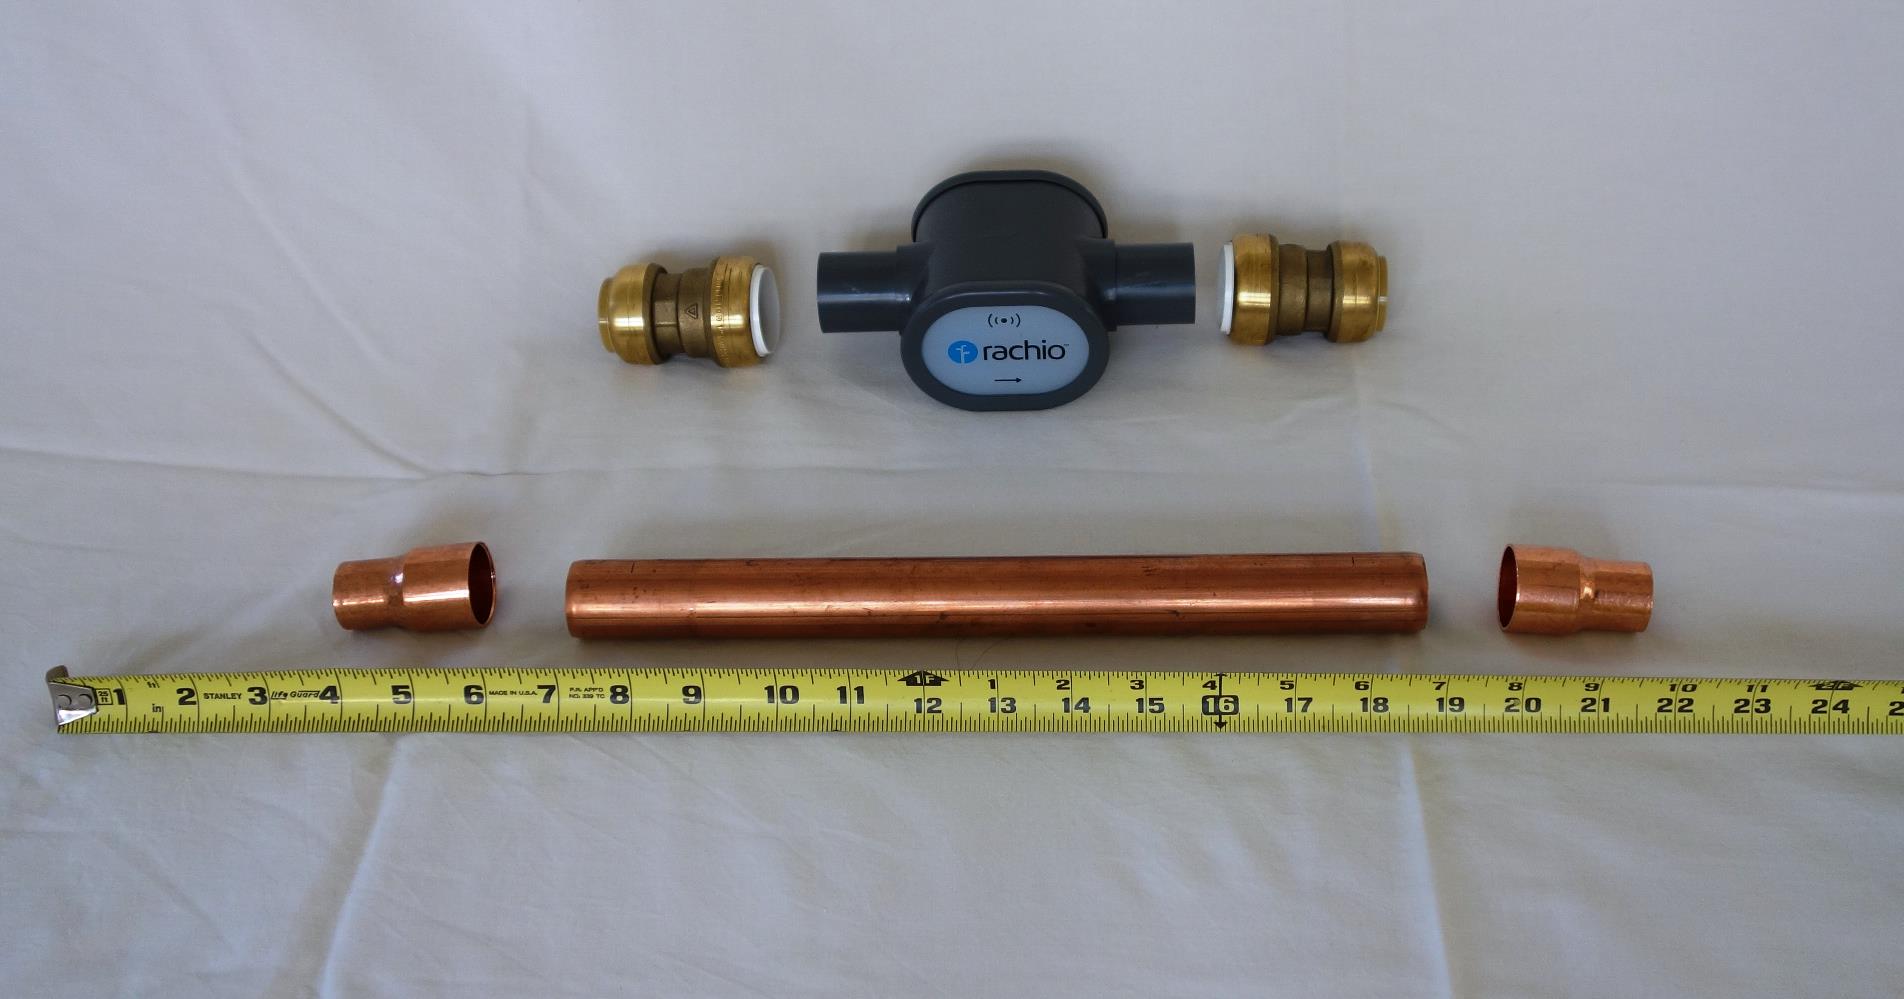
- At least 9 inches of 1” diameter Type M copper pipe. I used the entire 12” piece that I bought from SupplyHouse.com
- Two 1" x 3/4" CxC {1} Copper Couplings
- The same two SharkBite UIP4020 transition fittings as specified in Rachio’s instructions for installing the flow sensor onto 1” copper pipe.
{1} “CxC” means that each end of the fitting will slide onto a copper pipe of the specified size. If, on the other hand, your fitting were labeled “FTG” (also known as ‘street’), that means that it is the same exact outer diameter as the specified copper pipe size. “C” used to describe a fitting means that it’ll slide onto the outside of the pipe; “FTG” means that it’s the same size as the pipe.
Prices vary (especially online) but, when I priced the all-SharkBite method suggested by Rachio for 3/4” copper pipe, the sweat-it-yourself approach I’m describing herein came out cheaper by about $25. Besides, my way will be less restrictive to flow due to elimination of the downstream ball valve and removal of the SharkBite stiffening collars. Decide for yourself whether or not that difference in money and performance is worth the time and effort it’ll take to do it this way. Oh, by the way, the information in this posting is for your own use, so no warranty is implied: you’re on your own—good luck!
Tools
You’ll need tools for cutting, deburring, and soldering copper pipe. If you’re someone who already has experience sweating pipe, then you already know what those are and probably already have them. If you’re new to the job, here is a great learning resource, one of many online!
You’ll need:
- A pipe cutter and deburring tool (my old General No. 120 has that built in)
- Lead-free solder
- Paste flux and an application brush
- A propane torch (and an igniter, if your torch head doesn’t have one built in),
- Some emery paper and maybe a fitting brush (I use coarse steel wool instead for both inner and outer surfaces)
I highly recommend some heavy leather gloves as well—things can get really hot when sweating copper pipe!
Prepare the SharkBite fittings
SharkBite fittings for joining copper pipe to PVC pipe have two different colored release collars: the tan end is for copper pipe and the white end is for PVC pipe. Because the copper end is also used for PEX, CPVC, or PE-RT pipe, the fitting includes a stiffening collar:
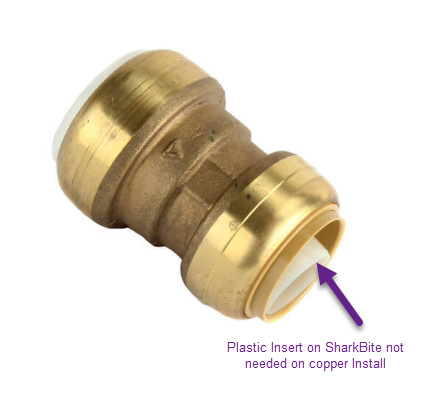
The stiffening collar is not required for copper or CPVC pipe so, although SharkBite claims that it does not restrict water flow in spite of its relatively small internal diameter, it can be removed. If you don’t have the SharkBite disconnect tongs, or don’t want to go through what @corfam did in his excellent post on the subject, try this: hold the PVC end of the fitting in the palm of one hand while using the forefinger and thumb to depress the tan collar like so:
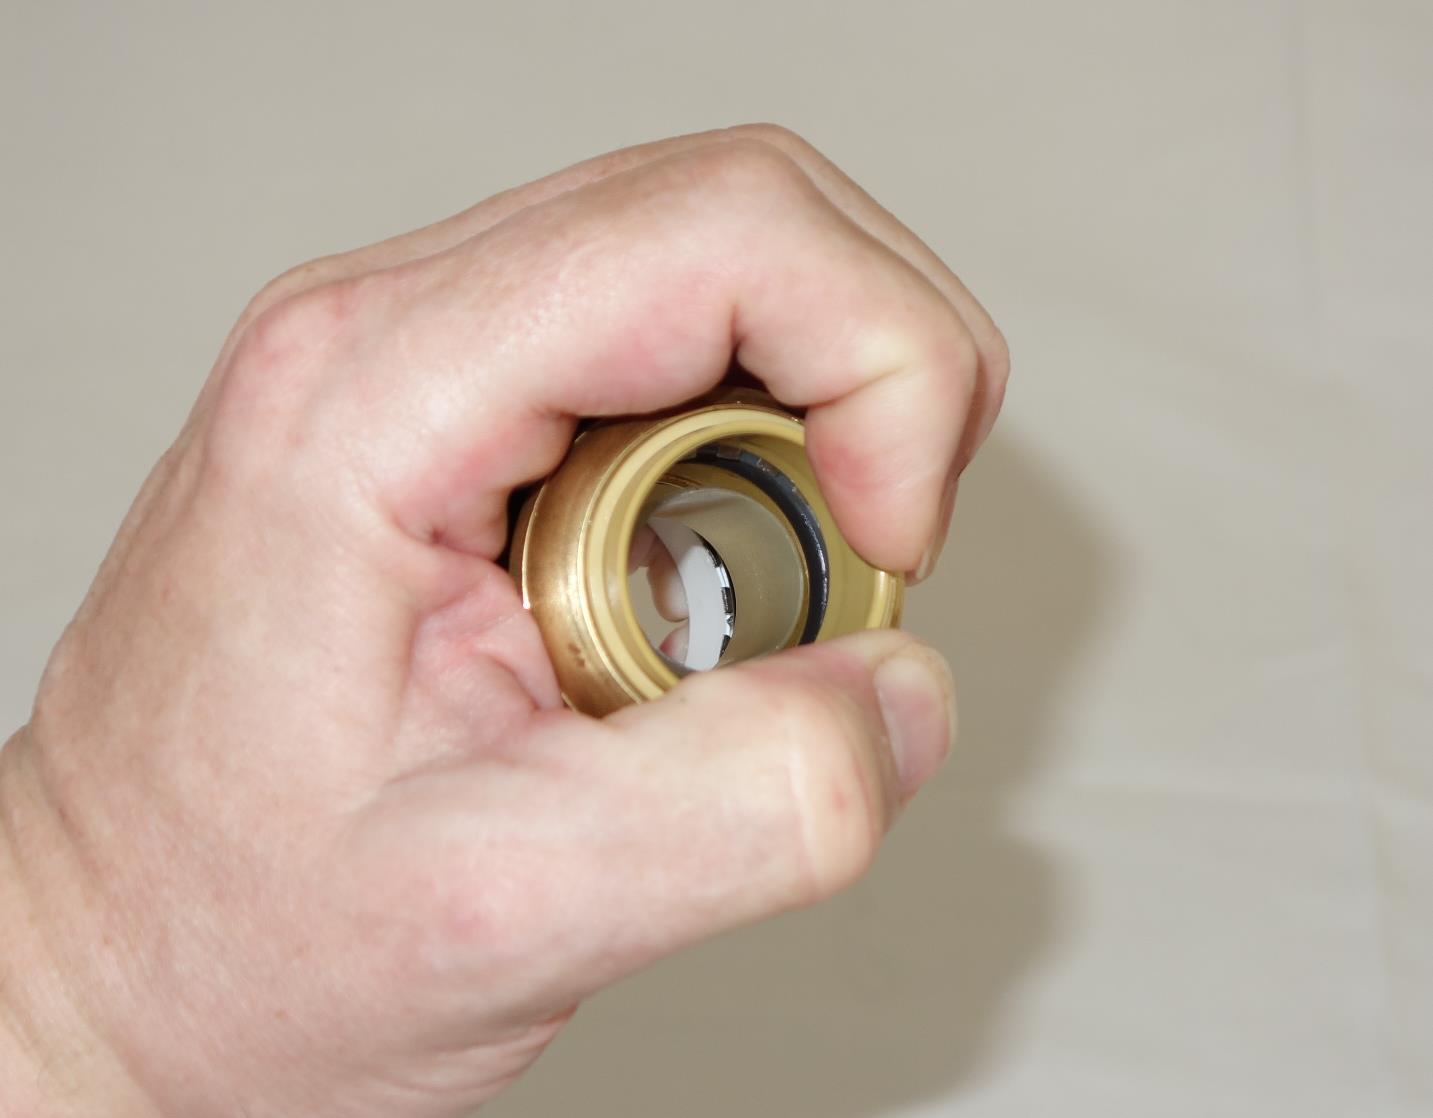
You can see how this depresses the teeth of the metal grab ring on that side of the fitting, moving them out of the way. Now, using the forefinger of your other hand, tilt the stiffening collar so that you can pull it out, starting on the side where the grab ring is depressed:

Repeat with the second SharkBite fitting. Here’s that the fittings look like with and without the stiffening collar:

Prepare your cut
The insertion depth of the 1” pipe into big end of the CxC coupling will vary (even within a single brand) so, before you cut the pipe, measure and note the insertion depth. The insertion depth of the 1” copper pipe into the SharkBite fitting is approximately 1 5/16”. In my case, the combination of those two measurements came out to about 2 1/2 inches. So, just to make things easy (and to leave a little room for the SharkBite removal tool, should that ever become necessary), I cut a 3 inch piece off of the pipe, leaving me with 9 inches for the upstream end—comfortably over the minimum of 6” recommended by Rachio (See “If I Knew Then…” below). Mark which transition fitting goes on which end of each piece of pipe; As I mentioned before, the insertion depth can vary (by 1/8” or more)! Lay your pieces out to check the approximate overall length of your final assembly:
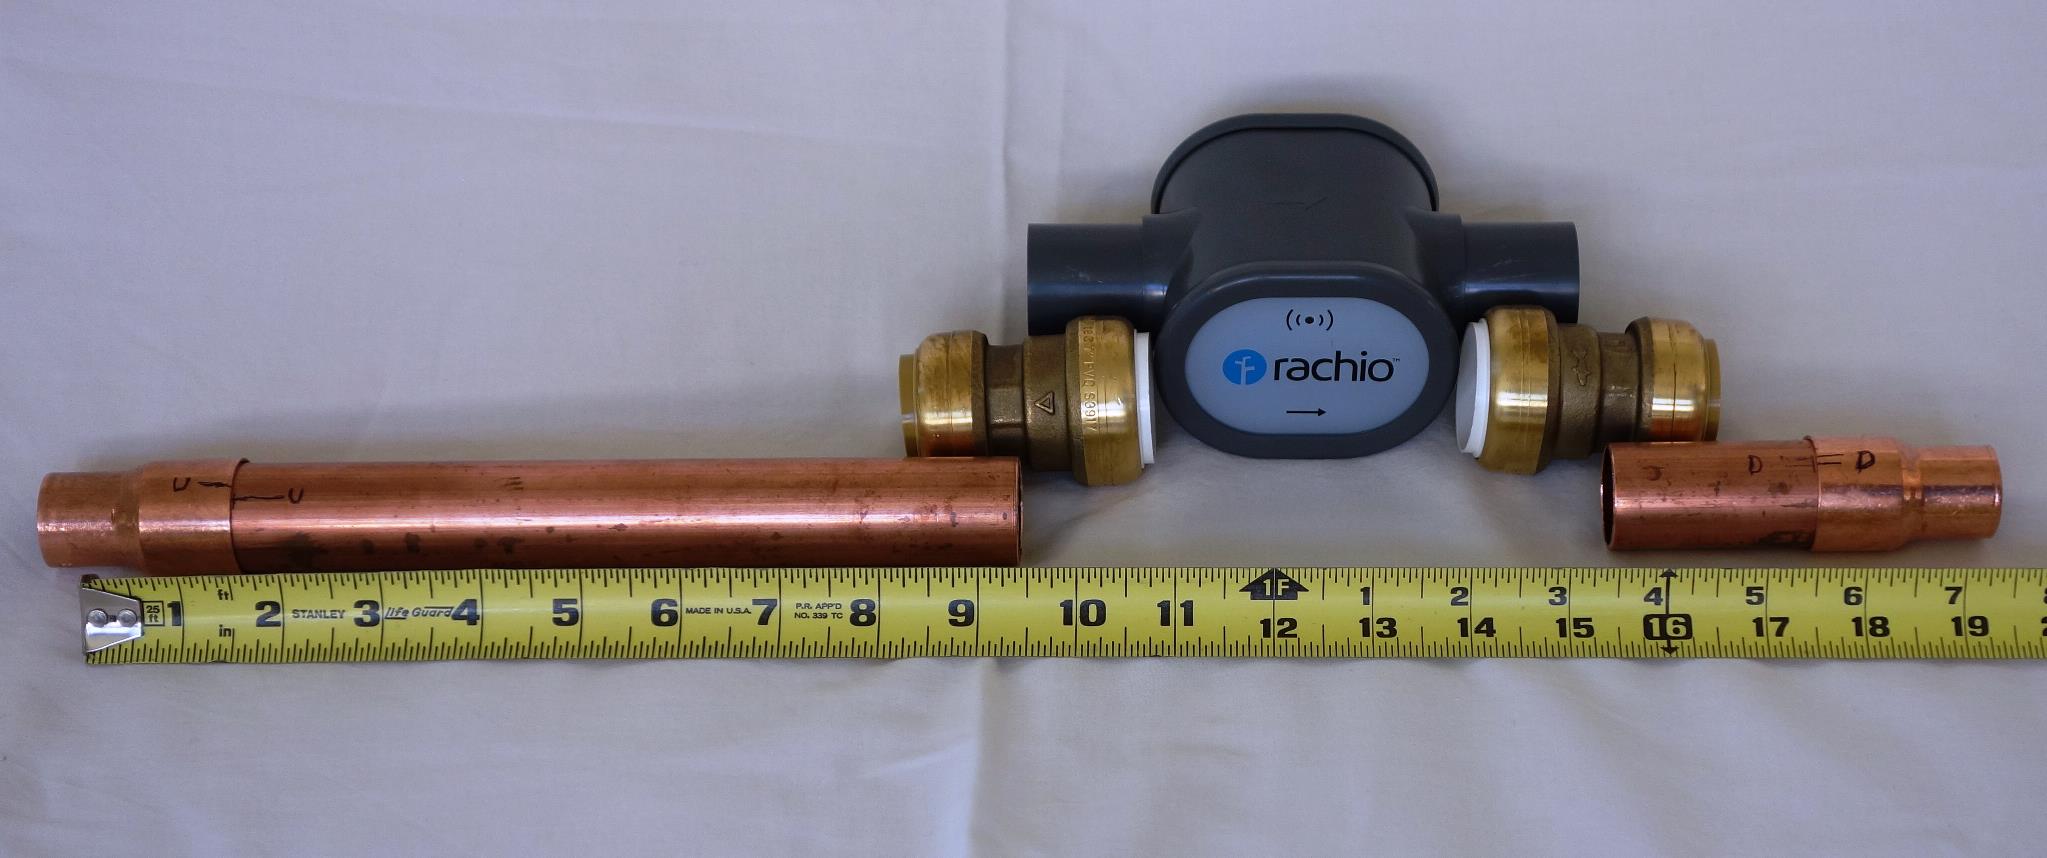
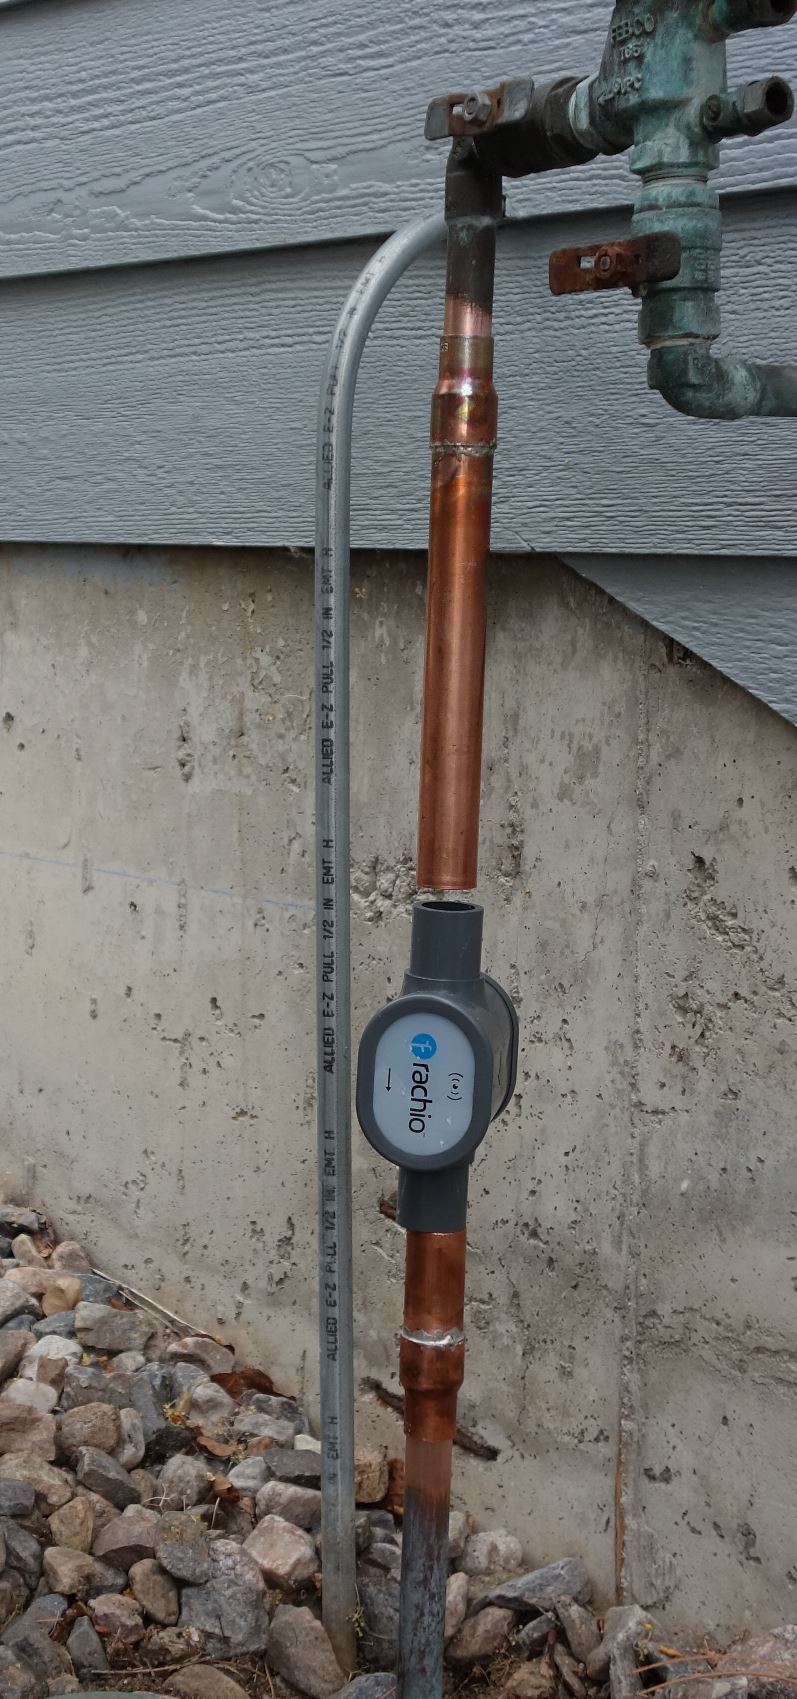
What, exactly, am I measuring here? Well, you can see from the picture approximately how all of the components line up. Based on both Rachio’s instructions and my own experience, the SharkBite fittings and the flow sensor will need a gap of 6 1/4" between the upstream and downstream pieces of 1” copper pipe. On the 3/4" ends of the copper fittings, you are measuring to the tiny marks shown here:
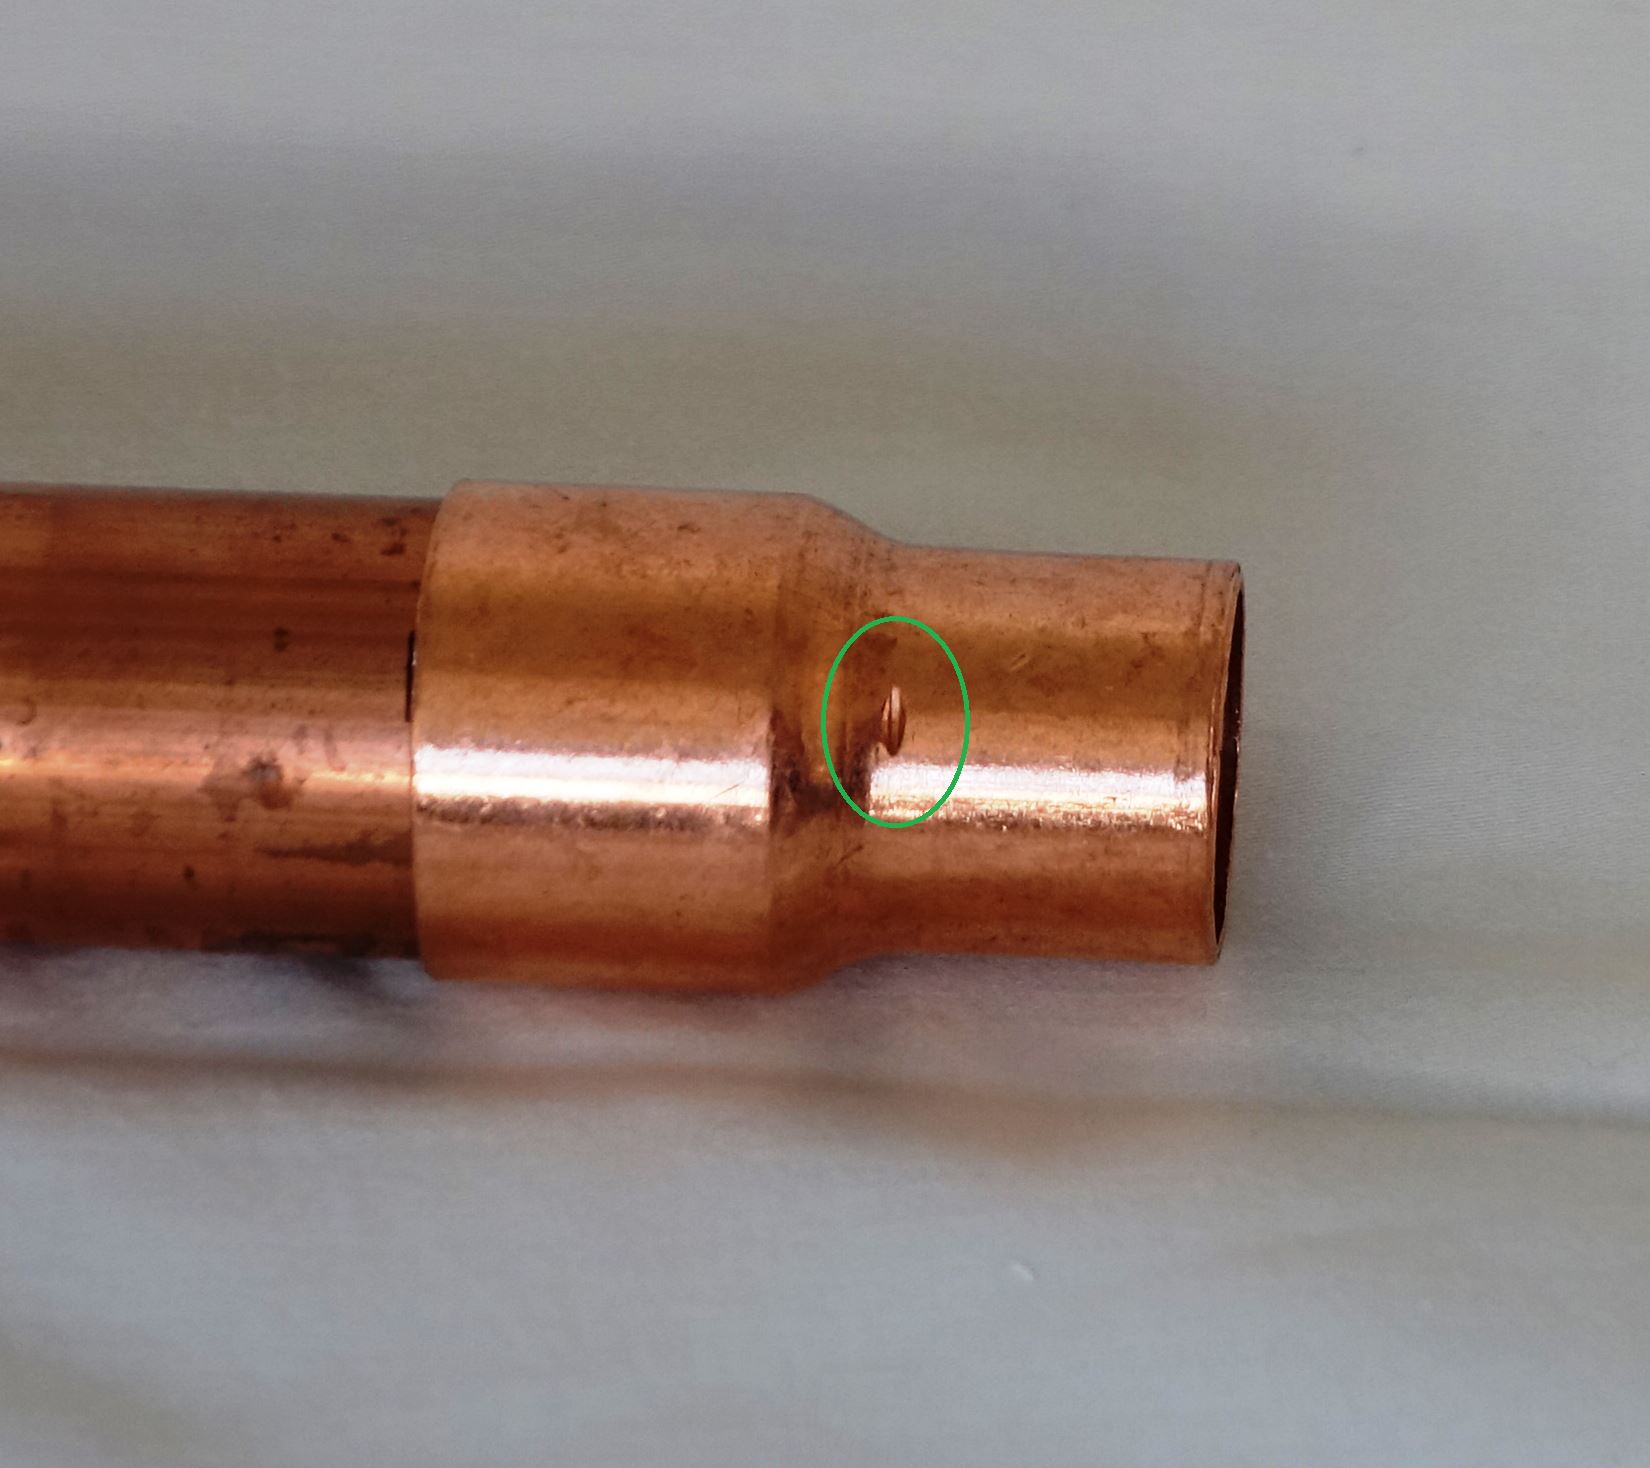
These are stops embossed into the fitting to keep the 3/4” pipe from sliding too far into the fitting. In my case, the overall length of 3/4" pipe that I’m going to be cutting out is 18 3/4".
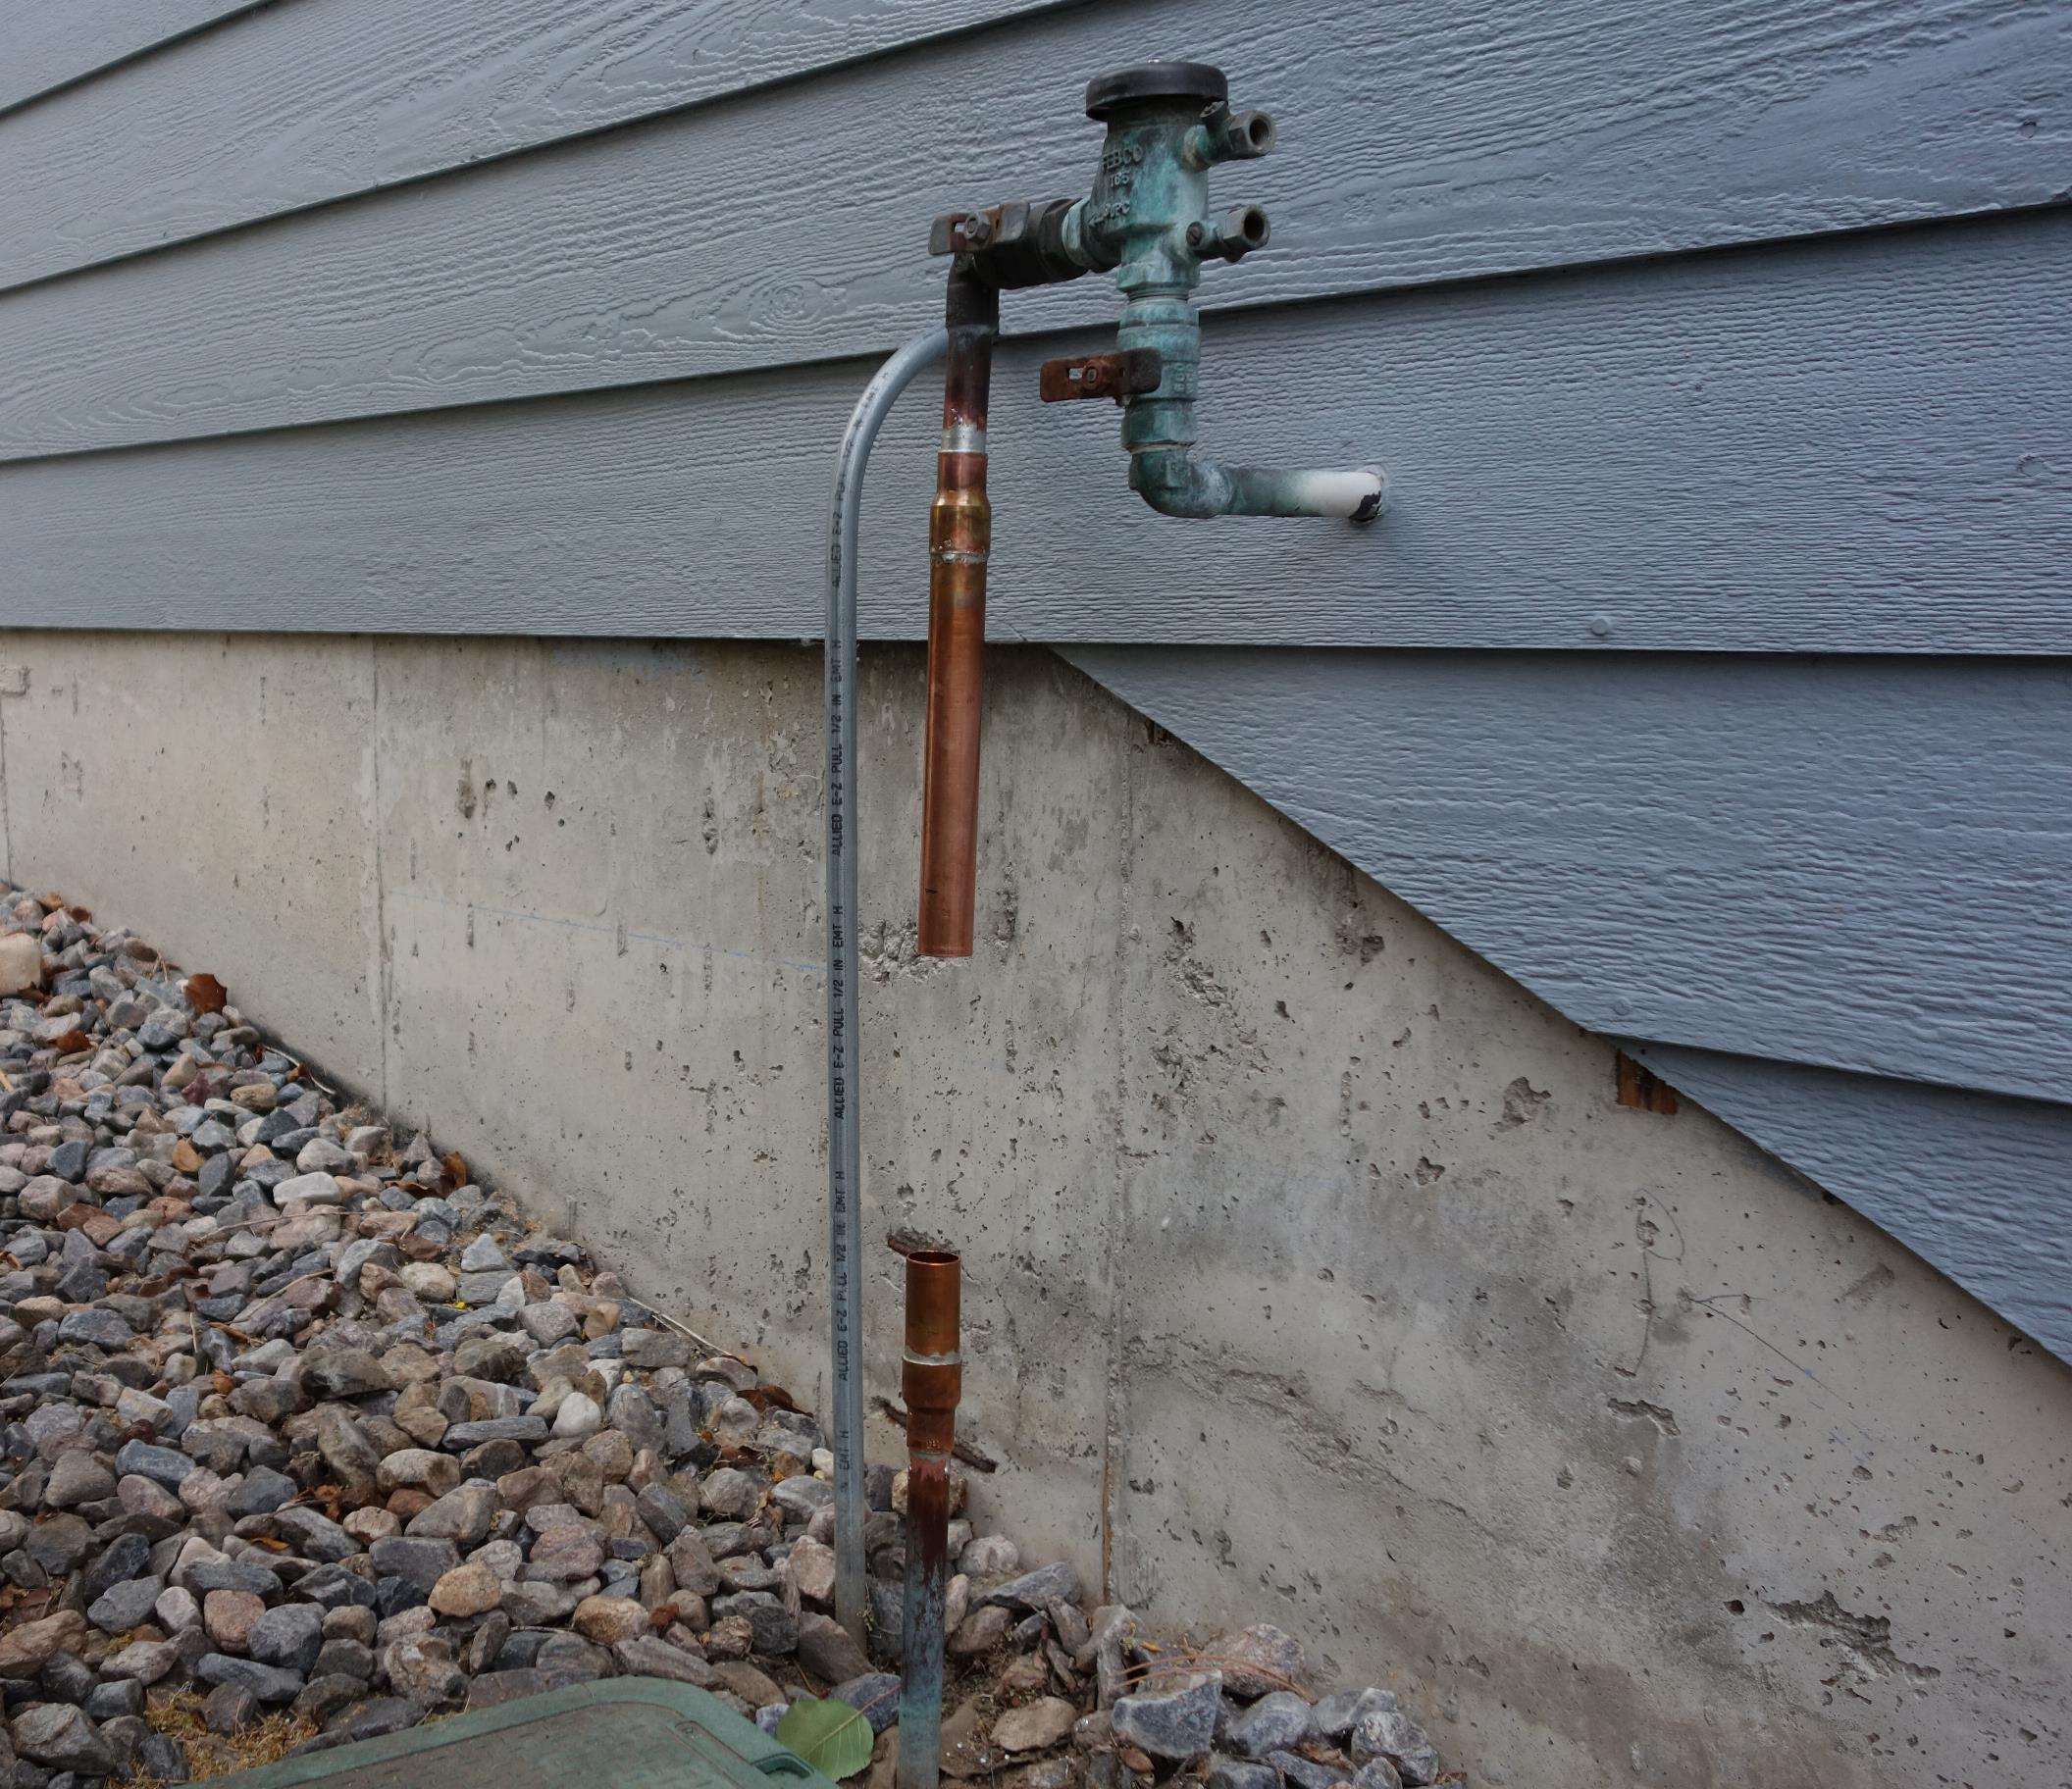
Now, go outside to make sure that you have enough room in the downpipe that exits from your vacuum breaker or anti siphon device:
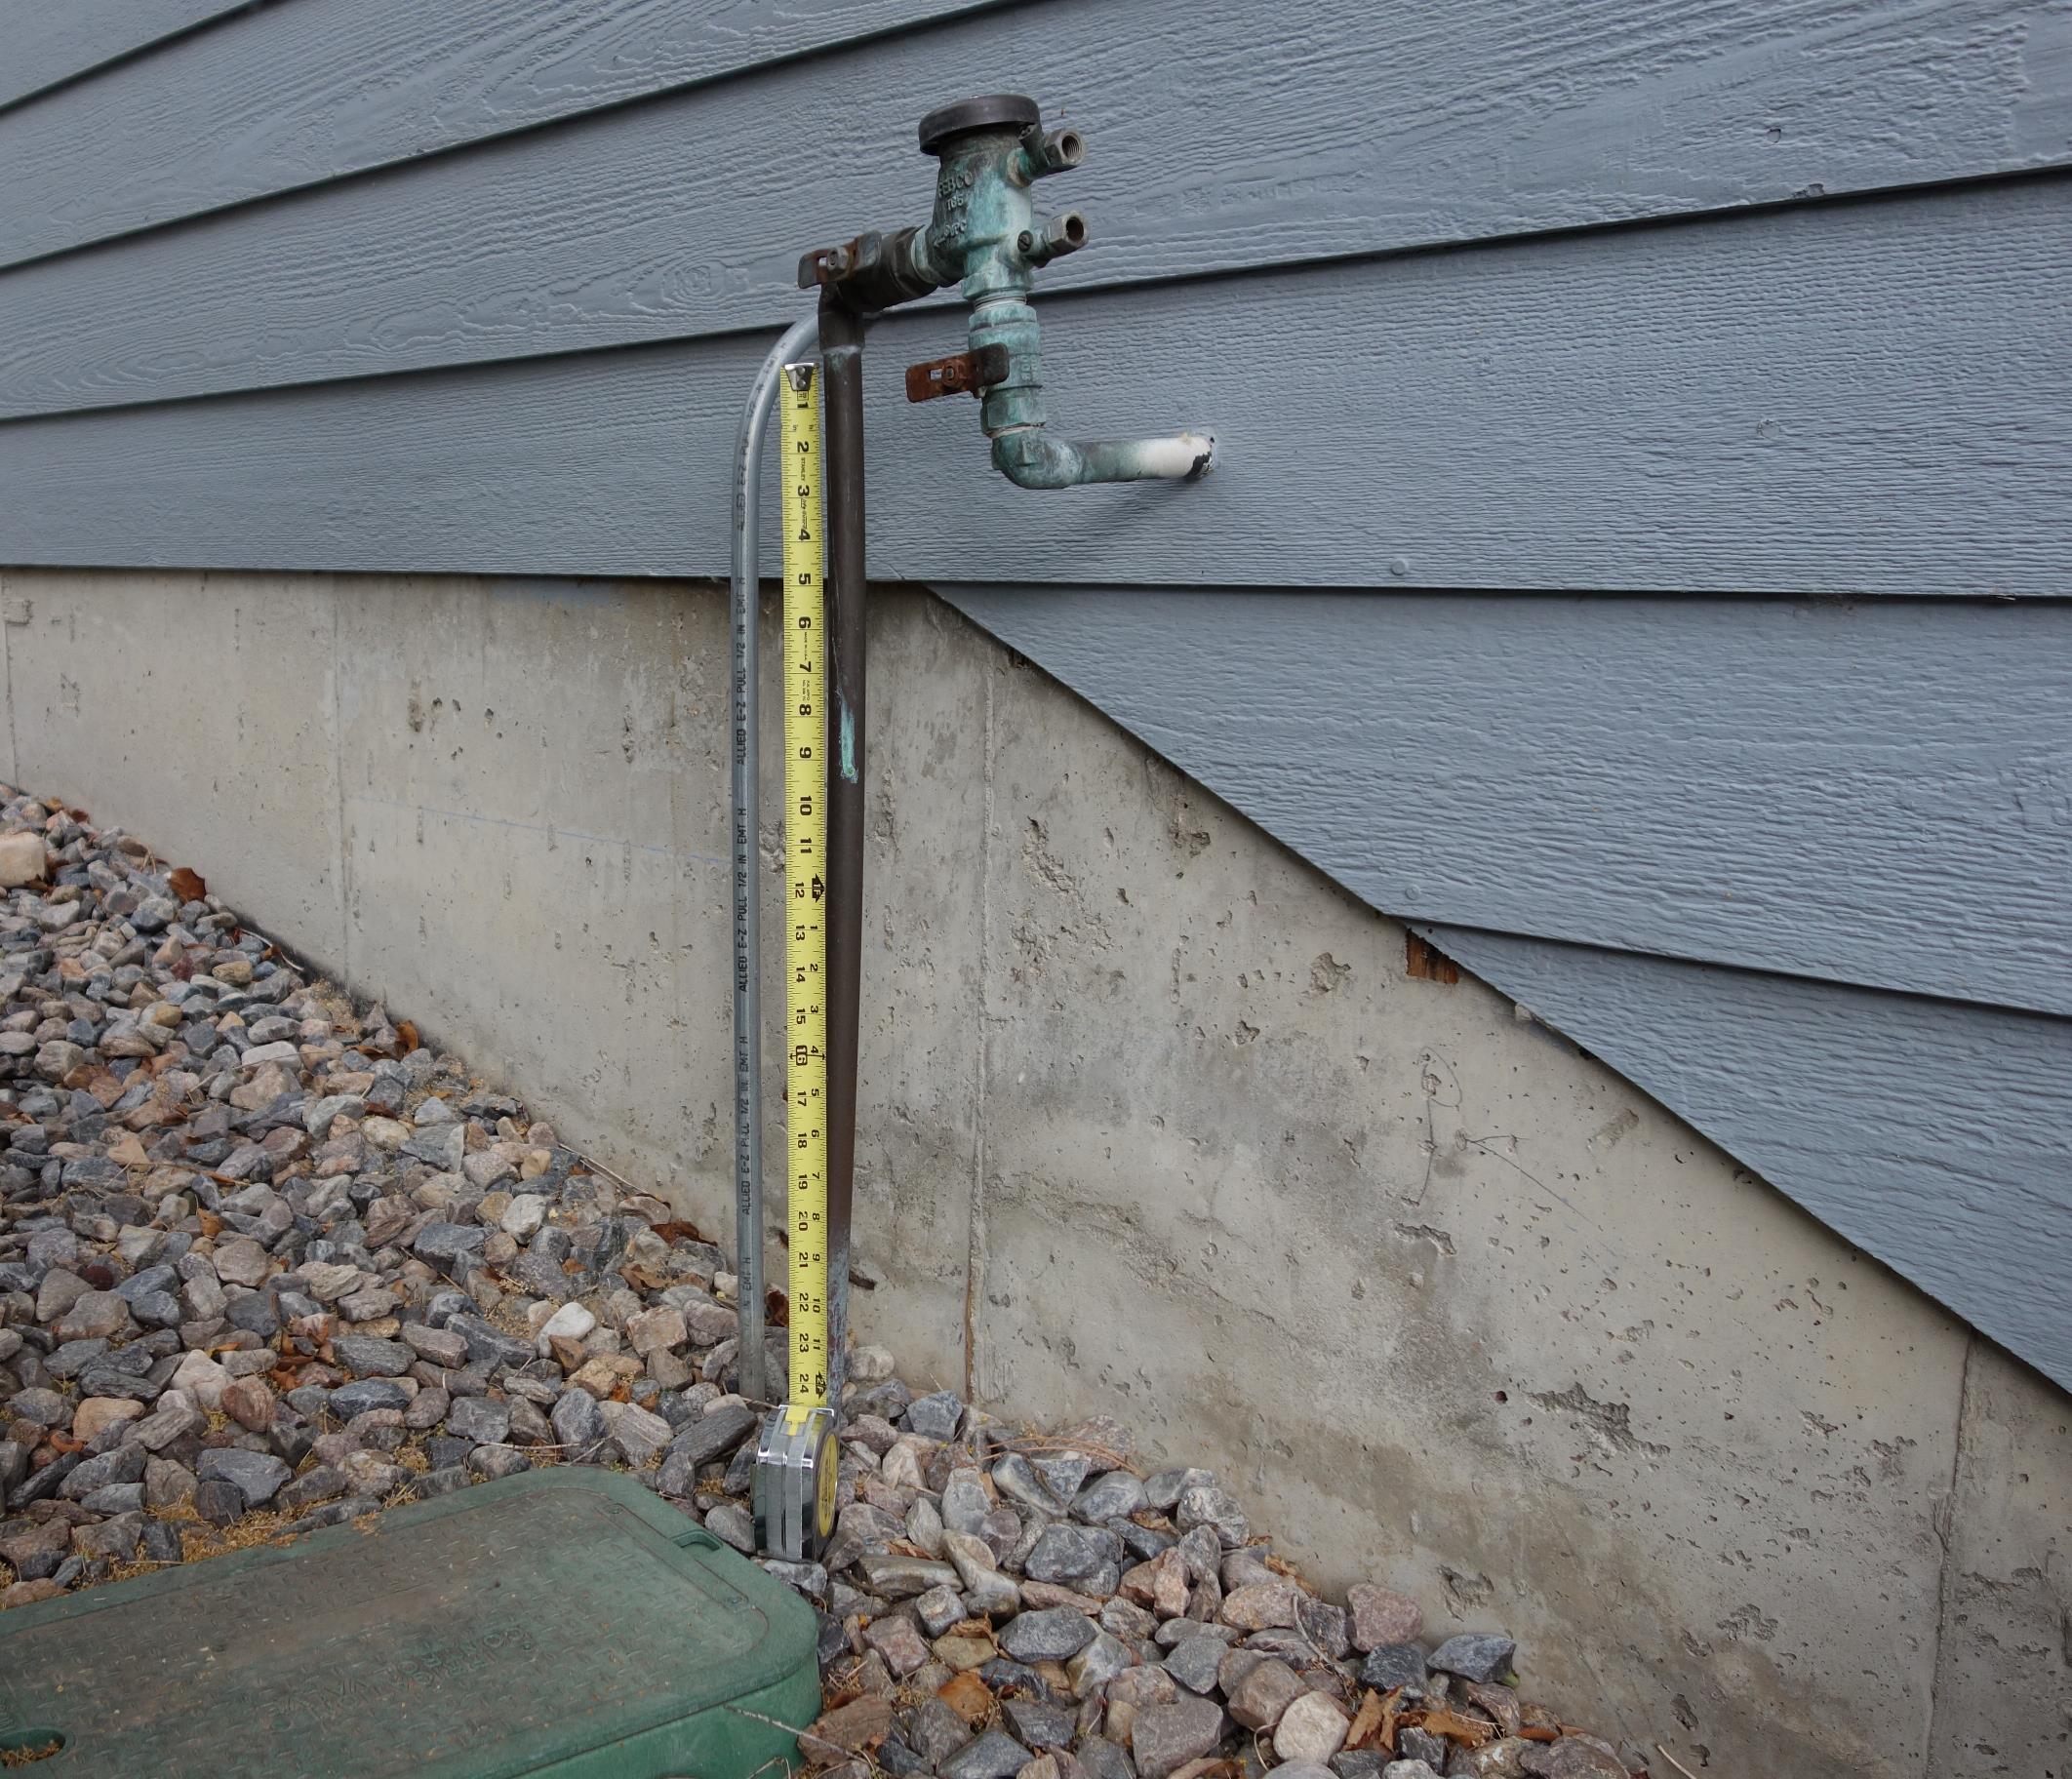
Plenty of room; Looks like I’m good to go!
If you don’t have enough room to fit your new plumbing assembly, you will need to shorten the upstream piece of 1” copper pipe. However, don’t make it shorter than the minimum six inches that Rachio specifies!
Starting a few inches down from the top elbow, use a fine-point permanent marker to mark the downpipe for the impending cuts; in my case, that is 18 3/4".
While you’re out there, turn off the water to the vacuum breaker and open the testcocks. Then run your sprinkler for a while to drain the water from the pipe that you are getting ready to cut.
Solder the transition fittings
While the outside plumbing is draining, this is a good time to attach the 1" x 3/4" transition couplings to the sections of 1” copper pipe, making sure to attach each fitting to the end you marked previously so that the overall length of your assembly doesn’t change. Follow the pipe-soldering instructions linked above. A bench or table vise is a great way to hold the 1” pipes while you attach the transition fittings, but an old broom handle might work well too!
Surprise or “Whoa—Did You See That?”
Using the pipe cutter, carefully cut the 3/4" downpipe at the top mark. As soon as I made my top cut, surprise: the copper pipe snapped apart, leaving a 1 1/4” gap where I had expected only a small cut:
Apparently, twenty years of settling around my foundation (Do you now see that faint line on the foundation above the landscaping rock?) had caused the irrigation plumbing to put a significant amount of tension on the copper downpipe. Notice, if you compare this picture with the previous one, that the vacuum breaker is now straight and level; the tension in the downpipe had been twisting the plumbing going all of the way back into the house! Time to re-measure and re-mark the lower cut to compensate for the new gap!
Continuing on…
Make the lower cut and clean the ends of the pipe:
While you’re at it, sand or steel-wool the inner surfaces of the 3/4” transition fittings.
Before you solder the transition/pipe subassemblies in place, test fit to make sure everything looks right:
Looks pretty good, but I think that I’d like that gap to be smaller than it is to ensure that the SharkBite fittings will be in a little bit of compression once everything is put together. So, I’m going to slide the top pipe subassembly a little bit down from the stop while the solder is hot.
Next, apply flux to both pipe ends and fittings and then solder the lower subassembly in place.
Due to the effect of gravity, and since I don’t have three hands, holding the upper subassembly in place while heating the joint with the propane torch and applying solder was going to be a little tricky. I ended up bending a piece of cardboard to bridge the gap:
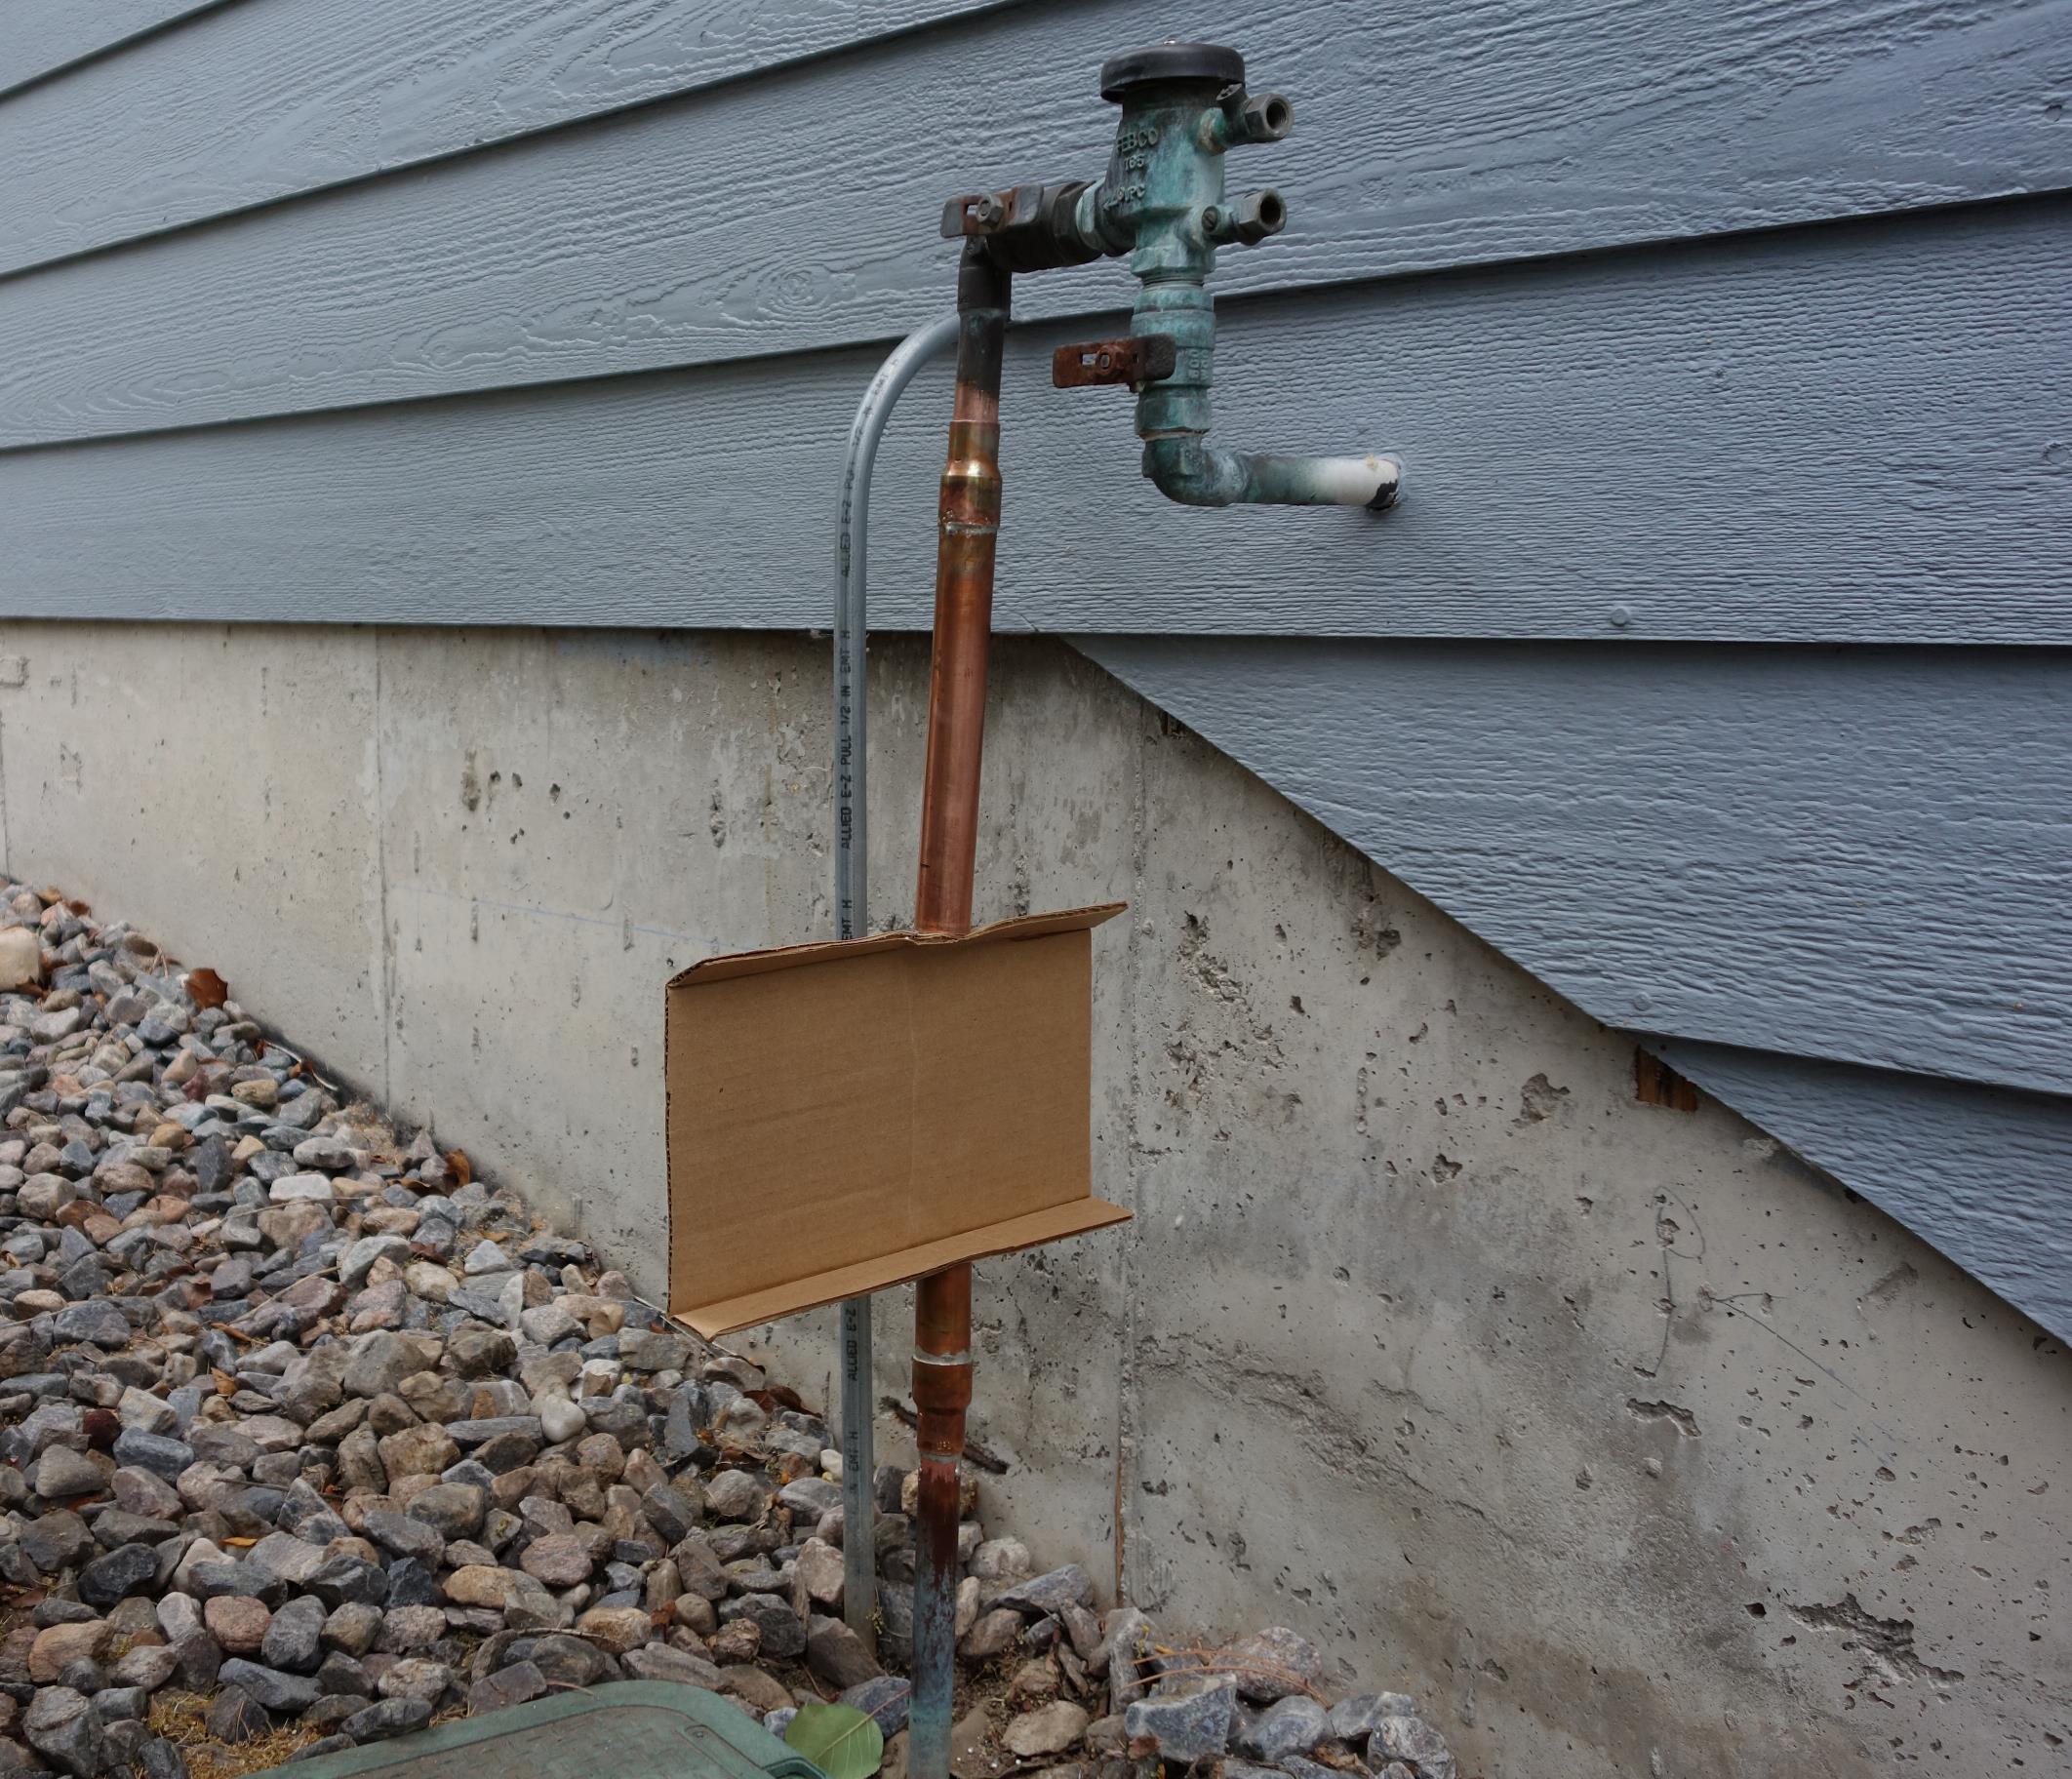
While this worked just fine as a third hand, it got me to thinking…
If I Knew Then What I Know Now
I might have gone with an 18”-24” piece of 1” copper (sized to fit the available room in the downpipe)—a minimum of 15 1/2” to leave room for the six inch upstream section, the flow sensor and SharkBite fittings, and a SharkBite removal if necessary below the sensor. Then, after soldering everything (all four joints) together one after the other, I would cut out the 6.25” of 1” pipe for the flow sensor as per Rachio’s instructions for 1” copper. It would have cost a few bucks more, but would probably have been much easier to do, all-in-all. Live and learn!
Although not shown in the picture, before soldering the upper joint, I highly recommend wrapping a wet rag around the elbow at the top of the downpipe to protect the upstream fittings from the intense heat of soldering. Here’s what it looked like after all soldering was finished:
Finally, follow Rachio’s instructions for installing the flow sensor using the two SharkBite fittings on 1” copper pipe, turn the water back on, calibrate your system, and you’ll be ready to go!