Where to Place Catch Cups

I have my Rachio for a couple years now. First the 1st gen then the second gen. Overall have enjoyed it more than our non connected previous Hunter System. The main reason for the purchase was so that it could automatically suggest watering schedules and constantly change based on current and future weather, temp, time of year etc. While Gen 1 was a bit buggy in that regard Gen 2 seems to be able to handle all of that with Flex Daily in general.

Yet still have always stuck with the traditional fixed schedules with manually entered in times since any time I let Rachio decide it says to run for instance the sprinkler for 12 or 13 hours, which is completely off for our zones so have always ignored it. To note entered in the custom zones for each each based on the specs of the heads.

My guess is, since each zone overlaps each other as they should, Rachio is calculating as if there was no overlap which is why the numbers are so drastically high. So I’d like to do catch cups and factor in all the overlap to get precise numbers and hope once and for all will be able to use all of Rachios amazing automations for proper time estimates I can count on.

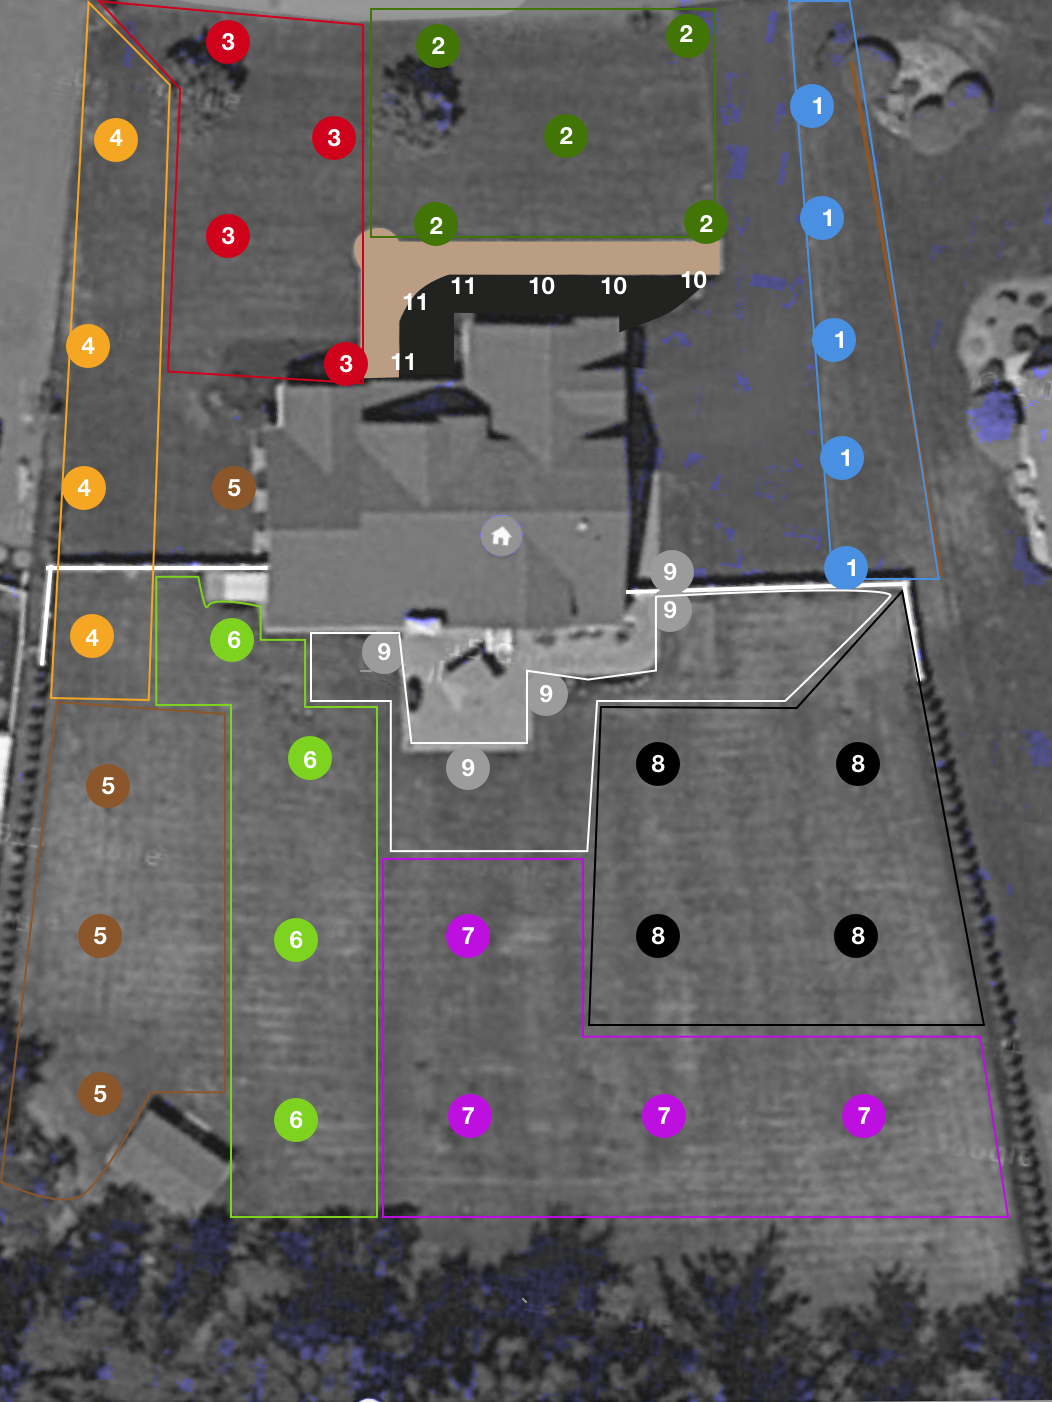
Attached is a drawing home our lawn. I added number/circles with each sprinkler head is organized by zones. For the borders for each zone drew in the middle between each adjacent zone but there is overlap on all of those. My next challenge is where to place each catch cup for each zone. I’m using Orbit Catch cups but their example locations are based on a perfectly square with only a few heads so hard to apply to my layout.

Would love if anyone could share their thoughts or if someone could draw little circles on my image of where it’s recommended to put each cup. I have a rough idea but imagine there are smarter irrigation pros here than me!

Well if your zones overlap that much, your best bet will be to distribute cups through the zone evenly but have a few in the overlap area. Run the zone, make the recordings, run the adjacent zone for the same time and see how much water was added, this will effect your efficiency rating so to speak but i would like to see the numbers myself just to satisfy my curiosity.

If your images is correct, the head to head coverage doesn’t look right for zone 5 and 6, but on the corner of the house where zone 4 5 and 6 meet seems most odd, I’ll assume that some advance nozzle setup is in play there to keep the pr consistent.

2 Likes

Hello,

By overlap that much… each covers their own zone, however of course with any irrigation system if there are two or more zones next to each other they will of course be overlap, since if there isn’t then there will be dead spots (assuming the person uses rotor heads. The map is from google so that is all exact. for the heads went outside and turned on all the heads and marked roughly on the map where each is as a general guide for this mockup.

For zone 5 and 6, not exactly sure what you mean. As the zone 5 heads cover the left strip, the 6 cover the right. With the exception of the 5 head on the other side of the fence that connects right into the irrigation system by the house there. There originally wasn’t a fence separating the front yard from the backyard when we moved into the house that already had the irrigation setup.

So my plan is to distribute the cups evenly and run with the zone on first for 10 minutes, and then run another 10 minutes with one adjacent zone one, and then another 10 minutes with another adjunct zone on. Then I’d calculate the totals at that time, and mark it as a total run time of 10 minutes rather than 30, like the Orbit instructions say to do. All of that I don’t have any issue with.

My issue is still were to put the catch cups. For instance instructions say to put one 2 feet from head. But in there examples the heads are always up against an edge and in a corner http://wateringschedule.com/wp-content/uploads/2013/04/26250-24-rB21.pdf where of course having only one catch cup 2 feet away makes sense. But in real world examples like mine where there are heads in the center of zones and not just in corners I’m confused if I need to have one catch cup on each of the 4 sides of a sprinkler head or if just one, how do I decide which side.

For instance for Zone 7, I put in X’s where I assume the catch cups should go for that zone (put 1 2 feet away on all 4 sides). And I would then run zone 7 for 10 minutes, then run zone 6 for 10 minutes, then run zone 6 for 10 minutes, and then run zone 8 for 10 minutes. Calculate the total in the cups, and enter 10 minutes into the calculator for run time.

Does that seem best? Technically according to orbits, sounds like I should also have a catch cup on every diagnal between the 2 feet ones and the corners and sides, but that would add a great number more of catch cups I would have to buy and would rather not unless necessary. Just wish Orbits would have given a few other examples catch cup illustrations rather than the most basic layout.

The default settings for my zones when I enter the precipitation rate for the make/model of those heads, has the suggested run time astronomically high, around 13 hours. Hopefully getting closer to Rachio nirvana.

1 Like

Found this document online that seems to offer much more specific details on placing catch cups rather than Orbits more generic brief manual that doesn’t cover most real world use cases:

http://aces.nmsu.edu/pubs/_h/H510.pdf

Contrasts to some of the orbits info, and doesn’t give an exact answer to my issue, but overall starting fresh with this document I think will help me get there. Hopefully it helps some others too.

@ChrisC

Just an FYI, this calculator makes determining your results pretty easy.

http://wateringschedule.com/get-started/#/stations

Thanks yes, I have that URL thats mentioned in the Orbits instructions. Calculating the results hasn’t been an issue, rather just wher/how many to place the cups exactly in each zone has been the challenge since their example in their manual was for a very simply layout where heads are never in the middle of the zones but rather only on the sides/corners.

Also the wateringschedule.com site has been down for a few weeks. I let Orbit know it was completely down a few days ago since they weren’t aware. They said thank you and they would investigate. A couple days later they responded the issue has been resolved and that website is back up.

You got me curious on these so I took a peek at Amazon. Holy crap is that a lot of money for some vacuum formed plastic cups. I have a stockpile of cat food cans I’ve been cleaning and saving that I think I’ll stay with for now. :slight_smile:

2 Likes

The problem with cat food cups etc, is that complicates the calculations since they don’t have the ideal surface area, as noted in the nmsu.edu document. You can make it work but doing more calculations but complicates things. As well as having to find enough of cat size cans (especially for all of us without cats =), and then manually marking the interiors of all of them, etc. For many of us $25 bucks to avoid all of that is well worth it, especially since perfecting the irrigation process in the one time up front setup, will go along way in savings across the life of ones lawn.

Though of course all relative in how everyone values their own time. For some 25 bucks to save time an accuracy is worth it without a doubt, where is others where time is not an issue, and not spending any extra costs other than absolutely necessary certainly can get by with any homemade option they have available to them.

I don’t disagree, and I’m usually the guy to run out and buy the proper tool for the job. I just look at these and wonder how I’d repurpose them after the up front usage. They may make decent shot vials for booze at a summer cookout, I could certainly ring the top in some salt or sugar.

3 Likes

This is officially what we will be using at every Rachio party from here on out.

:cheers:

4 Likes