Have ordered the 5-1 and [this] (https://smile.amazon.com/gp/product/B00WZZQ2T6/ref=oh_aui_detailpage_o00_s00?ie=UTF8&psc=1) wall mount. I’m going to order the extension case too. Thank you both for pointing that out.
I think the 33 ft recommendation is in regards to the “standard height” for measuring wind…
The main purpose of my weather station is to record rainfall, so I mounted my weather station at a little over 7ft high. Its wind measurements have been in line with surrounding sites, but I don’t have any idea how high those are mounted.
I just posted this in the calibration thread, but I thought I’d post here too, since this thread has been more active.
I sure would like to see a video of this process because I don’t see how you have access to the cups. Even after removing the debris filter I can’t see the cups.
I called acurite and they told me 1) the sensor comes pre-calibrated and 2) if I need to calibrate it, do the following:
Hold the sensor lengthwise with each hand on the ends. Gently tilt it one way till you hear a click. That should register on the display as .01 ml. 10 clicks should register .1 ml. This is a dry process. I’ll admit it’s not clear to me how doing this proves a click .01 ml.
She also told me that when calling in the future for problems, 90% of the time they will want me to have the display and sensor in hand for any debugging.
I’d appreciate your thoughts on this.
Yes, sorry I got sidetracked with work and didn’t get around to making a video. I’ve posted a reply in the Acurite forums (link).
1 Like
I’ve appreciated all your help Gene (aka Eugene, my middle name). The procedure you outlined is making sense to me now.
Today my neighbor and installed the bracket for the sensor. That’s the real hard part.
2 Likes
I finally figured out you meant to insert the straw from the vents on the bottom. Once I understood that, I started the calibration. I got one cup calibrated, but have now encountered a problem. Using the straw on one cup now keeps both cups from tipping. I remove the straw and both can tip. I put the straw in on either cup, and neither will tip.
This has me confused.
I see the need for the video now  In any case the straw goes in only to tip the cup back onto calibration screw, than it needs to be removed. I’m not sure how you managed to calibrate one cup with the straw inserted.
There are two screws to calibrate, one is an active screw (the one the cup sits on), the other is inactive screw. On this image (link), active screw would be the one on the right (see how the cup sits on it), the inactive screw is the one on the left.
When the cup tips, active screw becomes inactive and visa versa. Since I recommend you calibrate one screw at a time, you need to insert the straw into the vent opposite to the screw you are trying to calibrate until the cup tips onto the screw you are trying to calibrate and makes it active again. As soon as this is done (cup is tilted), straw needs to be removed.
After one of the screws is calibrated, procedure needs to be repeated with the other screw. Straw would be inserted into the other vent (than the one you were using up to now) during this second phase.
So using this image (link) as an example again, during the first phase you would be adjusting / calibrating the screw on the right of the tipping cup and you would be inserting (and shortly thereafter removing) the straw into the vent to the left of the tipping cup. During the second phase you would be adjusting the screw to the left of the tipping cup and inserting the straw into the vent next to the other screw (to the right of the tipping cup).
No matter what phase you are at, you will be inserting the straw next to the screw you are NOT calibrating / adjusting to tip the cup onto the screw you are adjusting, making it active. Any adjustments you make to inactive screw will not do you any good. The straw is to make sure that after the cup tilts and switches active and inactive screws, you can make the screw you are adjusting active again.
Sorry that this is as confusing as it is, I’ll try to make a video this weekend.
Gene
Thanks Gene. I will insert straw into vent next to screw NOT being calibrated and remove screw. I can follow that. One thing confuses me in the image. You say the cup on the right is the active screw, the one to calibrate. It’s in the empty position, so how does it catch water?
I’m sure you mean that you will remove the straw, but just in case do not “remove [the] screw” 
Active screw is the one which is in contact with the cup (right one on the image), it is the determining factor of how far the cup tilts in that direction. Based on how far the cup is tilted in the direction of the active screw, system will require more or less water to tip onto the other (inactive) screw. You are effectively setting the limit on how much cup tilts (and thus how much water it will take to tip back) in the direction of an active screw, you goal is to fine tune it so that it takes 2.2ml to tip the cup in either direction.
Gene
At risk of making it more confusing here is a visual explanation
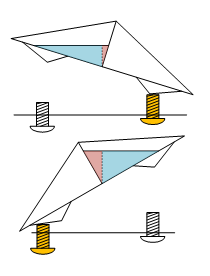
Cup on the top is less tilted (yellow active screw is turned in positive “+” direction).
Cup on the bottom is more tilted (yellow active screw is turned in the negative “-” direction).
Blue and Red areas represent water in the “full” cup, blue area is water volume that is contributing to cup tilting onto white inactive screw, red area is the water volume that is preventing the cup from tilting by pushing the cup in the direction of the yellow active screw.
The amount of tilt adjusts the ratio of the two, thus allowing you to fine tune at what level (how much water) will the blue area be enough to tilt the cup.
This is an example of a “bad” calibration. Ideally the screws should be level to each other and the same amount of water (about 2.2ml) should be enough to tilt the cup in either direction.
Gene
Yes, you are right, I meant remove the straw. That last image makes it clearer. Did I mention I am now CALIBRATED! Couldn’t have done it without you. Thank you very much.
2 Likes
You would still be stuck waiting for the 20 minute “drip” test that official calibration procedure requires. Glad you were able to calibrate it so quickly.
Cheers,
Gene
I would have done it quicker except for my thick skull. Once I realized the straw was only needed to tip the cup and not hold it in place. It went quicker.
1 Like
The sensor is up and working. It’s connected to the display and acurite’s servers. I have noticed the temps it reports tend to be more than what is reported officially by 3-5 degrees. I have also noticed that the sensors temps can vary by up to 3-4 degrees in a short amount of time. And I’ve noticed that my iPhone app doesn’t seem to be perfectly in sync with the display, temp-wise.
Is this normal?
I highly encourage you to use the closest NOAA airport station. With hobbyist weather stations they absolutely do not have the same level of accuracy, calibration and rigorous maintenance schedule seen at national weather service. I can speak from experience the data my Rachio receives from the airport 2 miles from home is always accurate. Plus Rachio uses the web/cloud to access all the national and PWS. Do not mean to rain down on your weather station idea. Guess its a moot point. You already purchased a weather station unit.
@jangell2 what do you mean by “official” report? Are you talking about a difference between a tabletop display and information displayed via an app, or are you comparing it to an outdoor thermometer?
In any case Rachio at this time does not make use of granular data. From what I understand a daily summary is used within moisture calculations, @franz please correct me if I am wrong.
Short temperature spikes are practically negligible within a daily summary, and they can be caused by something as innocuous as a temporary change of the wind’s direction.
Finally if you are talking about acurite app, I think that they are using 5 minute summaries instead of more real time data. You may wish to try enabling weather underground upload and seeing data there.
So, I wouldn’t say what you are seeing is too out of the ordinary.
@robertokc Not all of us have a benefit of a nearby airport. Mine is close to 10 miles away, which in micro-climate prone Florida may as well be in a different state. Personally I’ve taken a lot of time to make sure that my sensor is calibrated as accurately as I could (went as far as scanning the opening to determine exact area and performing all of the calculations from scratch). Now I can rest easy, knowing that my PWS is as good as it is ever going to get (which is likely good enough).
1 Like
Yeah, my airport is probably 20 miles away. It could record a deluge and my home could get nothing.
By official I meant The Weather Channel App. I enter the zip code and I get forecasts and current conditions for my city, however I don’t know what station they are using. Yes I was talking about the acurite app and your explanation makes sense.
When you say a daily dummy is used for moisture calculations, I presume that they are using my sensor for that, otherwise, why did I install it? Having the sensor provide data to my Rachio controller was my primary motivation to install the sensor.
And I just noticed I misspelled Rachio in the header. Ooops!
After you setup the transfer of the data from weather underground to pwsweather and select your pwsweather station from Rachio’s interface, Rachio will start to use your data. They will get a summary for the day from your station and use that.
Weather Channel and similar apps usually average readings over a wide area and from numerous sources, no one station will ever match such sources exactly.
Header is fixed
I suspect a lot depends upon where you are located. My closest NWS station is KONT which is 6.5 miles due south of my house. I can leave my driveway and be in the terminal in 12-15 minutes.
But, I’m about 1,000 ft higher in elevation which means lower temperatures, which are almost always computable from adiabatic lapse rate. Also, rain is very different. KONT can report no or trace precip and I can record a quarter to a third of an inch. Or, sometimes, vice versa.
Of course, for forecasting, Rachio is going to use the output from the nearest NWS station since that requires analysis from a human forecaster.
I’ve had a personal weather station for years. It sends to WU, PWS and CWOP. CWOP (via MADIS and the Gladstone’s) sends a very nice daily QA report which let’s you me how good your observations are for everything except precip which is too localized to compare with other sites in general.
I think here, up close to the mountains in Southern California, a personal weather station is a good investment if you are really concerned about accuracy for your microclimate.
Steve.
I see this a sensitive subject for people. But I want to remind people that rainfall is not a part of the ET calculation. ET varies minimally over 20 miles. The ET equation includes solar radiation, temperature, wind speed and relative humidity. Yes, rainfall can affect ET, but not so dramatically as you would expect. It is difficult to convince people because they assume ET is all about rainfall.