Hello i am an newbie and have never digging in my lawn to insert hoses etc and want some help with the overall design.
I want to add a automatic watering system to my new greenhouse and potatoe land outside, starting with a 32 mm polyether hose with a T link to two new branches (one to potatoeland and one to greenhouse).
But i wondering, should i insert the valves early so i dont need to draw so much copper wire and i have all valves in one place (to the price of more hose) or should i insert the valves late (i can have the T link later, but then i have to dig wires in my lawn).
I’m about to planning the simplest design ever (two zones) but fail to figure it out.
Do you guys insert the valves in the beginning (in a box close to the faucet)
or
in the end of a line in their separate hoses? This option means that there are valves spread out across the garden.
I think i go with valves in the beginning in this case (?), but sometimes if i want to go to the other side of the garden it is inevitable that valves are here and there…?
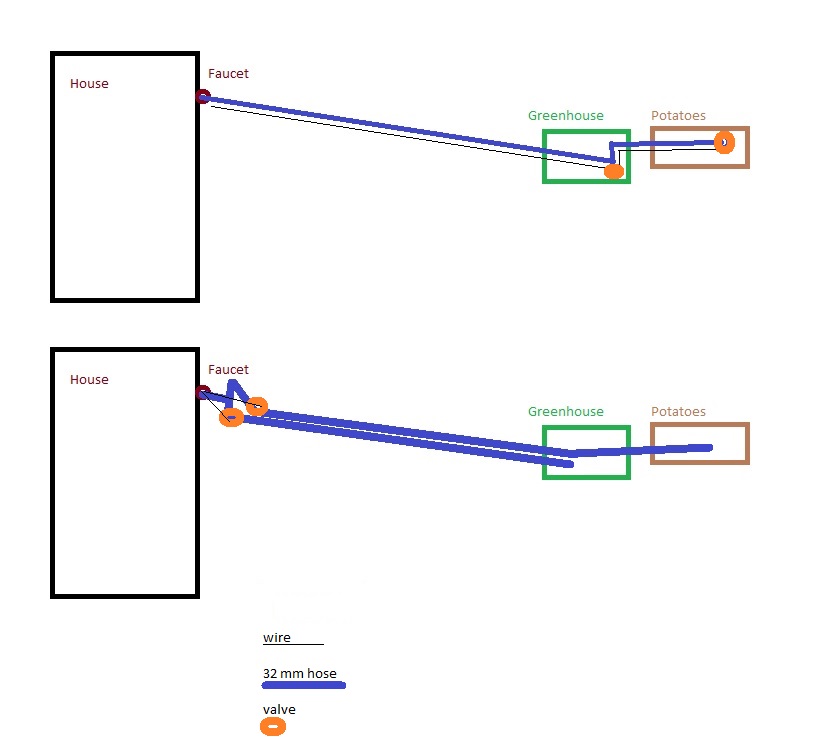
Hi @KJA, here are the pros / cons as far as I see them:
Options A (top option, with valves near the end)
Pros:
less hose required
probably cheaper overall (3 lead wire tends to cost less than the hose)
Cons:
A good portion of the hose is exposed to constant pressure
higher likelihood of leaks / breakdowns
Option B (bottom option, with valves near the start)
Pros:
Similar to standard irrigation setups
Better compatibility with valve assemblies which have valves in close proximity to one another
long sections of hose are not under constant pressure (last longer / less chance of leaks)
short section under constant pressure can be made out of higher quality materials
probably a cleaner setup on the far end (hose can run underground right up to the sprinkler)
Leak within one zone, will not affect the other
short wire run means valves are getting higher voltages / more likely to work (which may be the problem on the long runs)
Cons:
maybe a bit more expensive at first
harder to expand if you wish to add another zone later
How to Trench New Flexible Pipe or Wire Without Disturbing Existing Landscaping:
I recommend Funny Pipe (which is stronger than surface irrigation low pressure hose). There is also high pressure tubing that can be used if you want to put valves away from the house to distribute to several areas using valves. These can tolerate house pressure continuously.
To use this small size flexible tubing, you should plan on low precipitation rate emitters. Otherwise you have to use larger flexible tubing, which is more difficult to insert into the narrow trench.
If the flexible pipe is AFTER the valve, you can bury it 6-8" deep. If you are running high pressure tubing and putting the valves away from the house, you should plan to bury it deeper. This may require something more than a straight shovel to do the trenching.
Irrigation systems (valves) should be protected by a pressure regulator. So, the tap into the water supply should be made after the house’s pressure regulator.
Thank you for both of the answers. I think i start with having the valves in the beginning, one issue though is to extend to near by zones (dont think i lay a third hose on the same place.
If the next zone you create to “extend” your system has the same watering requirements (same type of plants) as one of the other two zones, AND if you use low precipitation rate emmiters (such as If you use low precipitation rate emmiters (such as Hunter rotator heads MP1000 series instead of traditional higher preciptation rate emmiters such as Rainbird spray heads) then you may be able add the new area to one of the original 2 areas without running more pipe and valves.
If the “extended” area is near one of the other two areas, and has the same watering requirement (same type of plants) but will exceed the capacity of funny tubing to supply that much water, you might consider using a larger flexible pipe in the original installation rather than funny pipe. That makes it more “extendable” without doing much work in the future. There are many types of larger flexible pipe available up to 1.5" in diameter. Google for them, if a larger pipe than funny pipe (1/2") will be required. They are not often used in landscaping, but rather in homes to carry high pressure water. However, there is no reason you could not use in a landscaping application. The flexible nature of the pipe allows you to strench with a straight shovel, and avoid digging a 3-4" standard trench which involvesl much more work.