Can’t help but wonder how many meetings Rachio customer support must have had after engineering explained the process to install this wireless flow meter.
First, DYI parts will cost about $75 for a $99 add on. Can’t imagine how much a plumber would charge.
And to boot, even customer support admits the only compatible outflow connector they can find is one with an unnecessary ball valve. I loved the comment, “If you find something better please let us know.” Really? You gave it that much thought when designing a product where the necessary parts to install do not even exist?
How about better engineering?
Since it appears you require a 6 inch length of a 1” inflow pipe, why not just add that 6" (20 cents worth of plastic) to the product (1 less adapter & pipe). Now, how about threading the 1” PVC ends so we can use a 3/4" Sweat Fitting Kit w/ 1" Union Nuts, Washers & Tailpieces (Bag of 2) for less than $20 total parts to connect it all. Supply House
I was already not happy with the kludgy outdoor enclosure, now this?
We’re exploring alternative options, but at this time, the ball valve fitting is the best option for one fitting -or- you could use 1 inch CTS to 1 inch PVC IPS fitting above on the flow meter, then reduce down to 3/4 inch copper using a 1" x 3/4" Reducing Coupling with 1" copper in between. Similar to this photo:
Adding 6 inches of 1" inflow pipe to the meter is a great idea, but will require a mold change. However, your idea of threading the PVC ends could be accomplished using a 1 in. PVC-Lock x 1 in. MPT Adapter – we’re currently testing these with underground installations.
As for sweat fittings, we wanted to avoid recommending asking a home owner to sweat or glue fittings and pipes. Additionally, we don’t recommend any solvent/glue on the flow meter as we’ve seen installations where the glue dripped inside the flow meter, causing turbulence to the water flow and inaccurate usage readings.
We appreciate your feedback. I’ll follow up to your support ticket as well.
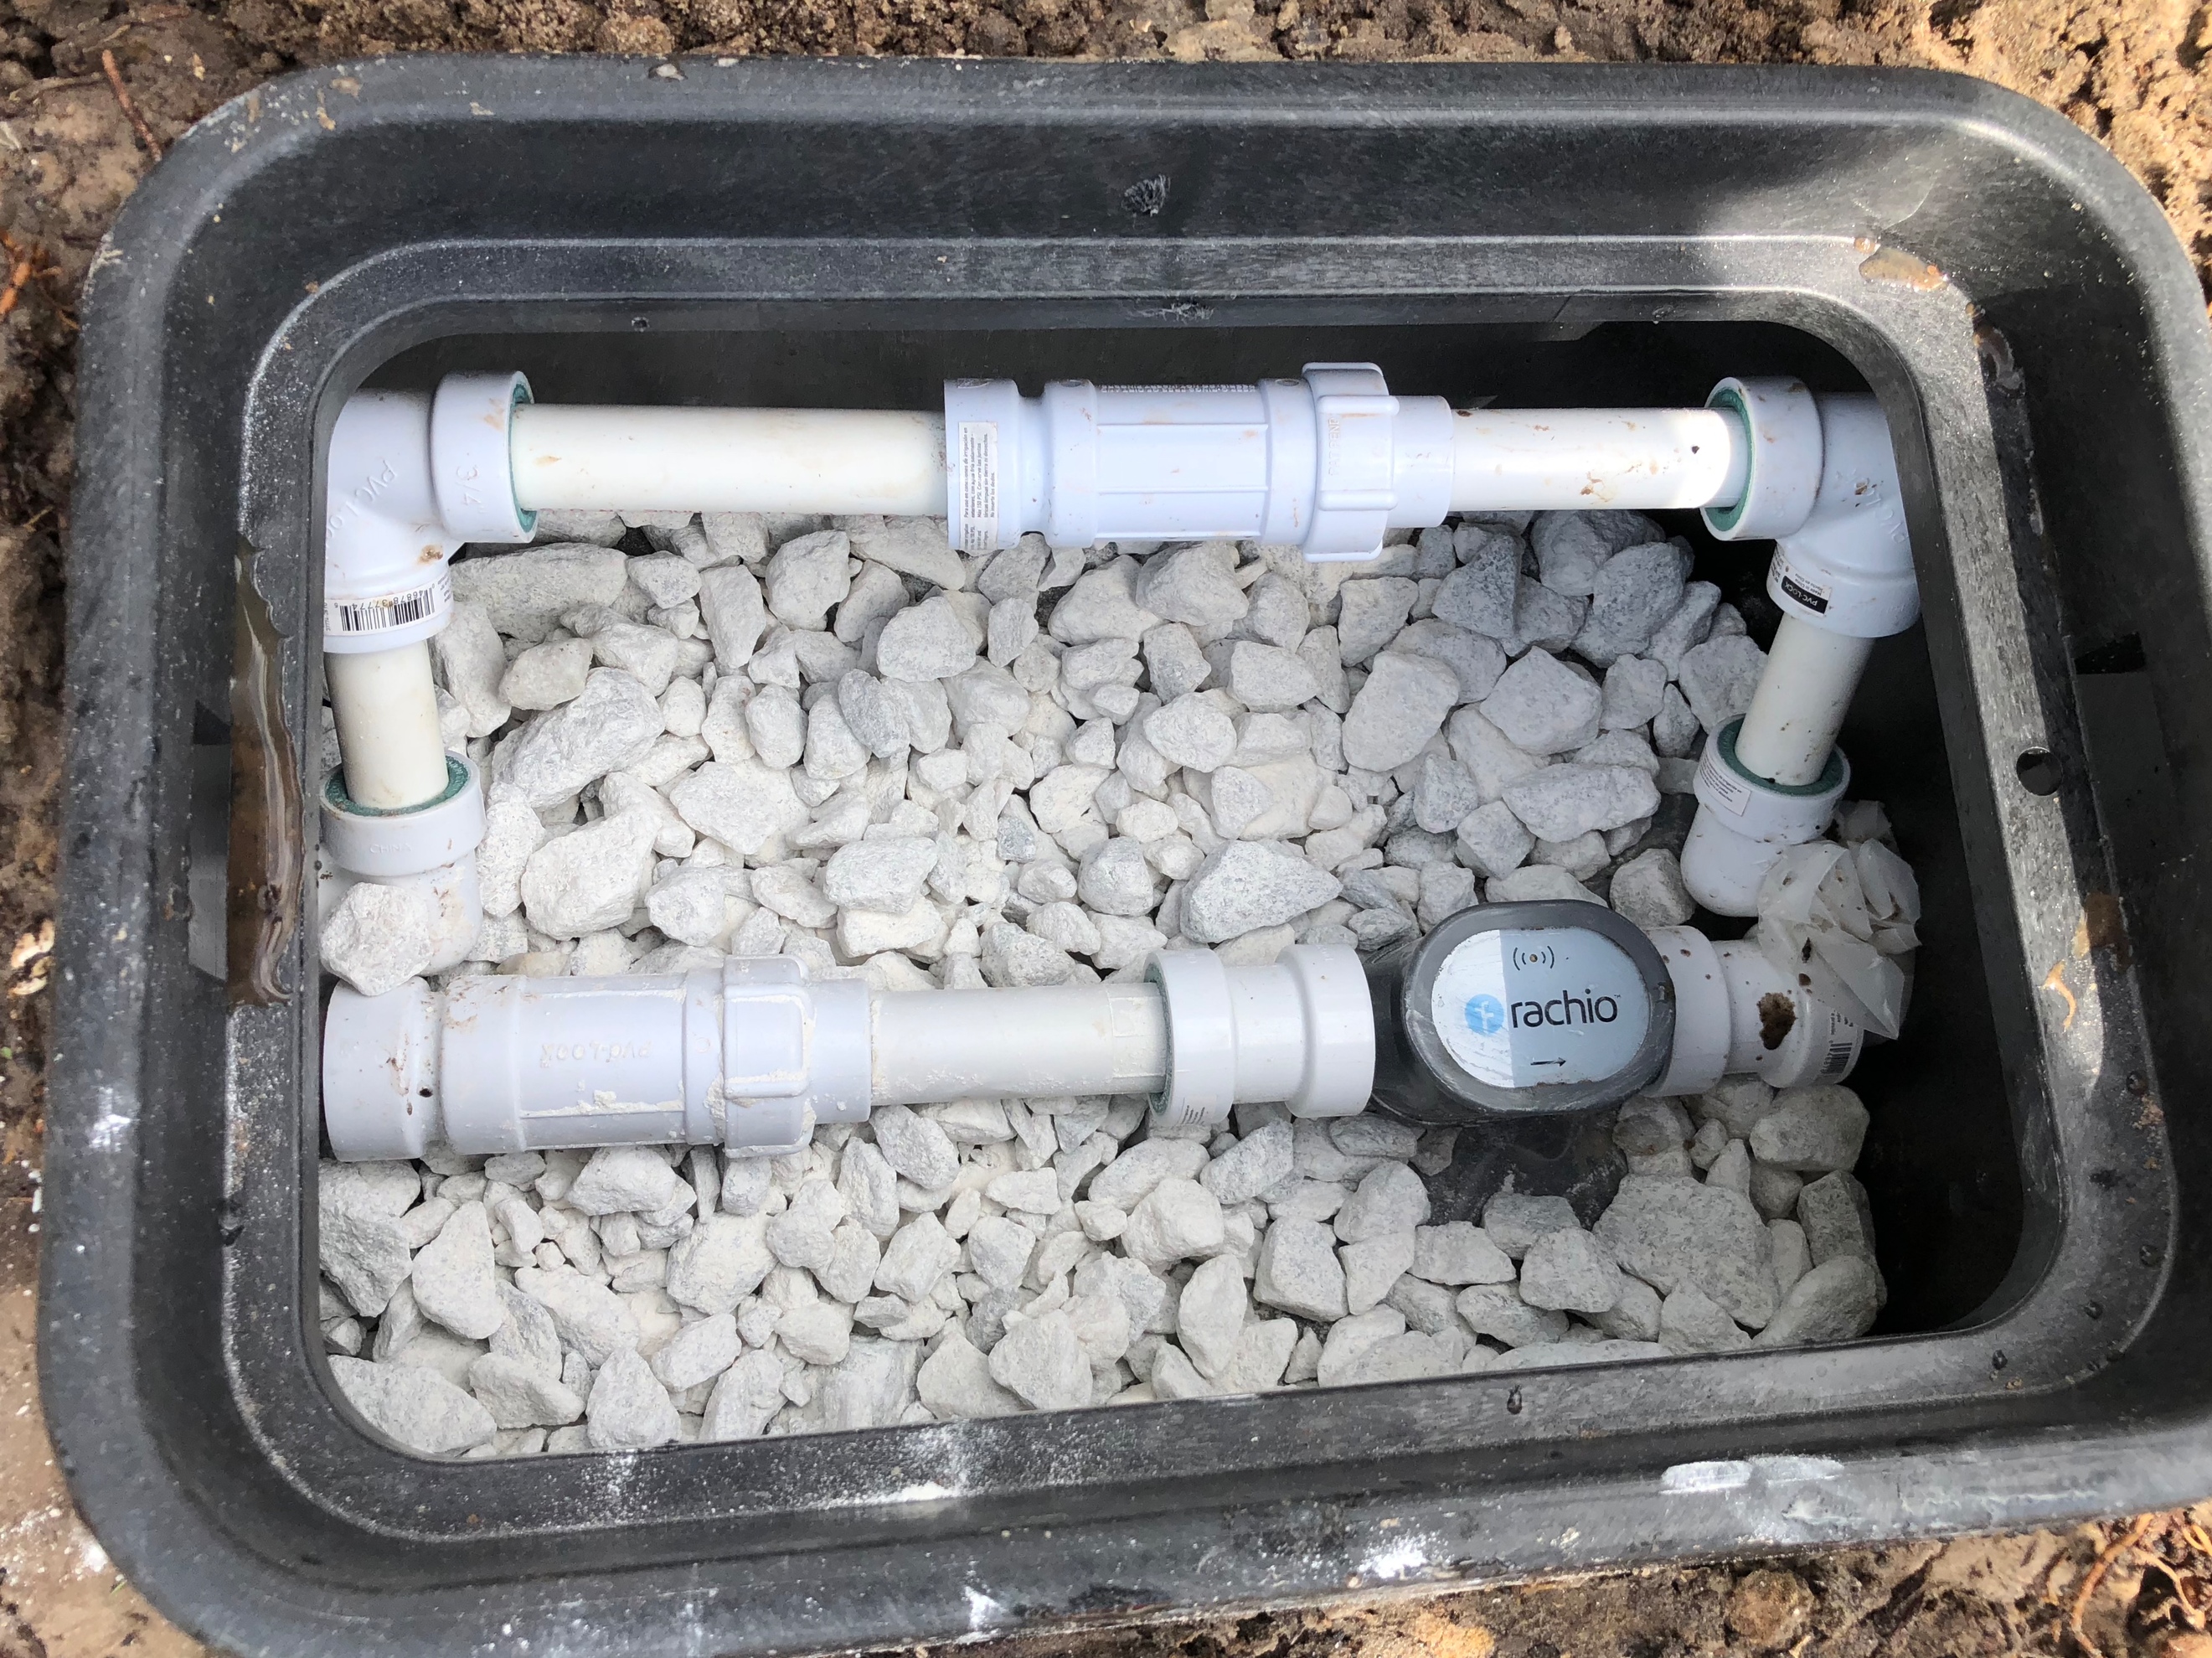
My friend here in Oklahoma City has realized an installation in the ground makes changing batteries impossible. He has a double check which is not up to Oklahoma City plumbing code. I have an above ground unit but I don’t think I have enough space to install the flow sensor.
@robertokc – We’ve been consolidating feedback from underground installations this week and plan to have instructions available by the weekend and a video within a few weeks.
The above ground installation video (posted above^) is getting some final edits and will be added to YouTube. Was there anything missing in it that you’d like to see? Or were you referring to an underground install video?
Some valid comments and I worked with Emil to help me through changing my incorrect installation due to my back surgery. After this and reading the posts here one future enhancement could be in the mold where you have 3/4 inch and 1 inch molded as a single inlet / outlet piece and you can remove the 3/4 if you have a 1 inch supply, so saving the customer fitting costs.
The Flow Meter costs $99. The DIY installation parts cost at least an additional $75. If you use a plumber, much more. Again, with better engineering, the install process could be much less and even easier.
The only 1" irrigation installs I have seen have been for commercial applications. I have never seen other than 3/4" for residential. There are additional issues with the outdoor enclosure box. The Rachio product is clearly intended for residential use, and from what I can see, an indoor installation.
Finally, regarding sweat fittings, I agree they are a pain, but the installation instructions repeatedly (strongly)recommend professional installation (in which sweat fittings are always preferred). But this product is not at all designed for industry standard plumbing. No respectable plumber would ever use “SharkBite” connectors.
To Rachio’s credit they have offered a full refund, which I intend to do. I do not think I am unique, but the current physical design simply does not fit my application. The software functionality is pretty good, but overall not worth the installation issues.
looking forward to the underground video instructions. TruGreen does installs in my area and I talked to them about doing an install in the near future. They let me know they are going to wait until they receive some units and experiment with installs before they begin doing them for customers.
Works for me, and I may attempt DIY if the video gives me confidence
I live in FL and I have 1" main lines (reclaimed water).
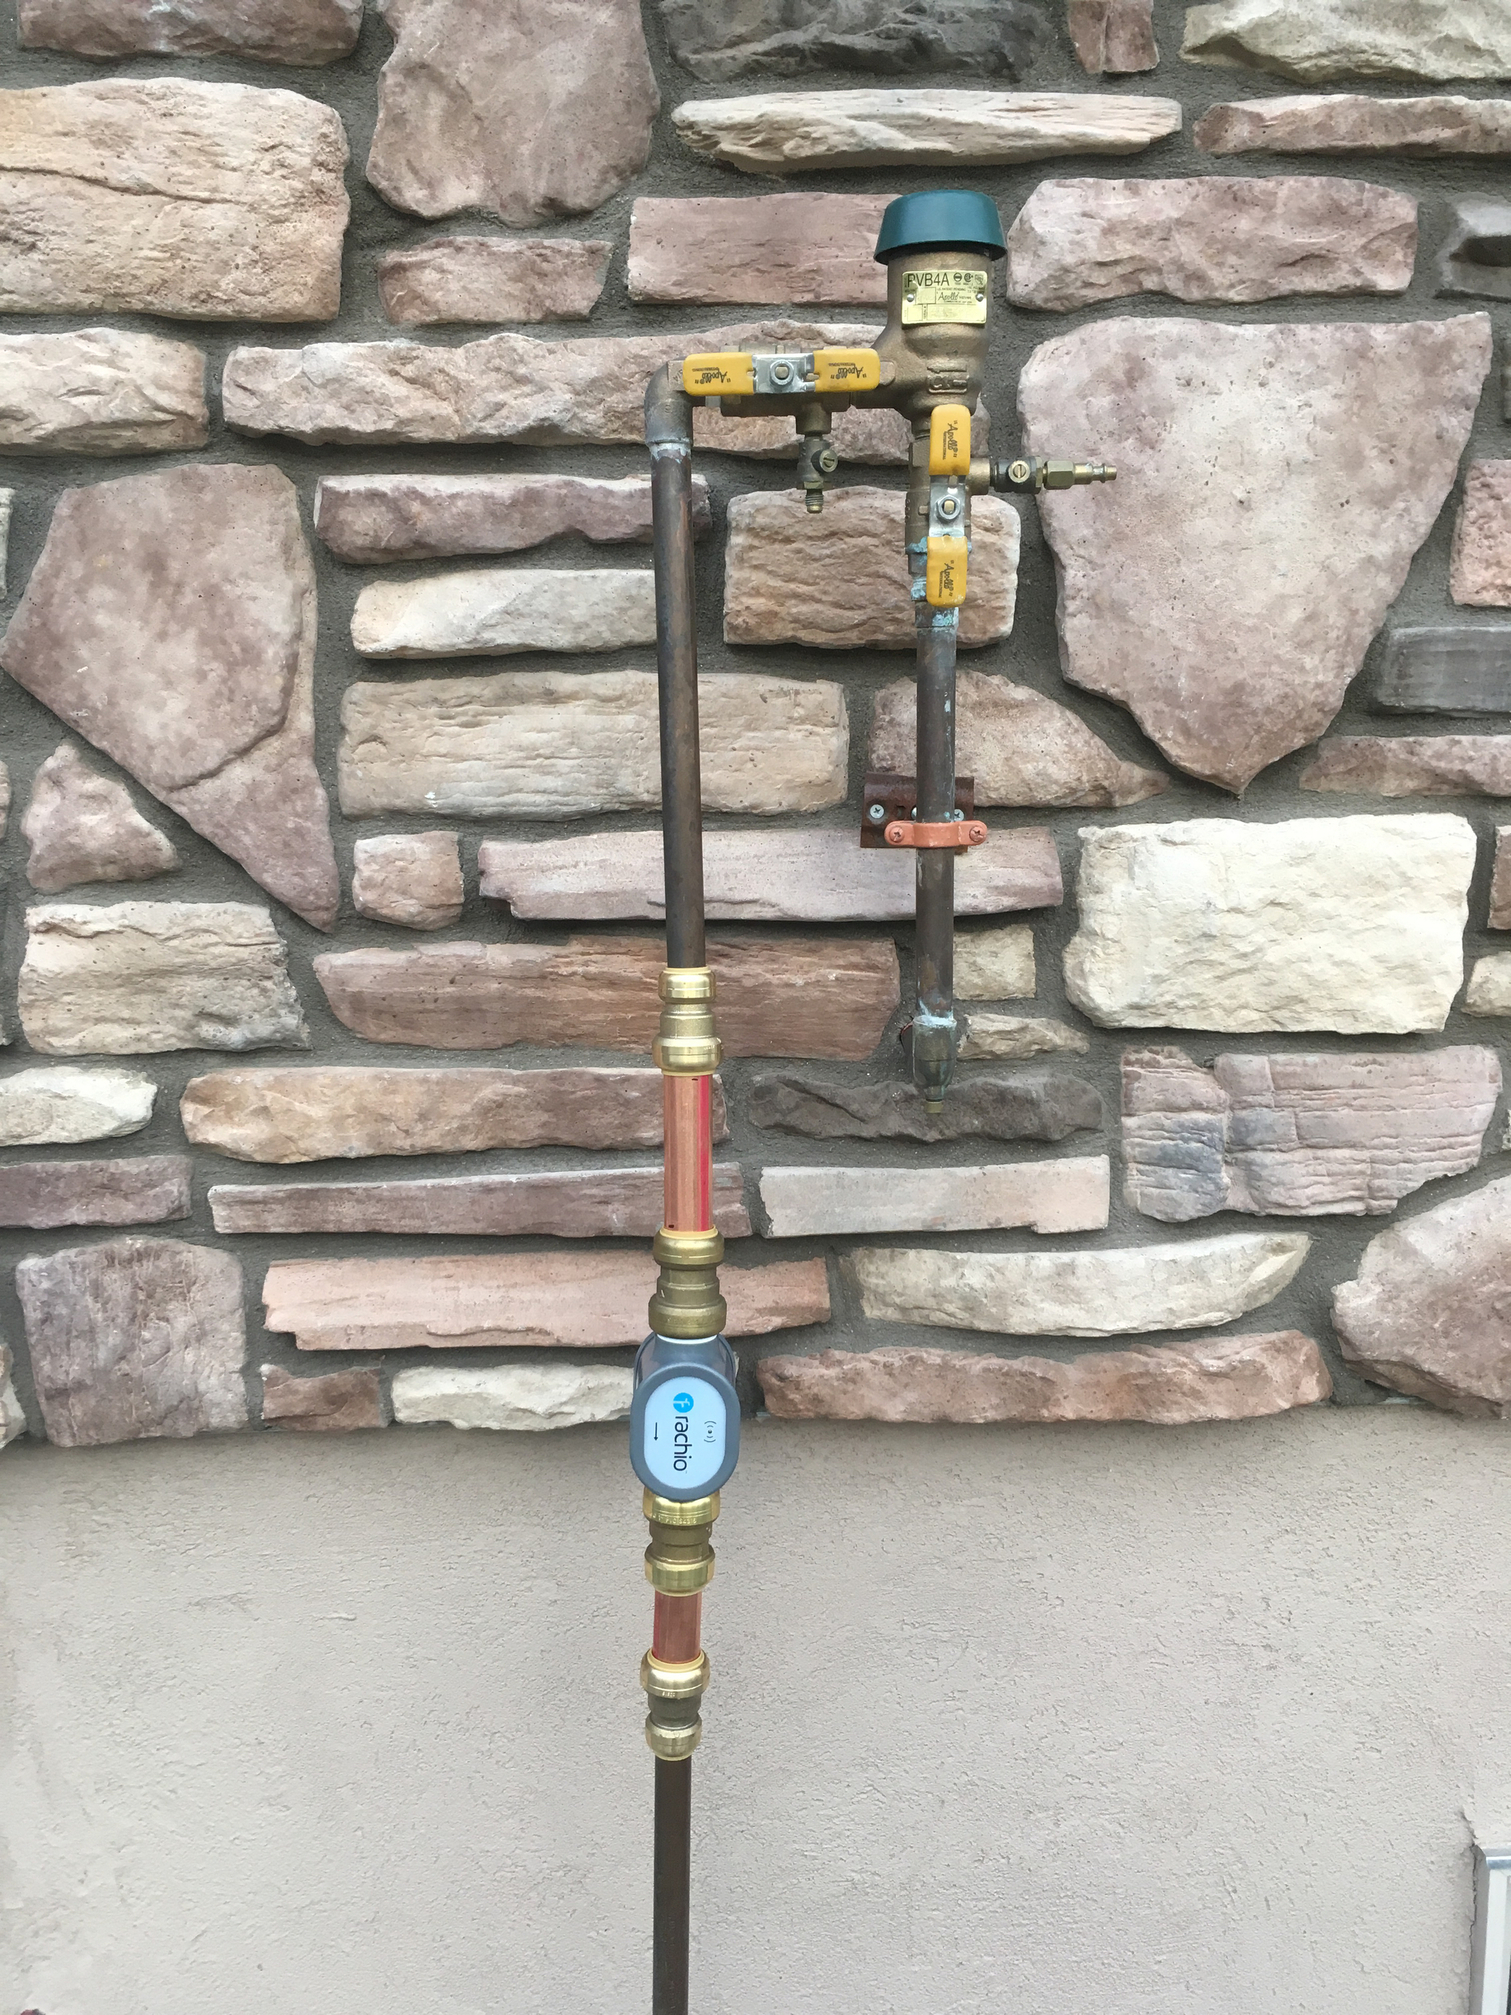
I’ve had my Rachio 2 (and now 3) installed outdoors in the enclosure for 2+ years in direct FL sunlight with no issues.
Yes, the flow meter install process is laborious and not for everyone (I just did mine today). Even more so if your irrigation lines are underground. Pretty cool tech once you get it in.
Maybe I missed something, but I just installed my controller into its outdoor enclosure and the installation couldn’t have gone any smoother. The fit and finish of the product is everything I expected it to be.
I really think the engineering on all the Rachio products has been good and well thought out. In this case, since the flow sensor needs to support a variety of connection types (PVC, Copper, PEX) and fit into various spaces the challenge is making the system flexible with lowest possible common denominator cost and footprint.
Everything in life can be improved, but I don’t think the Rachio team did anything wrong with the engineering of the flow meter. Sure, I’d love for the install to be cheaper, but I want everything cheaper. It’s up to each consumer to decide if the total cost is worth it. For my residential irrigation system I do have 1" copper before and after the backflow preventer so the install cost is $39 (for two 1" Sharkbite connectors).
I also have an outdoor enclosure that I’ve been using since install of my original Rachio 2. I haven’t had any problems, so I’m not sure what issues you’ve experienced.
Eventually after many issues getting fittings that would work - I had to go with 4 of them, I cut out the 3/4" copper pipe and attempted to install the whole contraption with all 4 fittings connected to the flow meter and six inch length of 1" copper. I just cannot budge the copper pipe on either end to fit the whole thing in to push the two SharkBite fittings onto the existing 3/4" copper pipe. They are totally immobile. I can get one side in but I cannot lift the upper pipe at all to fit it into the SharkBite.
Now I have an open gap in my copper pipe and I have no irrigation for the time being. This is a real problem in Arizona. What can I do?